
Installing the 1-2-2 match-up zone
Our base defense is man-to-man, but we mix up our looks throughout the game by incorporating a 1-2-2 match-up zone into our game plan. Most girls teams in our area do not use match-up zones, so our defense causes a great number of turnovers for the opposition, while allowing us to play at a speed and tempo we desire.
Our players love this defense because we have the ability to press, then fall back into it very easily. Plus, our players now are adept at anticipating passes and cutting off the passing lanes. We also trap out of the 1-2-2 match-up zone, which has been successful as well.
By using a variation of our main defense, it causes our players to stay focused and remain motivated in their defensive assignments. When a defense is successful, like our 1-2-2 match-up zone is, then players are more determined to want to become better defenders and take pride in defending the ball.

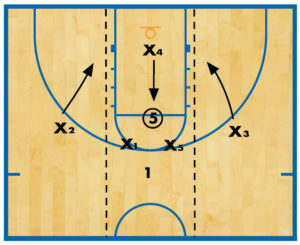
DIAGRAM 1: Rules for center. X5 is your center. X5’s first responsibility is to cover the corner. X5’s progression continues with coverage of the strong block, weak block and high post.

DIAGRAM 2: Rules for power forward. X4 is your power forward and has the same rules and progression as your center, just on the opposite side of the court. So, X4’s responsibility progression runs in this order: corner, strong block, weak block and high post.

DIAGRAM 3: Rules for off guard. X2 is your off guard. X2 first covers the strong wing, then the basket or strong block, and finally the high post (X2 also needs to keep an eye on a potential 3-point shot from the wing).

DIAGRAM 4: Rules for small forward. X3 is your small forward. X3’s responsibilities are just like X2’s only on the opposite side of the court. So, the defensive progression is: cover strong wing, basket or strong block, and finally the high post while keeping an eye on a potential 3-pointer from the wing.
 DIAGRAM 5: Rules for point guard. X1 is your point guard. X1 first covers the shot from the top of the key, then moves to high-post coverage. On occasion, X1 is needed to cover either wing if a wing defender makes a bad decision. Within these player responsibilities, you must stress that all defenders make aggressive, correct decisions. If a defender has to choose between being aggressive and being correct, the choice is being aggressive. The worst thing to do is to stand flat-footed and not make any decision. All players move on all passes, and their hands are up for potential deflections.
Vs. 1-3-1 & 1-2-2 offenses
When an offense runs a 1-3-1 offensive set, the ball needs to be pressured by X1. Pressure the ball on the wings beneath the foul line, as well as if it’s in the corners.
Also, when there is an overload on one side, these are the rules:
1. If the center doesn’t have someone to cover, then the center shades the ball side, looks for cutters and looks to offer help.
2. If the forward doesn’t have someone to cover, then the forward moves into the lane to help and covers cutters.
3. If the guard doesn’t have someone to cover, then the guard drops into the high-post area, looks to help and is ready to move.

DIAGRAM 6: Pass to weak-side wing. In this common instance, the ball is passed to the weak-side wing and the center moves from the strong side across the lane. X5 stays with the center, and X4 drops so the two defenders now have switched sides.
Against a 1-2-2 offensive set, your post defenders need to be ready for shifts on the baseline.

DIAGRAM 7: Weak-side player moves up. In a 1-2-2 offensive set, when the point guard passes to the wing and the post player on the opposite block comes to the middle, the post defender (in this case X5) must stay with the cutter. X5 denies the pass to the middle as there is pressure on the wing.

DIAGRAM 8: Post movements. In this instance, the center is on the ball-side and moves to the middle. X5 must follow. The strong forward moves across the lane to move into the ball-side block. X4 needs to follow. X4 and X5 effectively switch sides again.
Trapping from the 1-2-2 match-up zone is an important part of this defense’s success. The following four diagrams show the movements needed to trap in four scenarios.

DIAGRAM 9: Short-corner coverage. We make it a point always to trap when the ball is entered into the short corner. In this diagram, 5 is in the short corner and has received a pass from the wing. X3 and X5 trap 5. X1 moves from the point to cover the ball-side wing, while X4 takes the high post. X2 roams in the lane.

DIAGRAM 10: Corner coverage. In this trap, X1 and X3 trap the ball in the corner, while X5 fronts the post. X2 rotates and covers the ball-side wing. X4 covers the middle of the lane.

DIAGRAM 11: Wing coverage. Designate that you only will trap the left side or the right side, or you only will trap the wing at certain points in the game to keep the offense on its toes. In this instance, the ball is passed to the left side. X5 comes up from the post to join X3 in a trap. X4 moves across the lane to cover 5 on the strong block. X1 takes away the reverse pass by staying at the top of the key. X2 roams in the lane.

DIAGRAM 12: Point coverage. If a substitute point guard comes into the game for the offense, this is a perfect trap to use. X1 and X3 trap the point guard. X2 takes away the strong-side pass. X4 and X5 roam but protect the basket. X4 and X5 need to anticipate where the ball is going by watching players’ eyes.
Coverage drill
To practice players’ coverage within the defense, as well as to work on your offensive players’ shooting, try this coverage drill. The drill features four shooters around the perimeter and three defenders.

DIAGRAM 13: Coverage drill. Your three defensive players must cover all four shooters spaced around the perimeter. The defensive players win if they get four stops in a row and the offensive players win if they hit three, 3-point shots in a row. All offensive players are allowed to crash the boards but must take the ball back beyond the 3-point line. This drill can go for awhile, which works on the stamina of all players. Be sure everyone is hustling to get the most out of this drill.
RELATED

News
Videos


Shop


