Strength and conditioning: Learning the ropes
Many years ago, I learned the value of using thick ropes for developing a crushing grip. It was truly an educational experience, highlighted with a great deal of initial discomfort and lingering soreness.
 Much of this knowledge was unsolicited through being required to handle thick, heavy ropes in manual labor situations, and in experiencing the resulting numbness in my hands and forearms.
As my interest in strength training was cultivated, I met several individuals in the field who incorporated ropes of varying lengths and thickness for a host of extremely difficult grip exercises.
The most prominent of these individuals was Kim Wood, who was with the Cincinnati Bengals for many years, and for several decades was the dean of the NFL strength and conditioning coaches. Now retired, Kim will still crack your knuckles with a handshake.
No fancy guru stuff here; just basic exercises that demanded a tight, solid grip and a tough mindset to grind it out.
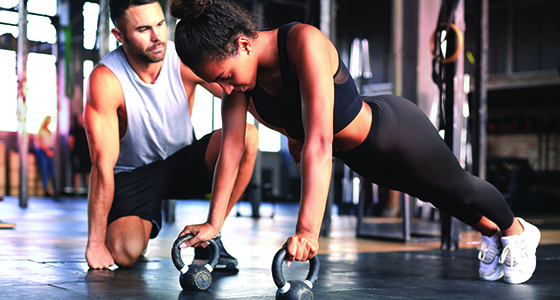
Regardless of body positioning (seated or standing), the improvements in grip strength using any type of rope exercise is guaranteed to be dramatic. In this segment, we present several variations on the same theme using the true bellwether of grip strength implements — thick, strong, coarse ropes.
Roping a crushing grip
In our search to find more uses for ropes, we’ve come up with some pretty decent ideas. These include movements executed by draping the ropes over our power racks, attaching them to our pulley systems, clipping them onto large wooden sleds, and looping and clasping them through large weight plates.
If it’s heavy, and a rope can be rigged-up to it, we’ve probably tried it. Here are some of our favorites:
 |
| Photo 1 |
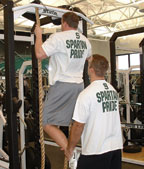
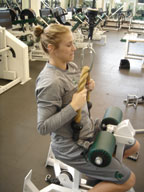
Assisted rope pull-up (photo 1): This amounts to a modified pull-up that is an excellent choice for athletes who — for whatever reason — cannot handle their full body weight in a vertical pull-up.
Maintain a firm grip on the rope, and pull yourself up to a position where you can place your feet on the spotter’s thighs. Doing this reduces your body weight significantly and allows you to perform quality reps. Pull yourself up to the position where your hands are even with your chin, pause momentarily, and then lower yourself with control to a point where there is a slight bend in the arms to maintain some tension in the working musculature.
 |
| Photo 2 |
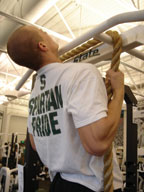
Unassisted rope pull-up (photo 2): This is a full, bonafide pull-up from a vertical hanging position. Again, the goal is to pull yourself up to the point where your hands are even with your chin. Pause briefly, and then lower yourself to a position where there is a slight bend in the arms.
In the past, we demonstrated the use of thick stretch bands that can be used to assist some of the bigger athletes or beginners who tend to have lower incoming strength levels on chin-ups/pull-ups. The stretch bands are also looped through and tied securely to the rack’s chin-up bar, and the athlete places one or both of his legs through it in a kneeling position for support and to unload body weight. Regardless of the chosen approach, this is one of the better all-around exercises for both grip strength and several other important areas in the upper body.
 |
| Photo 3 |
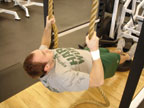
Modified rope pull-up (photo 3): Start in a slightly angled position (anywhere from 30 to 45 degrees, depending upon your ability and comfort level) with the arms straight and the shoulders and hips in alignment. In other words, do not let your hips “sag” to the floor.
Pull yourself up until your hands touch the outside of your chest, pause momentarily in that position, and then lower yourself with control to the starting point. This is a great alternative for those who struggle initially with vertical pull-ups.
 |
| Photo 4 |
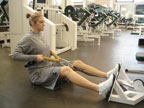
Seated pulley rope row (photo 4): We’ve attached a shorter, but much thicker rope to our low-pulley system for a seated row movement. From a fully extended arm position, pull the rope as close to the torso as possible, which puts the elbows in a deep posterior position. Hold that position momentarily, and then return with control to starting point. It’s important to engage the muscles of the mid-section/low back and stabilize the torso by sustaining an erect upper body posture.
 |
| Photo 5 |
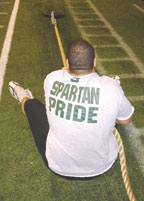
Seated rope plate pull (photo 5): Using 100-pound Iron Grip plates that have cutouts for handles on the top and bottom, we clasp the rope through one of the handles and perform arm-over-arm pulls from the seated position. We’ve depicted this exercise from the standing position in the past for those who prefer “ground based” activities, but the seated position is advantageous in the sense that it requires more work from the upper body musculature. Most significantly, from the grip muscles in the fingers, hands and forearms.
 |
| Photo 6 |
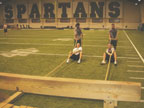
Seated rope sled pull (photo 6): Most football coaches have seen the large, old school wooden sleds that have made a dramatic and well-deserved comeback for a host of great strength and conditioning purposes. And for grip strength, few exercises rival the seated rope sled pull. The same arm-over-arm technique is employed and, as can be seen, two individuals can work in unison.
The two athletes shown in the rear are merely collecting the rope slack and will take over the sled pull when the seated players reel it in as far as they can. We have several of these sleds that we use in relay competitions, with this being one of the more grueling and productive contests.
 |
| Photo 7 |
Seated pulley rope pulldown (photo 7): Using the high pulley attachment, the shorter, thicker rope is used once again for a pull-down movement. From the overhead position, pull the rope to a point where the hands are at about chest level. Hold them there momentarily, and then return to a stretched, but comfortable starting position.
 |
| Photo 8 |
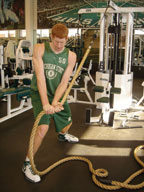
Standing pulley rope chop (photo 8): This is another movement that appeals to coaches who have an affinity for “ground-based” exercises.
Using the high pulley attachment, pull the rope from high to low and across the body while executing a slight torso twist in the same direction. Pause momentarily in the mid-range position (depicted in the photo), and then return under control to the starting point. Notice the athlete’s wide, solid stance, which is crucial for balance, power, and proper execution of the movement.
Final rep
As with all other strength training activities, a variety of set and rep schemes can be assigned to these movements. Having used just about every schematic you can imagine, we’ve opted — in most cases — to work in timed intervals for many of the exercises.
Try working these brutal grip movements continuously for at least 30 seconds and up to a minute in an alternating fashion with a partner. A couple of sets performed in this manner has your athletes mumbling sweet nothings about you while they clench their teeth.
Coaches tend to have engrained philosophies on exercise volume, and each one can stake a claim to the effectiveness of each. We’re not sure that there is a magical number, so we’ll leave that issue in your good, soon to be sore hands.
We normally perform up to four total sets in any given grip training segment. The assigned format may be to execute one set of four different movements, two sets each of two different movements, or four sets of one particular movement.
You will find that all approaches are similarly effective. Whatever set/rep script you decide to grab, just be sure to hold on tight.
Ken Mannie is the head strength/conditioning coach at Michigan State University.