
‘Stack’ offense frees up perimeter shooters, offers inside advantages
The following plays from the “Stack” offense can be run to either side of the floor. Both series require that your players pay close attention to setting and using screens. It’s imperative that the player coming off the screen must read the defense and make the correct cut.
‘Pin Down’

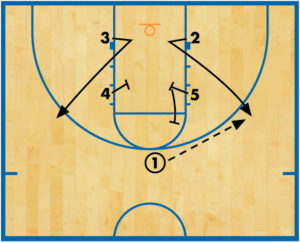
DIAGRAM 1: “Pin Down” (A). The point guard (1) dribbles to either side of the floor for entry into this offense. The ball-side post (4) L-cuts and fades out to get open on the wing and receives the pass from the 1.
DIAGRAM 2: “Pin Down” (B). 2 comes up the lane and sets a backscreen for 1 who cuts off the screen and heads toward the basket. 4 looks to pass to 1 for a layup opportunity on the basket cut. 5 comes up the lane on the weak side and pops up top.
DIAGRAM 3: “Pin Down” (C). 2 after setting the backscreen steps out to the 3-point arc. 4 passes to 2 (if there was a switch or “slow show” on 1’s cut 2 may have an open shot). 3 begins to set up his or her defender on the weak side.
DIAGRAM 4: “Pin Down” (D). 2 receives pass 5 sets a downscreen for 3 on the weak side. 3 reads the defense and makes the correct cut (outside or curl). Simultaneously 4 and 1 work together on the strong side. Both 5 and 4 must seal their defenders after they get the screens. 2 passes to the open player for the best scoring opportunity.
‘Reverse’

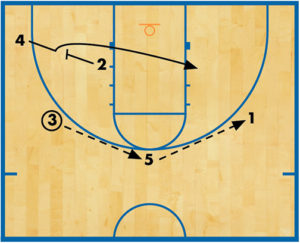
DIAGRAM 5: “Reverse” (A). As 1 determines a side of the floor to make an entry into (left in this example) the opposite wing (2) comes hard off the baseline double-screen. 1 passes to 2 and then cuts away.
DIAGRAM 6: “Reverse” (B). After 2 catches 5 steps out to the top and receives a from 2. 5 quickly reverses the ball to 1. 4 replaces 5 at the ball-side elbow. 5
DIAGRAM 7: “Reverse” (C). 4 steps out and sets a backscreen for 2 who cuts to the low block (2 must time the cut so that he or she is moving as 5 passes ball to 1). 1 makes an entry pass to 2 in the low post only if he or she is wide open.
DIAGRAM 8: “Reverse” (D). 4 and 5 set staggered screens for 3 who breaks to the top. 2 posts up. If 3 doesn’t take a shot he or she slides up to the top of the key.
DIAGRAM 9: “Reverse” (E). 4 and 5 set staggered cross-screens for 2 who cuts out to the wing and receives the pass from 3. It takes patience from your players to get to this secondary option open but more times than not this option is open more often than the first look.
DIAGRAM 10: “Reverse” (E). 2 receives pass looking first for the open jump shot. If the shot isn’t open 2 looks for 4 coming off 5’s mid-lane cross-screen. 3 and 1 exchange positions on the weak side of the floor at the top.
RELATED
News
Videos


Shop


