
‘Overload’ zone offense creates defensive imbalances
With the increasing popularity of zone defenses — especially at the high school and junior high school levels — it’s vital in today’s game to have a sound zone offense in place. And if you combine the zone offense with a solid man-to-man offense, your team will be hard to match up against.
The “overload” zone offense that our team has developed is extremely effective and can be adapted into lower levels of competition.
The basic concept of the overload offense is to bring all five players to one side of the floor and effectively outnumber the defensive players on the overloaded side of the zone.
For this to be successful, however, you must still utilize the backside of the floor to keep the defense honest, and to prevent them from making an adjustment to overload the same side as the offense.
Basic rules, concepts
With zone offenses of any kind, there are three rules that players must follow to be successful.
1. Spacing, keeping the floor spread. Offensive players must keep from standing next to one another, as this basically enables the defense to guard two offensive players with one defender.
2. Reverse the ball quickly. In this zone offense, when the ball is thrown into the corner, it must be reversed as fast as possible to keep the defense shifting and off balance.
3. Find the seams. Too often in a zone or continuity offense, you’ll see a player go to a “spot” on the floor because that’s how the coach drew it up during the chalk talk. Encourage players to move to the open spot on the floor and penetrat —taking the ball to the hole.
Overload alignment
The basic alignment in this offense is to set up in a two-guard front. A three-guard front may also be used effectively, depending on the personnel of your team and the various types of zones you see.
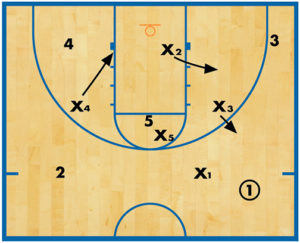
 DIAGRAM 1: Overload zone offense (initial alignment). This alignment shows the initial set up of the overload, with the 1 (point guard) having the ball on top and 2 set up on the opposite side. Players 3, 4 and 5 are set up along the baseline.
 DIAGRAM 2: Overload zone offense (initial passing).The initial goal is to get the ball in to 3 in the corner. 3 should be your team’s best perimeter shooter, as this will cause the defense to come out hard to defend him or her. This player doesn’t necessarily need to be quick off the dribble because, at this angle, you don’t want 3 driving to the basket.
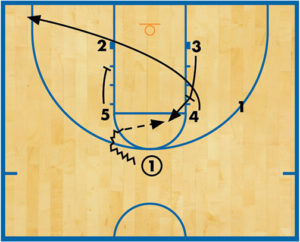
1 passes to 2, who quickly swings the ball over to 3. If the pass isn’t open to go to the corner, then 2 should hit 5 sliding up to the elbow from the opposite low block.
 DIAGRAM 3: Overload zone offense (corner entry). If the initial pass into the corner is successful, then things must happen quickly and together. The backside post player (5) flashes to the ball-side high post, 2 cuts in to the open area on the ball-side, and 1 fills out 2’s previous spot at the top.
At this point early in the offense, you now have five offensive players positioned with only three defenders on one side of the floor.
» ALSO SEE: Emptying the zone offense toolbox
 DIAGRAM 4: Overload zone offense (initial options). After the first set of movements in the offense, 3 now has numerous options to attack the defense. 3 can: A) Shoot the open jump shot. B) Throw to 4 in the ballside low post. C) Hit 5 in the ballside high post. D) Pass to 2 on the cut to the open-area that he or she filled.
 DIAGRAM 5: Overload zone offense (reversals, movements). If no shot is available on the initial series of movements or options, then 1 must quickly pop out to receive the release pass from 3.
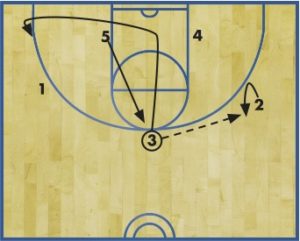
As this happens, the other offensive players must move quickly. 5 pops out from the high post to the top of the key, 3 runs all the way along the baseline and cuts to the opposite corner and 2 cuts to the opposite wing area on the weak side.
1 passes the ball to 5, who quickly reverses it to 2 on the wing. After making the pass, 5 slides down to the block and posts up. 2 looks to hit 5 in the post and then quickly passes the ball to 3 in the corner.
 DIAGRAM 6: Overload zone offense (overload right). You’re now trying to establish an overload on the right side of the floor. The movements are identical to the initial movements shown in Diagram 3, but now take place on the opposite side.
When 3 receives the ball in the corner, 4 flashes from the low block to the opposite high post, 2 flashes into the open “filler” area on the ball-side and 1 breaks across the top to fill the spot.
RELATED
News
Videos


Shop


