
Getting ‘Even’ against odd fronts
It’s extremely valuable for your team to have one offense that can work against multiple defenses. Our team uses a zone offense we call “Even” against conventional odd-front zones, trapping zones and match-up zones, as well as against half-court traps.
There are eight main concepts in teaching zone offense to your players:
1. Use odd-front zone offenses vs. even-front zone defense.
2. Use even-front zone offense vs. odd-front defenses.
3. Have players make cuts from behind the defense.
4. Flash cutters behind cutters.
5. Have players cut to open areas.
6. Attack through the high post.
7. Utilize ball reversals to beat the zone.
8. No “first-side” perimeter shots unless the ball has gone inside first.
‘Even’ vs. odd zone defenses
The eight concepts above must be emphasized in discussing the “even” attack against a conventional 1-2-2, 3-2 or 1-3-1 zone.
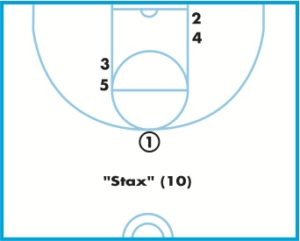
 DIAGRAM 1: Basic alignment. This diagram shows a 2-3 set alignment because you want to be in an even-front vs. an odd-front zone. The player at the high post (3) should be your best all-around player other than your point guard. The high-post player should be a good passer and be able to hit the short jump shot as well as dribble penetrate. 1 and 2 form a mainly stationary even front, or tandem, while 4 and 5 are at the wing spots.
 DIAGRAM 2: Wing entry. Ideally, on your initial wing entry you would like to enter the ball to 4 because, in this system, he or she is the better ball-handling post player and because entering away from 5 gets him or her “inside” the defense sooner.
As the pass is in the air from 1 to 4, 3 dives low to the short corner with his or her back to the baseline.
You want to have 3 dive to the short corner rather than the block because generally this isn’t a player you want to post up against the bigger players in the bottom of the zone. From the short corner, he or she can see the basket and has room to use his or her quickness to drive past the bigger defensive players.
5 flash cuts behind the cutter (3) to an open area. 5’s cut must be so quick and hard that he or she arrives at the high-post area at the instant that 3 vacates the area. 5’s cut must take him or her to an open area at the high post and not take him or her right toward the zone defender with high-post responsibility.
» ALSO SEE: Learning the three-down man offense
The object is to attack the zone through the high post, and you can’t do that if your players are “hiding” inside the zone.
 DIAGRAM 3: Wing-to-high-post pass. If 4 passes to 5 in the high post, 5’s option are:
- Look to make a high-low pass to 3 cutting in from behind the defense.
- Shoot the foul-line jump shot.
- “Fan” the ball to 2, who is sliding to an open area behind the defense. If 5 hits 2, he or she must dive to the ball-side block, while 4 flashes hard to an open area at the ball-side high post. 1 slides over to the left guard spot and 3 assumes the right guard spot. 2 is now the third person in the high-low-wing rotation of the offense.
 DIAGRAM 4: Ball reversal. If 3 and 5 aren’t open to receive a pass from 4, then 4 passes the ball back to 1 who reverses the ball to 2.
If 1 is overplayed, 4 can throw a skip pass to 2. As the ball is in the air to 2, 3 cuts from behind the defense to an open area between the wing and the corner on ball side and looks for a pass from 2. Ideally, 3 will go no farther than the extent of his or her shooting range, but it’s critical that he or she gets open. Simultaneously, 5 slides across the high post area ready to receive a pass from either guard.
If 2 passes to 3 to complete the ball reversal, 5 should slide immediately to the ball-side block (because 5 is a post player in our system, he goes to the block and not to the short corner). 4 completes the action with a hard flash cut behind the cutter (5) to an open area at the high post.
You now have a great situation — you have reversed the ball to a good player and you’ve created a high-low situation inside with your best post player on the block.
 DIAGRAM 5: Guard-to-high-post pass. At any time, both 1 and 2 can fake their perimeter passes and slip a pass inside to 5. Our rule is if the high-post player gets a pass from either guard, both wings (in this case, 4 and 3) backdoor to the blocks and both guards flare to the wings (see diagram 7). 5 can pass, shoot or dribble penetrate depending upon what he or she reads.
 DIAGRAM 6: Continuity. If you don’t have a scoring opportunity on the “second side” of the zone, 3 passes the ball back to 2, who reverses the ball to 1. As the ball is in the air to 1, 5 cuts from behind the defense to an open area between the wing and the corner on ball side and looks for the pass from 1. Simultaneously, 4 slides across the high-post area and must be ready to receive a pass from either guard.
If 5 catches the ball from 1, 4 dives low to the ball-side block and completes the action with a hard flash cut from behind the defense to an open area at the high post.
Note: 1 and 2 are mainly stationary in this offense, but they must not become statues. They need to look for opportunities to dribble penetrate or shoot the 3-point shot.
 DIAGRAM 7: Initial high-post entry. If 3 gets the ball from either 1 or 2 to initiate the offense, 4 and 5 must both execute backdoor cuts to the blocks, while 1 and 2 both flare to the wings. 3 can pass, shoot or dribble penetrate depending on what he or she sees. Any solid attack through the high-post area can really break down the zone.
Attacking trapping zones
There’s no substitute for being able to have one offense that’s effective against several different defensive approaches. We also run “Even”—our regular odd-front zone attack—against trapping zones, half-court traps and match-up zones.
 DIAGRAM 8: Basic alignment. Players are aligned in a 2-3 set. The player at the high post (3 in this case) should be your best all-around player who’s not your point guard. The high-post player should be a good passer and must be able to hit the short jump shot as well as dribble penetrate. 1 and 2 form a mainly stationary even front, or tandem, while 4 and 5 are at the wing spots.Having your post players on the wing initially gives you a taller player who can see over any traps by the defense.
Note: Since we don’t put the ball in the corner in “Even, we don’t worry about the corner trap. If we anticipate a wing trap, we’ll try to enter the ball directly from the guard to the high post or will quickly reverse the ball by passing the ball in a guard-to-guard-to-wing rotation. You definitely want to avoid continually starting the offense on the same side of the floor with a wing entry.
You can also make the following tactical adjustment after the ball has been entered to the wing.
 DIAGRAM 9: Diving the off-side guard vs. wing traps. Assume that 4 is being trapped on the wing and 3 and 5 have made their normal “Even” cuts to ball-side short corner and high post, respectively. The off-side guard (2) recognizes the trap and cuts behind the defense to an open area at opposite block. A pass out of the trap from 4 to 2 is highly unlikely, but putting 2 in this spot forces the backside zone defender to account for him or her. Either 5 or 1 must get available for a pass out of the trap from 4. If 4 passes to 5, 5 will have a high-post shot opportunity or can pass to 2 or 3 at either block. The backside look to 2 is frequently available.
 DIAGRAM 10: High-post reversal. If 5 doesn’t have a shot opportunity and 2 or 3 aren’t available at the block, 2 must step out to an open area at the wing. 5 hits 2 and dives to the low block exactly as if you were running the regular Even offense and the ball was reversed.
4 flashes hard to an open area at the high post. 3 stays at what is now the opposite block. 1 moves from the right guard spot to the left guard spot. If 2 passes to 4 at the high post, 4 has the same options with 5 and 3, as 5 did with 2 and 3 in Diagram 9.
This sequence is excellent against teams that “scramble” or continually trap out of a conventional zone alignment.
Note: If 4 passes out of the trap to 1, 2 returns to the off-side guard spot. 3 cuts from behind the defense to an open area at the wing and you’re now in your regular Even continuity.
Attacking half-court traps
 Half-Court Traps") DIAGRAM 11: Alignment vs. 1-3-1 or 1-2-2 (odd front) half-court traps. Set up with 1 and 2 in backcourt. If 1 has the ball, 2 must be even with or slightly behind 1. 3 is positioned between the free-throw line and the top-of-the-key area in the front court. 4 and 5 are on the wings in the front court midway between the half-court line and foul-line extended.There are several key teaching points for attacking half-court traps:
DIAGRAM 11: Alignment vs. 1-3-1 or 1-2-2 (odd front) half-court traps. Set up with 1 and 2 in backcourt. If 1 has the ball, 2 must be even with or slightly behind 1. 3 is positioned between the free-throw line and the top-of-the-key area in the front court. 4 and 5 are on the wings in the front court midway between the half-court line and foul-line extended.There are several key teaching points for attacking half-court traps:
- The guards must approach half-court quickly so as to conserve as much of the 10-second count as possible.
- It’s a good idea to make guard-to-guard passes in the backcourt. By simply changing the ball side of the floor, you may create an opening in the defense.
- Unless you’re almost at the end of the 10-second count, you want to pass, not dribble, the ball across the half-court line.
- If the ball is dribbled across the line, penetrate far enough into the front court so that a safety outlet can get behind the ball handler in case he or she is trapped.
- 3 must be very active in the middle and cut in and out from behind the defenders who have middle responsibility.
- 4 and 5 must be active and move back-and-forth along the sidelines to get themselves open.
- High post and wing entries are the same vs. an odd-front half-court trap as they are against a regular odd-front zone.
- The hard flash cut behind the cutter is just as critical on a wing entry.
- Guards must cross the half-court line after the ball does. (Yes, you have to go over this with your players!)
 DIAGRAM 12: Alignment vs. even-front, half-court traps. These kinds of traps aren’t as common as the odd-front, half-court traps, but you may occasionally run into an even-front trap such as a 2-1-2 or 2-2-1.We employ a 1-3-1 alignment against even-front traps, with 1 as the point, 2 and 3 at the wings, 4 in the middle and 5 positioned in the block area. This offense stems from a modification of our basic full-court press breaker.
With your three perimeter players, stress spacing as well as staying out of the prime trapping area just across half-court. 4 must make himself or herself a big target in the middle and 5 must occupy the backside zone defender(s) and come to the ball-side sideline whenever necessary.
RELATED

News
Videos


Shop


