Football: Stack 3-3 zone blitzes
 |
| The Stack 3-3 Zone Blitzes in Effect |
To combat the rising tide of spread offenses, many colleges and high schools are adopting the 3-3-5 or 3-5-3 defense. The 3-3’s flexibility and adaptability can help pressure the passers and cover multiple receivers and formations. With eight defenders close to the ball, the formation makes it hard to determine which of the defenders are going to rush and which are going drop.
Defenses can scheme anywhere from three to eight-man pressure. With eight two-point defenders, they can place more personnel on the field to cover receivers or running backs releasing out of the backfield.
Let us take a look at how many rush-four, drop-seven zone blitzes are available in the 3-3 package.The zone blitzes dissected in this article are “cover 3” zone affairs, with the corners defending the deep outside thirds and the free safety playing the hole. Before we get into the actual blitzes, however, we believe it is essential to identify and label the underneath zones that the non-blitzing underneath defenders have to defend.
DIAGRAM 1 illustrates the underneath zones to be defended.
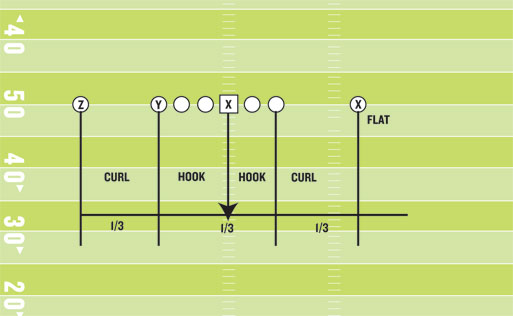 |
| DIAGRAM 1 |
- Hook zones: The width of this zone is from the football to the outside leg of the tight end or imaginary tight end — a depth of 15 yards.
- Curl zones: From the tight end or imaginary tight end to the widest receiver —also a depth of 15 yards.
- Flat zones: From the widest receiver to the sideline.
As you can see, there are six underneath zones but only four pass defenders. The defenders may thus be responsible for more than one zone. For example, hook zone defenders may have to expand to the curl. Curl defenders may have to expand to the flat area.
This is possible because we do not spot drop, but instead we pattern read. Zone responsibilities are predicated on the release of the No. 2 receiver. As a result, some defenders will be hook/curl players, while others are curl/flat defenders.
As earlier stated, the underneath zones extend to a depth of 15 yards. However, the depth of the defenders on their drop depends on the QB’s pass drop. As each defender reads pass, he must drop to his assigned zone as quickly as possible while keeping his eyes on a swivel.
Each defender’s eyes work from the QB to the No. 2 receiver. The eyes work back and forth in this manner until the QB stops his drop.
As the quarterback sets up, the underneath defender stops his drop and squares back up with the passer. At this point, the defender’s depth is influenced by the QB’s actions, while the width of the drop is affected by the No. 2 receiver’s release.
At this juncture, the defender must focus on the passer’s eyes and lead hard. He must also listen for verbal communication from other defenders. When the QB’s front or lead hand comes off the ball, each defender must break in the direction of the QB’s eyes.
This is called “breaking on the QB’s first intention.” If the throw is in the immediate area, the defender must break downhill, but not at a backward angle. This backward angle is commonly called “opening the garden gate” and allows the ball to whiz past the defender to the intended receiver.
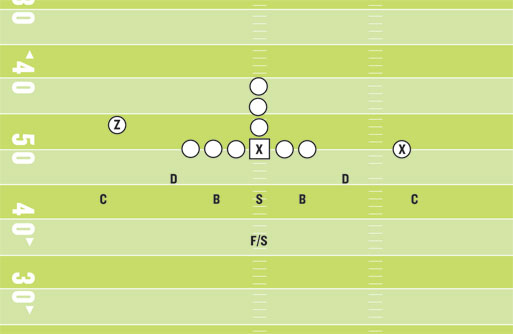
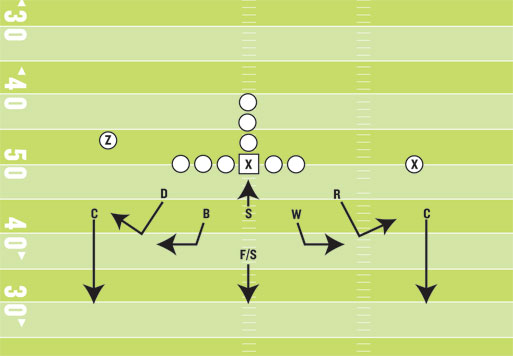
Base 3-3 defense, DIAGRAM 2:
 |
| DIAGRAM 2 |
Before getting into the zone blitz package, we believe it’s essential to discuss personnel and each defenders base zone drop. The diagram illustrates the base 3-3 defense and personnel.
- D = Dogs, the strong safeties
- B = Bats, the outside LB’s
- S = Sam, middle LB
- C = Corners
- F = Free safety
As you can see, there are right and left Dogs and Bats. However, for stunt purposes, the Dog to the strength call stays Dog, while the Dog to the weak side becomes Rover. The Bat to the call is tagged Bandit, while the Bat to the weak side is referred to as Will.
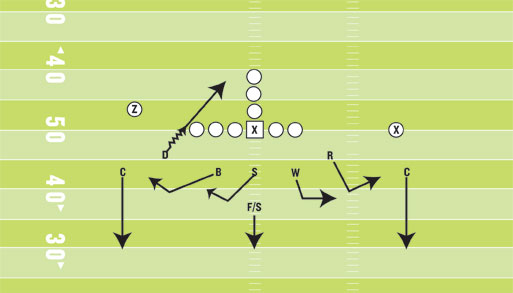
DIAGRAM 3 illustrates this concept with a strong left call. Strength is considered to be toward receiver strength.
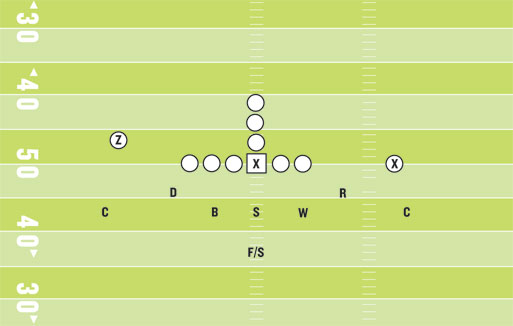 |
| DIAGRAM 3 |
- D = Dog
- B = Bandit
- S = Sam
- W = Will
- R = Rover
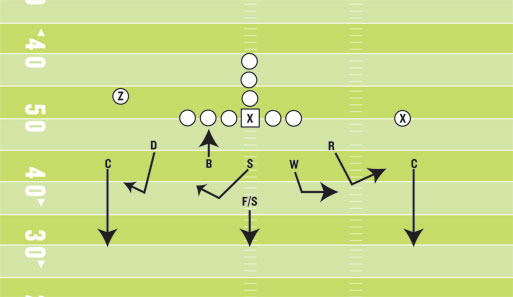
DIAGRAM 4 shows a base Cover 3 drop.
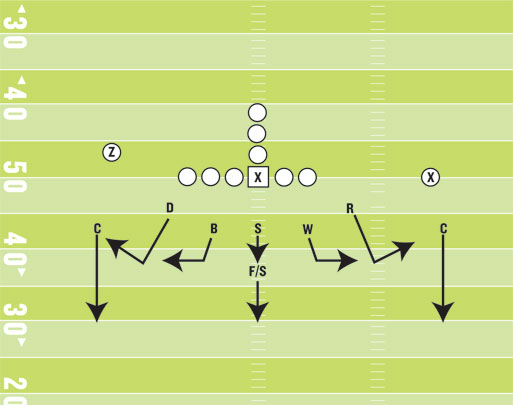 |
| DIAGRAM 4 |
Cover 3 responsibilities:
- Dog = Strong Curl/Flat
- Bandit = Strong Hook/Curl
- Sam = Deep Middle
- Will = Weak Hook/Curl
- Corners = Deep 1/3
- Free Safety = Hole
Zone blitzes
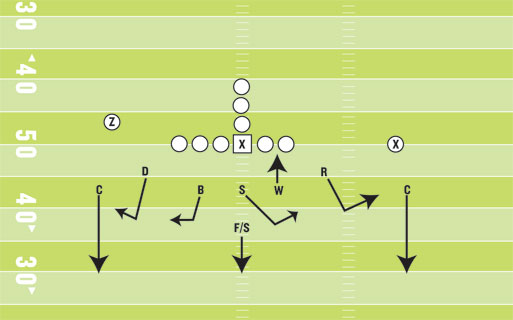
Cover 3, Sam: DIAGRAM 5
 |
| DIAGRAM 5 |
- Dog = Strong Curl/Flat
- Bandit = Strong Hook/Curl
- Sam = Stunt called
- Will = Weak Hook/Curl
- Rover = Weak Curl/Flat
- Corners = Deep 1/3
- Free safety = Hole
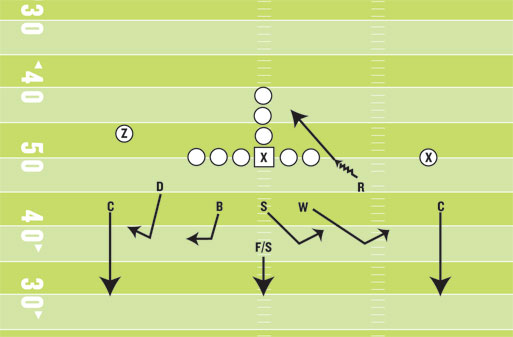
Cover 3, Dog: DIAGRAM 6
 |
| DIAGRAM 6 |
- Dog: Stunt called.
- Bandit: Strong Curl/Flat.
- Sam: Strong Hook/Curl.
- Will: Weak Hook/Curl.
- Rover: Weak Curl/Flat.
- Corners: Deep 1/3.
- Free Safety: Hole.
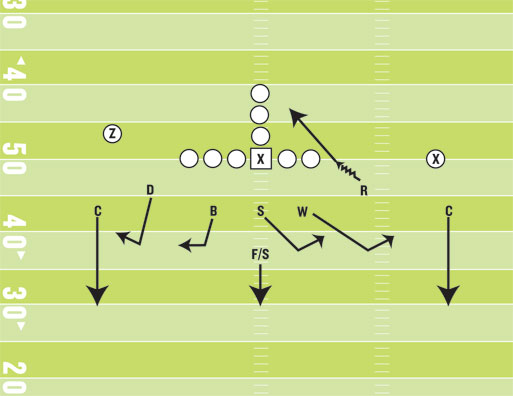
Cover 3, Bandit: DIAGRAM 7
 |
| DIAGRAM 7 |
- Dog: Strong Curl/Flat
- Bandit: Stunt called
- Sam: Strong Hook/Curl
- Will: Weak Hook/Curl
- Rover: Weak Curl/Flat
- Corners: Deep 1/3
- Free Safety: Hole
Cover 3, Will: DIAGRAM 8
 |
| DIAGRAM 8 |
- Dog: Strong Curl/Flat
- Bandit: Strong Hook/Curl
- Sam: Strong Hook/Curl
- Will: Stunt called
- Rover: Weak Curl/Flat
- Corners: Deep 1/3
- Free Safety: Hole
Cover 3, Rover: DIAGRAM 9
 |
| DIAGRAM 9 |
- Dog: Strong Curl/Flat
- Bandit: Strong Hook/Curl
- Sam: Weak Hook/Curl
- Will: Weak Curl/Flat
- Rover: Stunt called
- Corners: Deep 1/3
- Free Safety: Hole
Not only can you blitz according to formation strength, but also directionally. Blitzes can be brought from the weak side, short side, right, left, etc.
Direction blitzes
Cover 3, Right: DIAGRAM 10. The right Dog runs the stunt. The formation doesn’t matter. In the diagram, the Rover runs the stunt.
 |
| DIAGRAM 10 |
- Dog: Strong Curl/Flat
- Bandit: Strong Hook/Curl
- Sam: Weak Hook/Curl
- Will: Weak Curl/Flat
- Rover (Right Dog): Stunt called
- Corners: Deep 1/3
- Free Safety: Hole
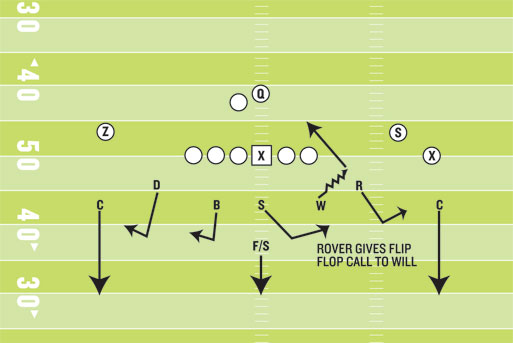
Flip flop
This is an adjustment in place whenever a Dog is in a stunt. If the offense presents a formation with two outside receivers split wide, with the outside LB (Bandit or Will) may be stretched to get to the curl zone. Should that be the case, the Dog can give the Bat a “flip flop” call. Flip Flop tells the Bat to run the stunt. The Dog will read out of the stunt and zone the Curl/Flat area.
Diagrams 11-13 give examples of this adjustment: Cover 3. Dog: DIAGRAM 11;
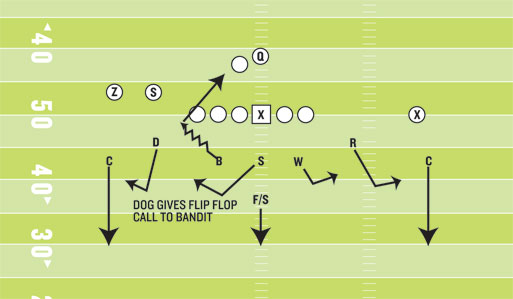 |
| DIAGRAM 11 |
Cover 3, Left: DIAGRAM 12;
 |
| DIAGRAM 12 |
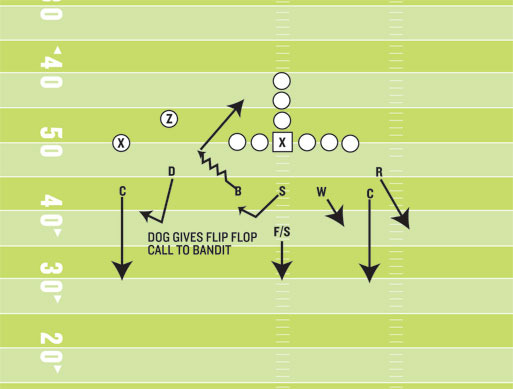
Cover 3, Rover: DIAGRAM 13.
 |
| DIAGRAM 13 |
Kenny Ratledge spent more than 30 years as a defensive coordinator at the high school football level.
You Might Also Like