‘Horns’ set increases floor spacing for better shots
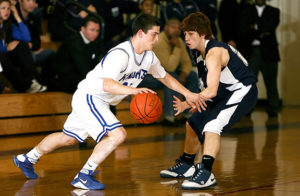 Basketball teams on all levels have designed plays where there are two post players near the top of the key and two shooters in the corners. Each post player sets a ball screen, giving the point guard the option to go either way.
This set typically is called “Horns.” The primary advantage of this set is the floor spacing it creates, allowing players to take advantage of their individual skill sets.
These concepts are naturally incorporated into this set: pick and pop, post touches, side pick and roll, weak side duck-ins, screen the screener, and dribble handoffs. There are five options that create both player and ball movement, allowing your team members to get open for quality shots.Pick-and-pop to side pick-and-roll
Your two post players (4 and 5) will always begin near the top of the key. Your two wings (2 and 3) will always begin in the corners.
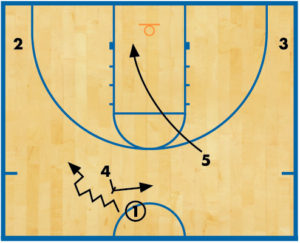 DIAGRAM 1: Ball screen. 1 decides to use 4’s ball screen. The weak-side post, 5, dives to the ball-side block. Since most teams defend the ball screen with a hard, aggressive hedge to prevent the ball handlers from penetrating, this naturally sets up the pick and pop action. After setting the ball screen, 4 pops to the top of the key.
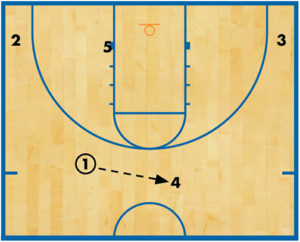 DIAGRAM 2: Shot option. If 4’s defender aggressively hedged the ball screen, he should be wide open for a pass from 1. Depending on the player’s skill set, 4 could attempt a perimeter shot.
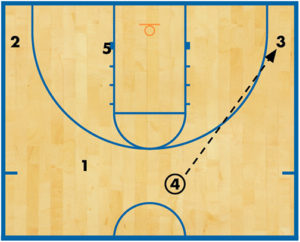 DIAGRAM 3: Corner pass. If 4 can’t make perimeter jump shots, then the player can quickly swing the ball to 3 in the corner. That forces the defense to quickly recover and change sides of the floor, since all of the action was just on the other side of the floor.
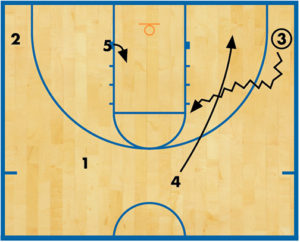 DIAGRAM 4: Multiple options. After completing the pass to 3, 4 springs to set a ball screen setting up side pick and roll action. As 3 comes off the ball screen, 4 will either fade to the short corner or roll to the rim.
1 and 2 are preparing to receive a pass from 3’s penetration. 5 steps into his defender, making contact, and ducks into the lane.
This last piece is crucial. By stepping into the defender and making contact, the defender is not able to help on 4’s roll to the rim or fade to the short corner — he or she must defend the player. 3 obviously has several options. 3 can hit 4 on a roll to the rim or pop to the corner, hit 5 on a duck-in, hit 1 or 2 on penetration and pitch action, or pull up for the jump shot.
Middle hit to screen-the-screener
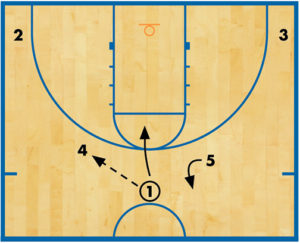 DIAGRAM 5: Pass and cut. 1 makes a “middle-hit” pass to 4. After completing the pass, 1 cuts down the middle of the lane, stopped at the dotted-line area. The weak-side post, 5, V-cuts to get open at the top of the key area.
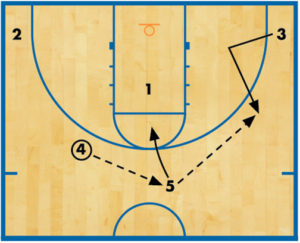 DIAGRAM 6: Swing. 4 quickly passes the ball to 5. While the pass is in the air, 3 V-cuts to receive a pass from 5 on the wing, free-throw-line extended.
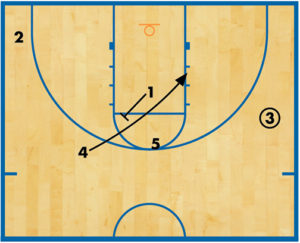 DIAGRAM 7: Screen on the block. Once 3 catches the pass, 1 turns and sets a diagonal backscreen on 4, who cuts hard to the ball-side block looking to receive the pass from 3. This is 3’s first option.
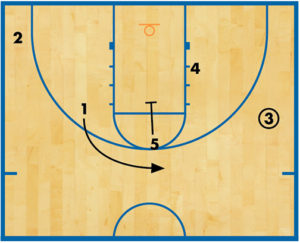 DIAGRAM 8: Open shooter. After setting the screen for 4, 1 receives a downscreen from 5, implementing the screen-the-screener concept. This is the one screen where the cutter does not have to set up his man. He or she must simply set the backscreen, then cut to the top of the key area. The better screen the player sets on 4, the more open the will be at the top of the key.
5 must visualize the placement of 1’s defender. If 1 sets a good screen on 4, the defender should be near the front of the rim helping on 4’s cut to the block. This is the area 5 must screen.
Dribble-hand-off action
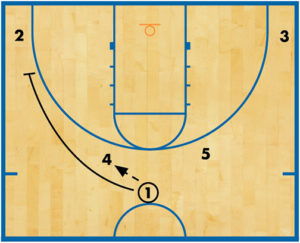 DIAGRAM 9: First pass. 1 makes a middle hit pass to 4. 4 then sprints to the ball-side corner and sets a screen for 2.
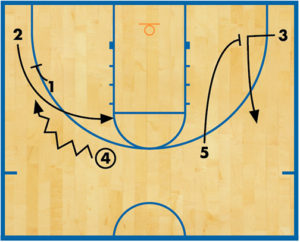 DIAGRAM 10: Screen defenders. As soon as 1 passes 4 to set the screen, 4 turns and puts the ball on the floor, dribbling toward 2. 2 receives a screen from 1 and immediately receives a dribble hand off from 4.
4 tries to get in the way of 2’s defender without setting an illegal screen. This creates driving angles for 2. 5 sets a screen for 3 to occupy the weak-side defenders.
Double screen away
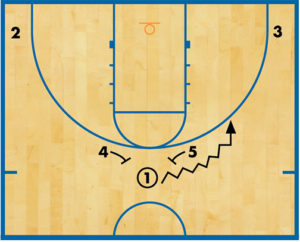 DIAGRAM 11: Two options. 1 can go off to either side, but in this case the player chooses to use 5’s ball screen.
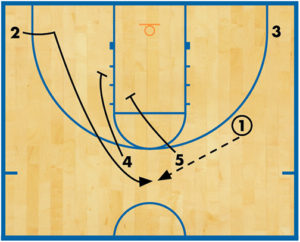 DIAGRAM 12: Double screen. 4 and 5 set a double screen away for 2, who L-cuts to the top of the key for an open jump shot. If 5’s defender over-helps on the screen, 5 should slip the screen and dive to the rim for a layup.
Screen-the-screener/flex action
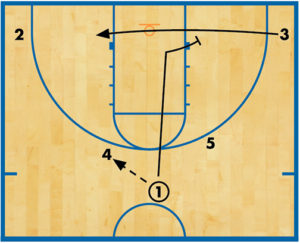 DIAGRAM 13: Pass. 1 makes a middle hit pass to 4. 1 then cuts down the middle of the lane and sets a weak-side “flex” screen for 3, who cuts hard to the ball-side block.
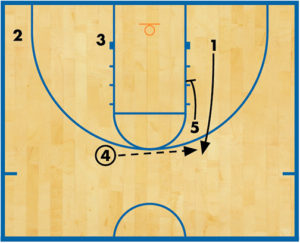 DIAGRAM 14: Scoring chance. If 3 is not open, 5 sets a downscreen (screen the screener) for 1. The better the screen, the more open 1 will be.
5 must “head hunt” and locate 1’s defender, who will most likely be helping on 3’s cut to the block. If 4 can’t complete the pass to 1, the player can utilize the dribble-hand-off concept and get the ball in their teammate’s hands this way.


