
Quick-hitters guaranteed to get your team good looks
Having a wide variety of set plays that you can call upon to counter any defensive situation can be a huge advantage to your team. While you’ve prepared your team both on and off the floor, it’s also your responsibility to give your players the tools they need to be successful from a strategical standpoint.
The following set plays are quick-hitting in nature and are great for attacking either a tough zone or an overly aggressive man-to-man defense.
’13’ vs. zone
This zone play is designed to attack the weak side of the zone and give you a good look at a 3-point shot.
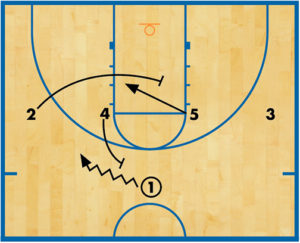
 DIAGRAM 1: ‘13′ vs. zone (A). From a 1-3-1 set, the shooter (3 in this play) always lines up on the same side as the low-post player (5).
1 passes the ball to 2. 2 passes it back to 1. 1 quickly reverses the ball to 3. 3 returns the pass back to 1.
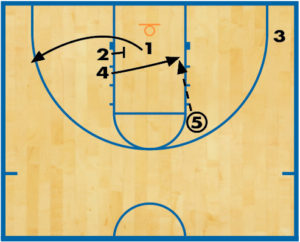
 DIAGRAM 2: ‘13′ vs. zone (B). After getting the ball back, 1 dribbles toward 2’s side to clear the ball. 4 pops out to the perimeter and 3 dives to the off-side corner.
 DIAGRAM 3: ‘13′ vs. zone (C). 5 screens the back of the zone, while 1 passes to 4 who quickly reverses it to 3 in the corner for an open 3-point shot.
‘3’ vs. zone
This play is run from a 1-4 low set and is designed to get a 3-point shot for your best shooter. It’s essentially a man-to-man play that we’ve used successfully against various zone defenses.
 DIAGRAM 4: ‘3′ vs. zone (A). From the 1-4 low set, 1 makes a dribble entry to the right side. As 1 dribbles to the right wing area, 4 flashes up the lane line and receives a pass from 1.
 DIAGRAM 5: ‘3′ vs. zone (B). 3 sets a cross-screen for 2, who uses the screen and makes a flex cut to the opposite low block.
 DIAGRAM 6: ‘3′ vs. zone (C). 1 sets a downscreen on the top defender in the zone. 3 breaks up, uses the screen and pops to the top of the key. 4 hits 3 as he or she gets to the top.
5 slides out of the corner and sets up in a position to get a screening angle on the off-side low defender.
 DIAGRAM 7: “3” Vs. Zone (D). 4 and 5 set screens on the off-side defenders, with 5 screening the low defender and 4 screening the off-side elbow defender. 2 curls up from the low block and receives a pass from 3.
In order to deliver the ball safely to 2, 3 may have to take a few dribbles to the left before making the pass.
2 comes hard off the double-screen, receives the pass and shoots the open 3-point shot.
‘Stack’ vs. zone
This is a simple, effective play against a zone defense. By out-manning the defense inside, you’re able to get high-percentage shots inside.
 DIAGRAM 8: ‘Stack’ vs. zone (A). Out of a 1-2-2 set, 1 passes to 2. 5 slides across the lane to form a low stack with 4.
 DIAGRAM 9: ‘Stack’ vs. zone (B). 2 passes back to 1, who dribbles across the top and delivers the ball to 3 on the wing.
2 breaks to the hoop, comes off 4 and 5’s low stack and pops into the opposite corner. 2 tries to draw the baseline defender with him or her into the corner. 3 looks to 2 in the corner.
If the defender doesn’t follow 2 into the corner, he or she must be ready to receive the pass and quickly shoot.
 DIAGRAM 10: ‘Stack’ vs. zone (C). 5 screens the middle defender in the zone (remember, 2 has drawn the low defender out). 4 steps to the short corner and receives a pass from 3. 4 can drive to the basket or shoot a jump shot from the short corner.
 DIAGRAM 11: ‘Stack’ vs. zone (D). This option is essentially the same play as “Stack” except it’s run from a 1-3-1 set.
4 is set up on the outside wing and 2 is in the high post. 1 passes to 3. On the pass, 4 breaks to the block while 2 cuts to the basket and fades to the off-side wing (trying to draw the defender with him or her). 3 passes back to 1, who receives the pass and dribbles hard to the opposite wing area.
From here, the offense runs the same stack action inside as before.
‘Runner’ vs. zone
“Runner” is a zone offense that’s designed to overload the baseline. It’s extremely effective against 1- or 2-man baseline zones.
 DIAGRAM 12: ‘Runner’ vs. zone (A). 1 makes a dribble entry to the left side of the floor. As 1 approaches, 3 slides down to the left corner. 2 pops up to establish a 2-guard front with 1.
 DIAGRAM 13: ‘Runner’ vs. zone (B). 1 reverses the ball to 2 while 3 cuts off baseline screens set by 4 and 5. After setting the screen, 4 cuts into the high post. 5 posts up on the low block as 2 receives the ball. 2 hits either 3 on the baseline or 5 in the low post.
 DIAGRAM 14: ‘Runner’ vs. zone (C). If no shot is available the action is run again. 2 passes to 1, while 3 cuts off baseline screens set by 4 and 5. After setting the screen, 5 cuts to the high post.
‘Cutters’ vs. zone
This is a zone offense designed to spread out the zone and attack the ball side with an overload or set up a 3-point shooter on the weak side.
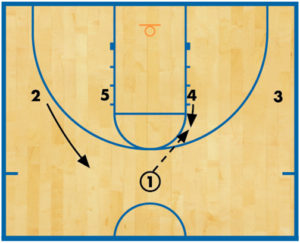
 DIAGRAM 15: ‘Cutters’ vs. zone (A). In this offense, 4 is the runner and will cut from corner to corner, following the ball. 1 passes to 2 on the wing. 4 runs to the ball-side corner looking for the ball. As 2 is receives the pass, 5 posts up in the low post.
 DIAGRAM 16: ‘Cutters’ vs. zone (B). 2 passes to 4 in the corner and cuts through the defense. 1 and 3 rotate to fill the open areas.
 DIAGRAM 17: ‘Cutters’ vs. zone (C). If no shot opportunity opens up, 4 passes out to 3 at the top of the key. 3 quickly swings the ball to 2 on the other side. As the ball is being reversed, 4 runs the baseline while 5 flashes to the middle of the lane and then cuts to the opposite low post.
News
Videos


Shop


