
Quick-hitters guaranteed to get your team good looks
‘1’ vs. man-to-man
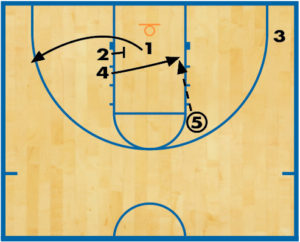
“1” is a quick-hitting man-to-man play that’s designed to get the point guard an open jump shot.
 DIAGRAM 18: ‘1’ vs. man (A). From a 1-4 high set, 1 passes to 2 and makes a UCLA cut off a screen set by 5. After setting the screen, 5 pops to the top. 2 looks to hit 1
 DIAGRAM 19: ‘1’ vs. man (B). 3 makes a V-cut toward the basket and cuts back to the top off a screen set by 4. 2 passes back out to 5, who quickly reverses the ball to 3. After setting the screen, 4 rolls to the low-post block.
 DIAGRAM 20: ‘1’ vs. man (C). 1 runs the baseline and comes off a cross-screen set by 4. 3 hits 1 for the open jump shot. On the weak side, 5 sets a downscreen for 2 to set up a possible ball reversal.
‘1-down’ vs. man-to-man
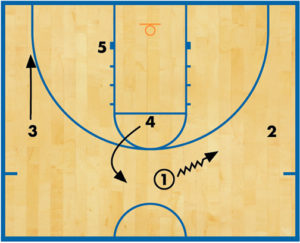
“1-down” opens up two scoring opportunities for the point guard — off a high backscreen or a double-screen on the weak side.
 DIAGRAM 21: ‘1-down’ vs. man (A). From a 1-4 high set, 2 and 3 set up wide, while 4 and 5 position themselves on at the lane-line extended on each side.
1 initiates the action by dribbling to the left side of the floor.
 DIAGRAM 22: ‘1-down’ vs. man (B). As 1 approaches, 4 pops up and sets a screen. 1 passes to 5 popping up on the opposite side, uses 4’s screen and cuts to the basket.
 DIAGRAM 23: ‘1-down’ vs. man (C). 5 swings the ball to 3 on the right-wing area. 2 slides toward the elbow on the weak side.
 DIAGRAM 24: ‘1-down’ vs. man (D). 2 and 4 set a double-screen for 1 on the weak side. 1 uses the screen and curls to the top. 5 sets an on-the-ball screen for 3, who uses the screen and dribbles to the the top.
Off the ball screen, 3 has three options. A. Drive to the basket for a score. B. Dump the ball to 5 on a pick-and-roll move. C. Pass to 1 for an open jump shot coming off the double-screen.
‘2’ vs. man-to-man
This is a play that’s designed to get the point guard an open 3-point shot.
 DIAGRAM 25: ‘2’ vs. man (A). This play is from a box-set alignment with 2 and 3 on the low blocks, while 5 and 4 are positioned at each elbow and 1 makes a dribble entry with the ball at the top.
1 passes to 4, cuts off the flare screen set by 5 and breaks to the weak-side wing. 2 runs the baseline to the ball side.
 DIAGRAM 26: ‘2’ vs. man (B). 4 throws a skip pass to 1 and downscreens for 2. As soon as the ball sails over 5’s head, he or she dives to the low post. 2 makes a V-cut toward the hoop, comes off 5’s downscreen and pops to the top.
1 looks to shoot a 3-pointer or dump the ball in to 5 in the low post.
 DIAGRAM 27: ‘2’ vs. man (C). If the screener’s defender (the player guarding 4) begins to cheat toward the sideline to help on the flare screen, you can call an option (called “slip”). On the option, the flare screener (5) quickly dives to the basket and receives a bounce pass from 4 for the layup.
‘2-down’ vs. man-to-man
This is a great counter play to “2.” The object is to isolate a post and perimeter player on one side of the floor by using dribble-weave action.
 DIAGRAM 28: ‘2-down’ vs. man (A). This play also begins from a box-set alignment with 2 and 3 on the low blocks, while 5 and 4 are positioned at each elbow and 1 makes a dribble entry with the ball at the top.
To start the play, 3 and 2 each break out wide into the corners. 1 passes to 5 and breaks to the opposite wing off 4’s flare screen.
 DIAGRAM 29: ‘2-down’ vs. man (B). 5 dribbles toward 2 and initiates a dribble-weave action. 2 has three options from this action. A. Take the handoff and drive to the basket. B. Set up the defender and backcut to the basket. C. Pass to 1 coming off 4’s downscreen on he weak side.
‘3-down’ vs. man-to-man
 DIAGRAM 30: ‘3-down’ vs. man (A). 1 dribbles right while 2 breaks to the corner and 5 slides to the ball-side low post.
 DIAGRAM 31: ‘3-down’ vs. man (B). 4 breaks across and sets a downscreen for 3 who cuts into the lane and receives the pass from 1.
RELATED

News
Videos


Shop


