
Match-up zone defense causes fits for offensive opposition
It’s no secret — good, sound defense wins you a lot of games. Whether it’s a man-to-man or zone, press or half-court, always have a defense ready that gives the offense fits. This means the defense needs to be hard to recognize or cause the opposition problems setting up its set offense.
The following match-up zone resembles both a 2-1-2 and a tandem-and-3 defense. The wings have to be very active and there must be constant pressure on the ball. Your center player near the top of the zone (Player X2 in the diagrams) has to be a good athlete with great communication skills.
When teaching this zone, emphasize that all players have different responsibilities based on where the offense sets. Defensive slides are based upon player position and ball location. The following are the basic responsibilities for each player:
- The quickest guard (Player X1) plays the top of the zone. This player usually starts at half-court. X1’s job is to push the ball-handler to that player’s weakest hand or side — not trying to steal the ball but just guiding the offensive player to that weak-handed side. As long as the player who brought the ball up court still has the ball, X1 sticks with that player until the dribble is stopped.
- Your second guard (X2) starts at the center of the foul line. X2 has the high post and wants to front any offensive player in the front post. If there isn’t a player in the high post, X2 slides to the passing side of the first pass.
- The wings (X3 and X4) are critically important as they are the trapping players if you decide to trap. The wings have to understand how to use the proper footwork, as well as how far to come out, to keep the ball out of the middle.
- The center (D5) covers the back of a high post if there is no low post. If there is a low post on the ball-side, then D5 covers that player.
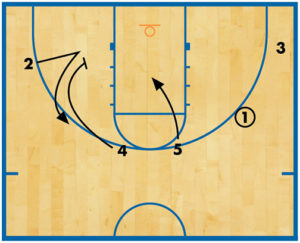
 DIAGRAM 1: This is the initial set up for the match-up zone. X2 takes position at the center of the foul line. X2’s job is to get the ball out of the middle of the floor and push it in one direction or another. Ninety percent of the time, the ball is pushed to the left side of the court because most ball-handlers are right-handed.
X1 starts at half-court to give the appearance that the defense is in a man-to-man. This confuses the offense into sometimes calling out a man-to-man offensive play. X1’s responsibility is to herd the ball-handler in one direction and pressure the ball. Plus, X1 is to remain on 1 as long as 1 has the dribble. X1’s objective is not to steal the ball but to force the ball-handler to an area where your defenders can trap or at least make it difficult for 1 to pass to a teammate.
» ALSO SEE: Four point guard rules for attacking zone defenses
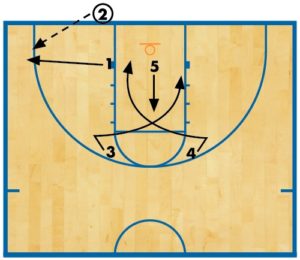
 DIAGRAM 2: At this point, the offensive player has been forced to the left side of the floor. Now, there are a couple of options. If the ball-handler still has the dribble, then trap with the original defender (X1) and a wing (X3). But, make sure there is not an offensive player in the corner, which leads into the defensive responsibilities in Diagram 3.
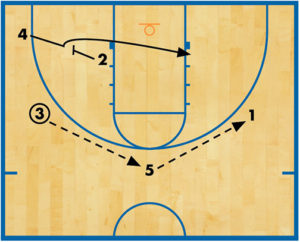
 DIAGRAM 3: In this circumstance, there is a player in the corner, so do not trap the ball. Instead, maintain pressure on the ball and rotate to that side of the floor. In this alignment it is vital for the center to deny the high post as long as there is no low-post player on the ball side.
 DIAGRAM 4: If there is an offensive player in the low post, X5 covers that player with pressure staying on the players on the ball-side.
 DIAGRAM 5: The defensive slides and possible double-teams are shown in Diagrams 5-7. In Diagram 5, the offensive player in the corner throws a pass to 5 in the low post. X5 already is covering 5 and as soon as the pass is made, X3 comes down to create a double-team.
 DIAGRAM 6: Another double-team of 5 in the post can come from X2. With 5 holding the ball in the low post, X5 already is in position in the post and X2 leaves the foul-line area to create a double-team. X1 and X4 need to be aware of the open player (2) at the foul line.
 DIAGRAM 7: With 3 holding the ball in the corner, X1 and X3 create a double-team while X2 rotates to cover 1. X4 rotates to cover 2. That traps 3 in the corner with the best option for success as a cross-court pass to 4, which most times is not a high-percentage play.
News
Videos


Shop


