
A simple, effective and flexible full-court press break
Attacking and breaking full-court pressure defense is no different than attacking any other kind of defense. Emphasize both an attacking mindset and good shot selection. Try to keep everything simple, while providing players with a few basic reads and adjustments so they are able to handle a variety of pressing situations.
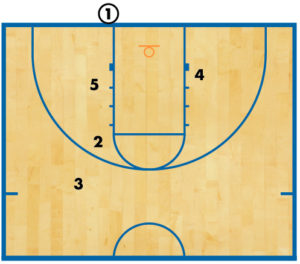
Alignment for press break
The alignment of all five players in this press break provides good spacing and is consistent with their positions in our numbered fast break. This alignment is used against all types of full-court pressure.

DIAGRAM 1: Alignment for press break. 4 always is the inbounder. Teach 4 to move quickly to the inbounding spot outside the backboard with the ball already on the throwing shoulder and with eyes looking down the floor — much the way a quarterback sprints out from the line of scrimmage in football. The point guard (1) initially sets up at the elbow in line with 4 and 5 initially set up at half court where the center circle meets the half-court line. 3 always is on the right side as your team heads down the floor, with 2 always on the left. Both 2 and 3 initially set up close to the foul-line extended. You don’t want them crowding 1.
Entries into play
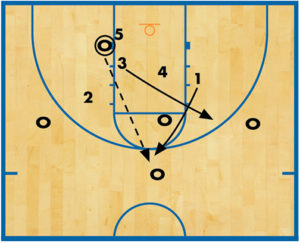
There are three basic entries out of this press breaker. The first is to 1, which is the primary look against most presses. Talk to 1 about not dancing and moving a lot to get open. Teach 1 to get a good seal and try not to catch the ball below the block, much like you would teach a low-post player when discussing half-court offense. If 1 is fronted, 1 simply walks the defender to the block, seals the defender and 4 lobs the ball over the defender provided there isn’t any backside help. If 1 is being three-quartered or played behind, 1 seals the defender and breaks to the ball.

DIAGRAM 2: ‘Point clear.’ Once 1 catches the ball, the next movements are based on the defense. If it’s a man defense, go with the “point clear.” 4 curls to the middle of the floor after passing to 1. 5 empties to the opposite free-throw line area. 2 and 3 maintain their 15-18 feet of spacing from 1. Once 1 reads it is a man press, 1 yells “Clear!” and 2, 3 and 4 clear down the court keeping vision with the ball. It is critical for 1 to wait for 4 to curl to the middle before proceeding up the floor with the dribble so that 4’s defender isn’t as readily available to double-team.

DIAGRAM 3: ‘Point zone.’ If 1 reads the press is a zone, 1 calls “Zone!” and 4 stays in the middle, trying to get the ball from 1, 2 or 3 as those players reverse or skip the ball to one another. 5’s job is to go to the ball-side sideline whenever the ball is in one of the wings’ hands. This gives an additional look up the floor, occupies one of the defenders in the back of the press and opens up the back side of the press. If 4 does catch the ball in the middle, 4 looks at the back-side wing cutting toward the basket (in this case 2). Zone presses tend to have all five defenders on the ball side of the floor, so if 4 does receive the pass from 1, both wings should cut and 4 reads which one is open since the press defenders will not have committed to one side of the floor.
The second entry goes to one of the wings. Have 2 and 3 “V” back to the ball. As with 1, you do not want a wing catching the ball below the block as this is prime trapping position for the defense.

DIAGRAM 4: ‘Wing clear.‘ If 3 catches the ball (as in the diagram), 5 goes to the ball-side sideline in the back court. This avoids the risk of an over-and-back violation. 1 breaks to the middle of the floor and 4 steps in. 3 must read whether the press is man or zone. If 3 reads man press, 3 yells “Clear!” and 1, 2, 4 and 5 clear down the floor keeping vision with the ball.

DIAGRAM 5: Wing zone. If 3 reads zone press, 3 calls “Zone!” and 1 stays in the middle trying to get the ball from 3, 4 or 2 as those players reverse or skip the ball to one another. Once again, 5’s job is to go to the ball-side sideline whenever the ball is in a wing’s hands (once the ball goes from the wing back to 4, 5 slants down the middle of the floor from his ball-side sideline backcourt position to the opposite foul-line area). If 1 does catch the ball in the middle, 1 attacks the press on the dribble, since 1 is the primary ball handler.
The third entry is called the “5 Entry,” as the ball is being entered to the 5.

DIAGRAM 6: ‘5 Entry.’ If 1, 2 and 3 are having problems getting open, 5 flashes hard to the ball-side elbow. 4 makes a high, two-hand overhead entry pass to 5. 1 and 3 backdoor with 3 continuing all the way to the opposite free-throw line and 1 curling back to the middle of the floor. 5 hits either player, if open. Meanwhile, 4 steps in and 2 holds position at the opposite wing. If 1 or 3 are not open, 5 gets the ball back to 4 and widens out to the wing spot vacated by 3. 3 now takes 5’s press break responsibilities and vice versa.
Adjustments to press breaker
Different scenarios force you to adjust your press breaker. Try these four adjustments to keep the ball moving into the front court.

DIAGRAM 7: Box. This is used against full-court man defense in total denial. 1 stays at the usual ball-side elbow. 5 is on the other elbow. 3 is halfway between the elbow and the half-court line aligned with 1. 2 is in the same position as 3 on the other side of the ball. When 4 slaps the ball, 1 screens up for 3, who cuts to the right-side wing. 1 then comes back to the ball in the middle of the floor. Simultaneously, 5 screens up for 2, who cuts to the left-side wing. 5 slips the screen looking for the long pass from 4. You now are back in your regular press-break alignment.

DIAGRAM 8: Loop out & fill. This is used against a hard wing trap and denial of the three immediate receivers. 4 passes to 3. 3 now is being trapped. The other three defenders are denying 5, 1 and 4. 1 must release down the floor and loop out to the wing spot. This causes 1’s defender to follow. 2 flashes hard to the area 1 has vacated, gets the ball from 3 and immediately passes to the back side to 1. This should create an opportunity for 1 and 5 to run a 2-on-1 break.

DIAGRAM 9: 21 flash. This is used against a 2-1-2 press. If 4 is being locked up in the press by the middle zone defender, the opposite wing (in this case 3), flashes from behind the defense into the open area to give the defense another look.

DIAGRAM 10: Even. If 1 reads a soft 1-2-2 or 1-3-1 three-quarter or half-court press, morph the press break into a half-court trap offense by calling out “Even!” and having 3 fill the middle, 4 and 5 fill the wings and 1 and 2 fill the guard spots.
Coaching points
There are five main coaching points to consider with these press breakers.
1. The end result either should be a layup or a shot in the paint, otherwise, your offense needs to pull the ball out and start the offense. Don’t take quick, long shots.
2. Against man pressure, emphasize to the guards to stay in the middle of the floor as they bring the ball up the court. They also need to make extensive use of the crossover, pullback and hesitation dribble. No spin dribbling! Spin dribbling increases the effect of a surprise trap or a run-and-jump attack.
3. Against zone pressure, emphasize — particularly with the wings — that they must look up the floor after catching the ball. The progression ideally should be middle (to 1), sideline (to 5), skip (to 2 or 3 depending) and back to 4.
4. In practice, work on press breakers more in 5-on-0 rather than 5-on-5. It’s more important for your players to know where they are supposed to be and what their reads are, rather than knowing exactly what an opponent’s press is going to do. Plus, you may not have enough skilled players to duplicate the opponent’s press.
5. Make sure your players are very conscious of the six trapping areas, or corners, that an effective press tries to exploit.
RELATED
News
Videos


Shop


