Football: Talladega High School’s ‘Magnum’ defense
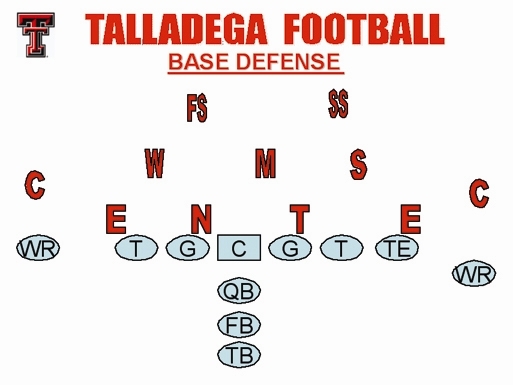
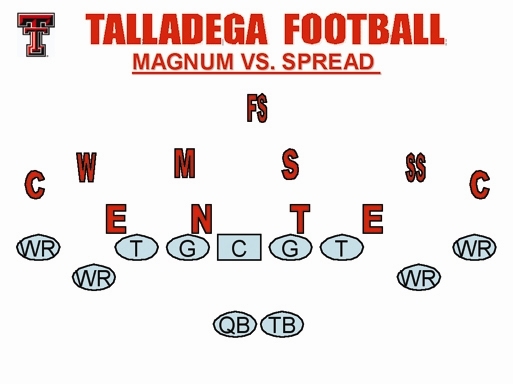
Talladega High School’s “Magnum” defensive package presents a 4-3 look (DIAGRAM 1) with variations consisting of one front, two coverages and six blitzes.
 |
| DIAGRAM 1 |
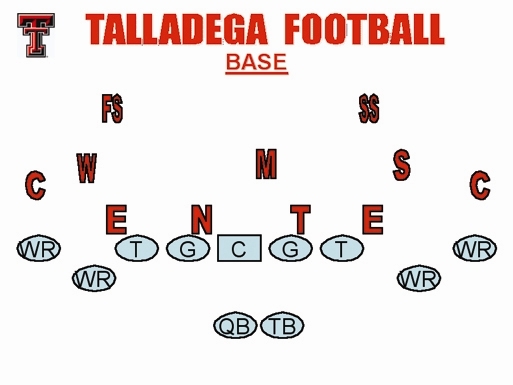
DIAGRAM 2 shows how simple it is to derive one of its most popular variations, the Magnum 4-4.
 |
| DIAGRAM 2 |
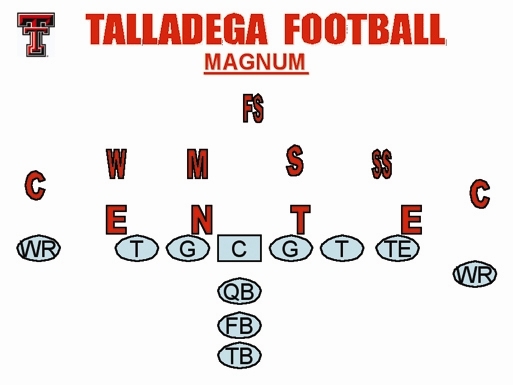
As you can see in DIAGRAM 3, it also enables us to change things around and give the offense something else to prepare for when scouting us.
 |
| DIAGRAM 3 |
You can also see that we are left with only five men in the box, enabling the offense to outnumber us.
Whenever the offense wants to spread and run, we counter with our Magnum (DIAGRAM 4). We now have six men in the box, which balances us with the offense:
- We have made it as easy as possible to change from base to Magnum.
- The front four stay the same in base and Magnum.
- Mike and Sam (middle and strong) LBs align over the guards.
- Strong safety rolls down to C gap against a tight end (Diagram 2) or head-up vs the No. 2 Receiver if there are two of them (DIAGRAM 4).
 |
| Diagram 4 |
Coverages
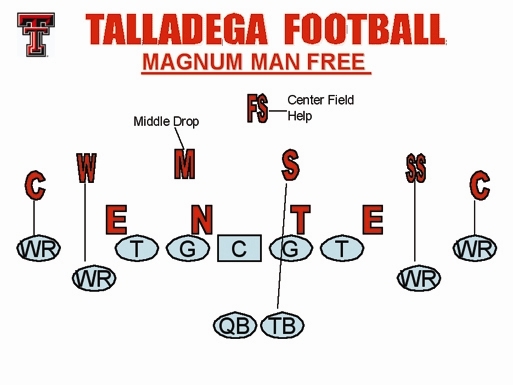
We have two main coverages in our Magnum Package — man free (DIAGRAM 5) and cover 3 (DIAGRAM 6).
DIAGRAM 5: In our man free coverage, the corners — Will (weak-side LB) and the Strong Safety — are the men covering the wide receivers. We usually use a hard press coverage, but we also can play soft.
 |
| DIAGRAM 5 |
The Sam linebacker has the running back, Mike has the middle drop, and the free safety offers centerfield help.
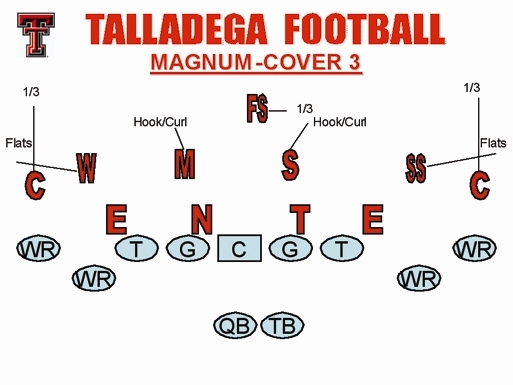
DIAGRAM 6: In our cover 3, the corners and the free safety have deep thirds, the Will and Strong safety have the flats, and Mike and Sam have hook/curl.
 |
| Diagram 6 |
Blitzes
We use several blitzes in our Magnum package to bring pressure on the offense.
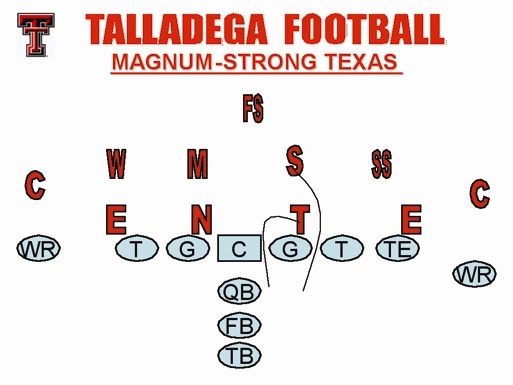
In DIAGRAM 7 (Magnum Strong TX), the DT loops into the Strong A gap and Sam will explode into the Strong B gap.
 |
| DIAGRAM 7 |
DIAGRAM 8 (Magnum Weak TX): The nose guard loops into the weak B gap, and Mike explodes into the weak A gap.
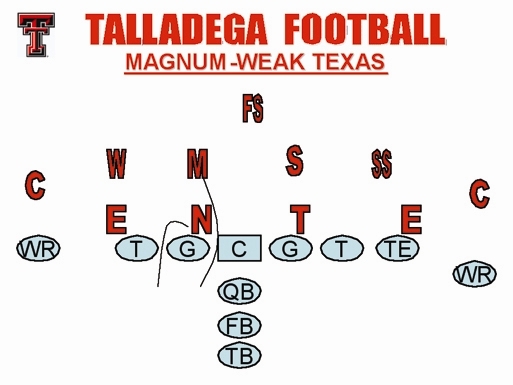 |
| DIAGRAM 8 |
DIAGRAM 9 (Magnum Double TX): The DT loops into the Strong A gap, Sam explodes into the Strong B Gap, the nose guard loops into the Weak B gap, and Mike explodes into the Weak A gap.
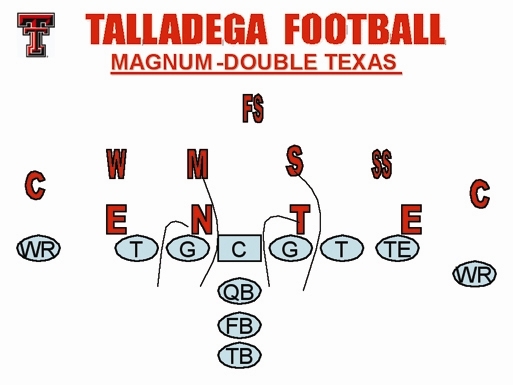 |
| DIAGRAM 9 |
DIAGRAM 10 (Thunder): A zone blitz with a Cover 3: The weak DE drops to hook/curl, the Mike is responsible for the flats, and the LB blitzes off the weak end.
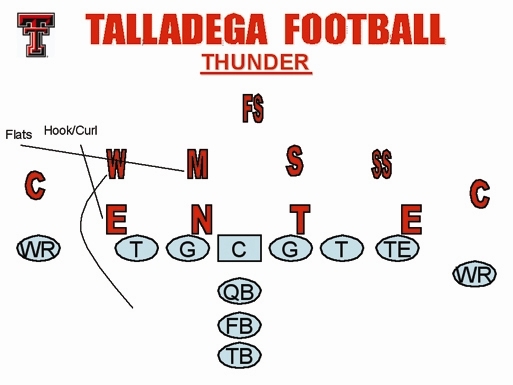 |
| DIAGRAM 10 |
DIAGRAM 11 (Lightning): The strong DE drops to hook/curl, the Sam is responsible for the flats, and the strong safety blitzes off the strong end.
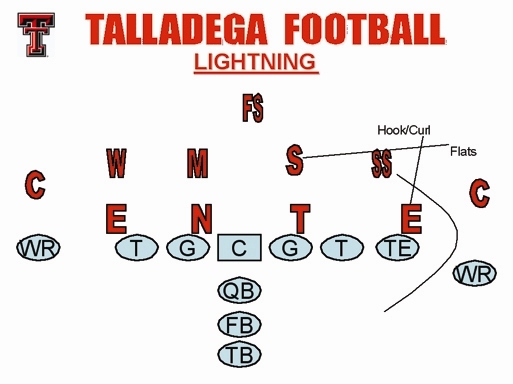 |
| DIAGRAM 11 |
Tornado (DIAGRAM 12): In our last blitz, we are bringing maximum pressure and leaving many holes for the passing game. Cover 3 applies the pre-coverage.
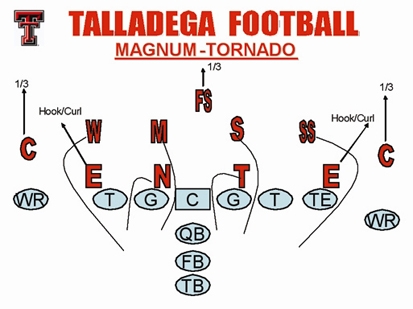 |
| DIAGRAM 12 |
DIAGRAM 12 (Magnum Tornado): Will and strong safety come off the edges. Mike, the nose guard, the DT, and Sam run the double Texas. Both ends drop to the hook/curl, and the corners and the free safety are responsible for the deep thirds.
You Might Also Like