
‘Shamrock’ zone offense unlucky for defenses
The “Shamrock” zone offense is an effective series for when you want to move the ball around quickly, find holes in the zone, get the ball into the low post use the high post to drive open up passing lanes, or swing the ball to the weak-side cutter.
Players need to make pass fakes, be squared to the basket while in triple-threat position, be ready and aware of what’s occurring on the weak side of the zone, and must utilize skip passes to the weak-side cutter.
Player responsibilities
This is an excellent offense to use when you have two good post players who can play in either the low or high post, and both are capable of posting up, driving, passing, or hitting a short-range jump shot from the foul line.The wing players must move well without the ball. They also must read holes in the zone and be in triple-threat position when receiving a pass. Upon receiving a pass, a wing player must be prepared to dribble, penetrate, shoot, drive and dish, pass into the post, or quickly reverse the ball on the perimeter.
Running the Shamrock
Ball movement is the key to the Shamrock zone offense. If a player holds the ball too long, it gives defenders time to reposition. That cuts down on passing lanes, thereby stagnating the offensive attack.
The offense is continued when the weak side becomes the strong-side overload through ball reversal and skip passes. Although the players are numbered in the following diagrams, the personnel and positioning of your players should be determined based on the makeup of your squad and the skill level of the players.
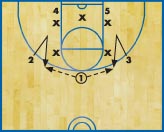
DIAGRAM 1: Player positioning initial movement. In this diagram, the Shamrock is shown against a 2-3 zone, but it’s effective against any type of zone defense.
From a three-out, two-in set, the point guard (1) handles the ball on top. It’s the responsibility of the wing players (2 and 3) to get open and initiate the offense. 4 and 5 set up below the zone along the baseline. 1 enters the ball to either 2 or 3 on the wing. For purposes of this article, we’ll have the initial entry pass be made to 2.
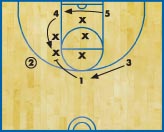
DIAGRAM 2: After making the entry pass to the wing, 1 follows the pass and sets a screen for 2 on the top defender on the ball side of the zone. 3 breaks to the top of the key. 5 cuts along the baseline to the ball side and momentarily overloads the zone, but they eventually drift back into the original position.
» RELATED: 10 ways to get the most from your spread zone offense
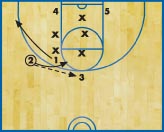
DIAGRAM 3: 2 curls around 1’s screen and drives to the basket. After setting the screen, 1 pops out to the corner. As 2 drives, he or she reads how the zone is reacting and either passes to 3 on top or kicks it down to 1 in the corner.
4 and 5 position themselves according to the initial pass. If the bottom defenders both step up to help stop 2’s dribble-drive, 2 looks to dump it down low to either post player. If the drive is cut off, 2 backs the ball back out to the wing.
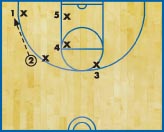
DIAGRAM 4: Post player movements. To make the initial overload even more effective, the post players must communicate with one another when the ball is passed to the wing. If 5 slides along the baseline (as shown in Diagram 2) to the ball-side low post, 4 breaks up to the ball-side elbow setting up in the high post.
Now the zone is overloaded to the ball side. 2 passes the ball to 1 in the corner.
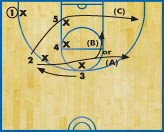
DIAGRAM 5: Cutting to find holes in the zone. After 2 passes to 1, they cut through the zone to the weak-side wing or corner. They’re looking to get the ball on a quick reversal or skip pass over the top of the zone.
2 reads the zone defense and cuts to either the weak-side wing (A), mid-post area in the lane (B) or weak-side corner (C).
3 fills the spot vacated by 2 and looks for the pass back from 1. If 3 receives the pass, they can shoot or swing the ball to 2 on the weak side.
Ball movement is key
Quick decisions, passing and ball movement are the keys for success in the Shamrock zone offense.

DIAGRAM 6: Passing the ball. When 1 has the ball in the corner, he or she has four immediate options:
- Pass to 3 on the ball-side wing. 3 immediately looks for a shot or quick ball reversal to 2 on the weak side.
- Pass to 4 in the high post. If 4 receives the pass on the ball-side elbow, he or she can drive, shoot a quick elbow jumper, or, if double-teamed, look to dump it in to 5 in the low block.
- Throw a skip pass to 2 on the weak side. 2 must always be alert to this opportunity and must constantly rotate high to low on the weak side.
- Entry pass to 5 in the low post. Due to the positioning of the defense, 5 may be open for a 1-on-1 opportunity against the defender in the low post.
The post players follow the pass and must always occupy the zone defenders on the top.
Weak-side overload
When reversing the ball to the weak side, players must react instantly to overload that side of the floor.
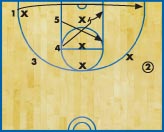
DIAGRAM 7: Overloading the weak side. After the skip pass or ball reversal is made to 2 the post, players must cross between the high and low post. 1 cuts along the baseline and settles in the opposite corner. While cutting to the low block, 4 can set a pick on the bottom defender to free 1 in the corner for the shot.
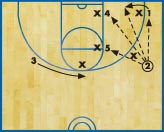
DIAGRAM 8: Continuity. Now the same formation has been established on the opposite side, and the players have the same responsibilities as before. If the short corner defender is overplaying 1, he or she can make a backdoor cut. 2 also looks to make a quick pass into the high or low post.
Shamrock options
There are several options that help to keep this offense from becoming too predictable.
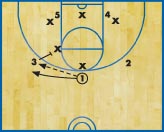
DIAGRAM 9: Passing option (A). 1 passes to the wing. But this time, instead of setting an on-the-ball screen and cutting to the corner, 1 cuts behind 3.
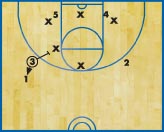
DIAGRAM 10: Passing option (B). 3 hands off to 1 and sets a screen on the top defender on the ball side. 1 receives the handoff and looks for a quick 3-point shot. If 1 cannot get a clean handoff from 3, they cut to the ball-side corner. The offense resumes as normal.
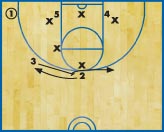
DIAGRAM 11: Reversal option (A). In this option, after 1 receives the ball in the corner, 3 (instead of reading the defense and making a cut) sets a screen for 2 on top. 2 cuts hard off the screen and breaks to the ball-side wing area.

DIAGRAM 12: Reversal option (B). After 3 sets the screen, he or she pops out to the weak-side wing area. The offense continues until the weak side becomes overloaded.
1 either throws a skip pass to 3 on the weak side; makes an entry pass to 5 in the low post; or passes the ball back out to 2 on the wing. The offense can then resume its attack.
Shamrock keys
- It’s essential that players be patient against the zone. Use the high post to create holes in the zone and free up the weak-side wing player for an open shot or isolation to drive to the basket.
- Ball fakes, quick passing and dribble-drives help to momentarily freeze the defense. They also result in open shots or passing opportunities.
- Post players must work together with their cuts and movements. If the player in the high post can drive, the low-post player almost always becomes open when the help defense steps up to stop the penetration.
- It’s critical that your players not just react to the movements of the zone. They must be aggressive and force the zone to react to them.
News
Videos


Shop


Happy Friday! We just released our September/October issue!![]()
![]() In this issue, discover indoor facilities of excellence. See five newly renovated outdoor facilities at the high school and collegiate level. Learn about this and more, including:
In this issue, discover indoor facilities of excellence. See five newly renovated outdoor facilities at the high school and collegiate level. Learn about this and more, including:![]()
![]() 🏋️Establishing a winning weight room culture
🏋️Establishing a winning weight room culture![]() 🏋️A transformational approach
🏋️A transformational approach![]() 🏋️Sharp shooting
🏋️Sharp shooting![]() 🏋️And more
🏋️And more![]()
![]() Read the issue here: www.nxtbook.com/greatamericanmediaservices/CAD/september-october-2024/index.php
Read the issue here: www.nxtbook.com/greatamericanmediaservices/CAD/september-october-2024/index.php![]()
![]() #coachad #coachadmagazine #coaches #athleticfacilities #excellence
#coachad #coachadmagazine #coaches #athleticfacilities #excellence
