1-1-3 match-up zone offers viable alternative to man defense
I never had our team play zone defense. Zone defense, to me, was utilized by teams that were weak, lazy or both. I even scheduled my coaching-clinic decisions around avoiding zone-defense chatter. I never listened to a clinic speaker who was discussing zone defense. All of this work on my part made me a bit ignorant as to the real reasons why a team opts for a zone defense.
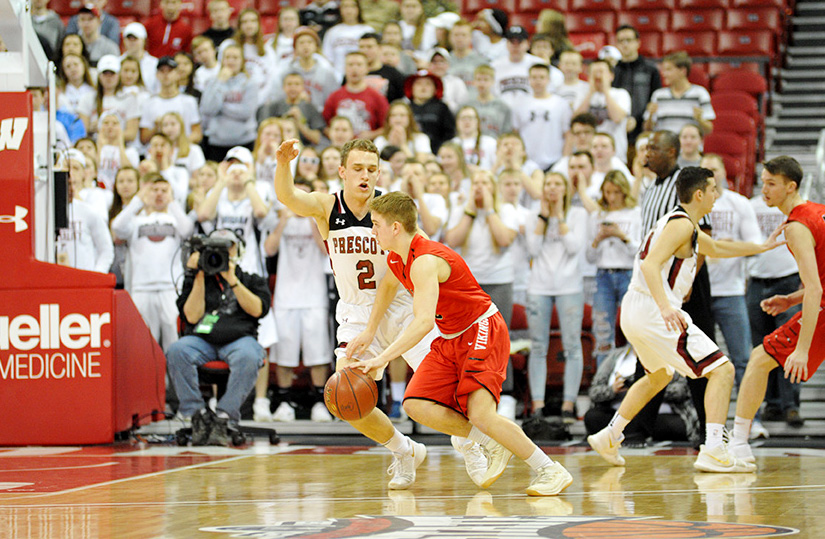 Then, a few seasons ago, I had a young team that did not have the ability to play a full 32 minutes of man defense. We stayed with teams for awhile but, inevitably, our players were exposed during the later stages of several games. Realizing I needed to make a move to counter our weakness, I devised a 1-1-3 match-up zone (called the 113 Match-Up) that incorporates many man-defense principles.
Even if you are committed to playing man defense all the time (as I once was), there still is something to be taken from our 113 Match-Up. It’s a fantastic change of pace that doesn’t cause a drop-off in the intensity level of your players.
Be sure to pay close attention to the drills at the end of the article as we used them daily when first installing this defense. We emphasized the importance of players flying around the floor within this defense and forced them to realize that if a mistake is to be made, you’d much rather have it come from too much movement rather than from too much standing still.
Setup & movements
The basic alignment for the 113 Match-Up is a 1-1-3 zone, which features a point defender, another perimeter defender positioned just above the free-throw line and three post defenders.
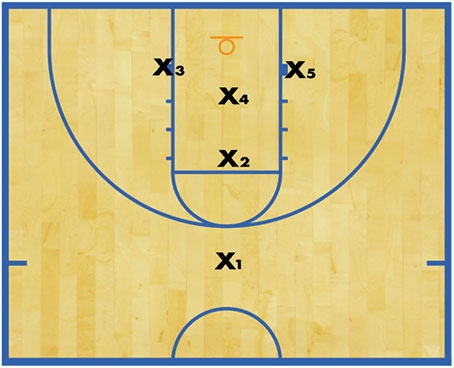 DIAGRAM 1: ‘113’ setup. There are two coverage areas in the 1-1-3 MatchUp defense. XI and X2 handle everything above the free-throw line while the three big players (X3, X4 and X5) are interchangeable and cover the space from the free-throw-line extended to the baseline.
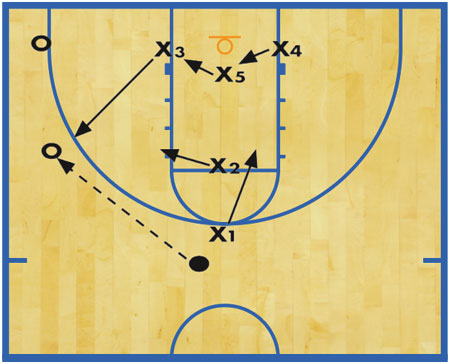 DIAGRAM 2: Initial pass. X1 picks up the ball at the midcourt line and influences it to a sideline alley (the area within 6 feet to the sideline), preferably the left side of the court to force the point guard to dribble with the left hand, which is typically weaker. X1 stays with the ball handler until the initial pass is made.
On the first pass to the wing, X3 closes out on the ball coming from the strong-side block. X3 influences the ball to the corner and discourages a ball reversal by staying on the ball handler’s “high hip.” X5 slides into the low-post area and full-fronts any post players. X1 and X2 drop to the free-throw line and guard the high post with their backs to the baseline.
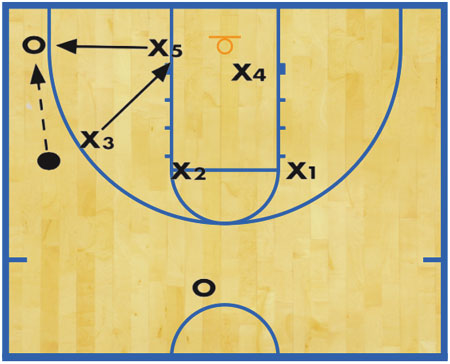 DIAGRAM 3: Pass to corner. On the pass to the corner, X5 closes out to the ball and X3 sprints to the low block. X3 must sprint, not slide, in order to deflect any quick post entries. If X3 is moving hard, you rarely give up any post feeds.
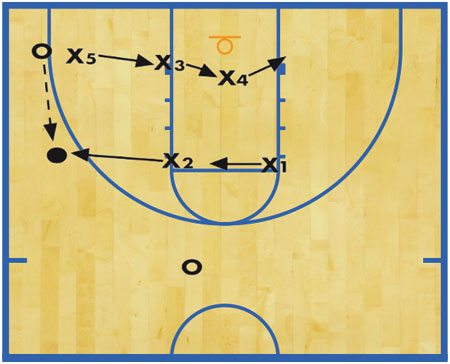 DIAGRAM 4: Corner-to-wing pass. A pass from the corner back to the wing has X2 closing to the ball and X1 moving to the ball-side elbow. X3, X4 and X5 rotate back into position.
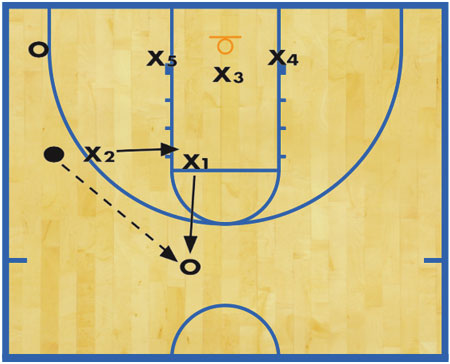 DIAGRAM 5: Wing-to-point pass. When the pass is made back to the point, the guards work in tandem with X1 closing to the ball and X2 hustling back to the free-throw line.
Special situations
On some occasions, the offense is going to find a way to move the ball across the court. The 113 Match-Up offers easy movements to counter any type of special situation that arises.
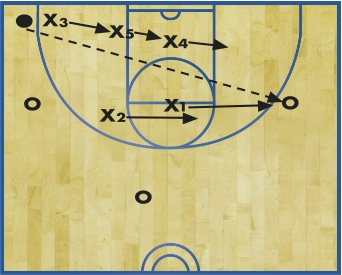 DIAGRAM 6: Corner-to-wing skip pass. If a skip pass is made from the corner to the opposite wing, the closest defender closes to the ball. In this case, that defender is X1. X2 shifts to the ball-side elbow. X4 comes to the ball-side block. X5 slides to the middle and X3 covers the weak-side block.
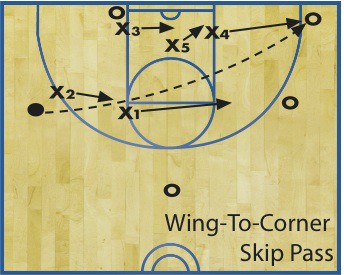
DIAGRAM 7: Wing-to-corner skip pass. When a skip pass is made from a wing player to the corner, then a post player closes to the ball. In this case, that player is X4. X5 shifts into the ball-side post. X3 comes to the middle. X1 moves to the ball-side elbow with X2 coming back to just above the weak-side-free-throw-line area.
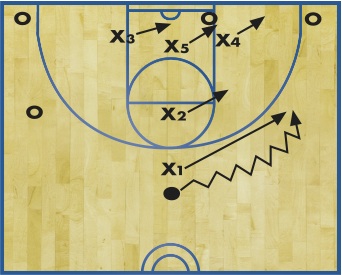
DIAGRAM 8: Dribble entry. An offense often attempts to dribble into the 1-1-3 zone. If that happens, X1 stays with the dribbler the entire time and X2 moves to the ball-side high post. The post players shift to cover the ball-side of the court with X4 in the short corner, X5 in the strong-side post and X3 in the middle.
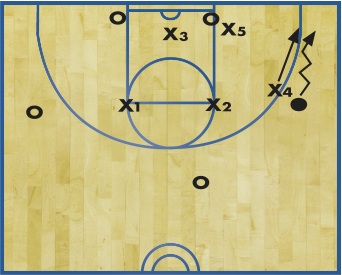
DIAGRAM 9: Dribble to corner. If an offensive wing player dribbles to the corner, the defender (in this case it’s X4) stays with that dribbler the entire time.
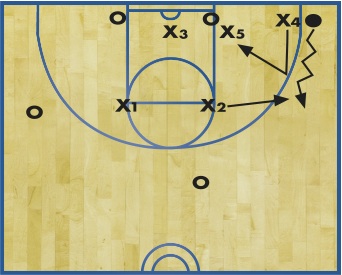
DIAGRAM 10: Dribble from corner. If the offense attempts to dribble out of the corner, your defense switches by having X4 come out of the corner and retreat to the post while X2 jumps out to the dribbler once he or she reaches the free-throw-extended area. X2 yells “Switch!” to X4 once the ball handler reaches the wing.
John Adam is the former head boys basketball coach at Lutheran High School in Parker, Colorado.


