
Taking away a dominant post player
Preparing for an ultra-quick point guard who gets into the paint certainly is a formidable task. The same goes for preparing to face a squad with a solid post player who has a size advantage on the block. Now, imagine if your team has an upcoming game featuring this type of point guard and post player.
 Our answer to this dilemma is the flat 3-2 zone. There are four reasons why this zone is successful:
1. It takes away penetration by building a wall up front. This wall makes it very difficult for a point guard to get into the paint from the top or the wing.
2. The primary post player is double-teamed easily without confusion because the middle man has the responsibility.
3. It forces a lot of shots from the corner, which have been proven as the lowest percentage shots.
4. Unlike other zones, you have the ability to rebound well from this look as long as you teach your players the box-out areas. Also, because of the specific player positioning, your players get more long rebounds than you would in a traditional zone.
Player responsibilities
Before jumping into specific diagrams of how to move and rotate in this zone, players need to know their fundamental responsibilities when it comes to this defense.
Wings: These are your quickest players. The wings must play the gaps well to take away penetration and force the ball to the outside. They also must anticipate ball reversal so they are in a position to defend a potential 3-point shot. Sometimes, they need to cover the point on a post-to-point pass or corner-to-corner pass.
Point: This is your longest and most athletic player, as well as your smartest defender. One year we used our 4 man in this spot while another year we went with the point guard because he was our smartest player. Your point player is going to be in a great position to rebound because this player sees the ball coming off the rim. He’s also in a great position to attack for the rebound. Length is important for this position because the point covers space on top against shooters while playing relatively flat. This player starts with his toes on the 3-point line to try to bait the offense to go to a two-guard set, which plays perfectly into the dynamics of the flat 3-2 zone.
Post: The post players need to cover the corners and the post blocks. They need to have great anticipation and work perfectly together. Tell them they are synchronized swimmers because as one moves a step out to the corner, the opposite post has to take a step across the lane to cover the block. When a post player closes out on the corner, it must come to the low side to force penetration to where there is wing help. If the post player gets beat baseline on his closeout, the defense becomes vulnerable due to a lack of help. The post plays high side when the ball is above the free throw line and plays low side when the ball is entered below the free throw line.
Rotations vs. 2-1-2 zone offense
Against a typical 2-1-2 zone offense, the following six diagrams show the defensive positioning from the flat 3-2 zone defense.
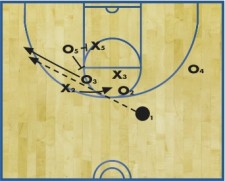
DIAGRAM 1: Ball on top. 3 puts his toes on the 3-point line to create a two-guard set. 3 then flattens out on the free throw line. The wings (1, 2) pinch into the middle until the two-guard set is formed. The post players (4, 5) stay on the block playing the high side of the post if present.

DIAGRAM 2: Ball on wing. 2 puts his toes on the 3-point line to force penetration to the sideline. 3 sinks to the middle of the free throw line. 1 sinks one to two steps below the free throw line to help bump the cutters coming through the middle. 5 stays on the high side of the post as long as the ball is above the free throw line. 4 gets in the mid-line in the paint.

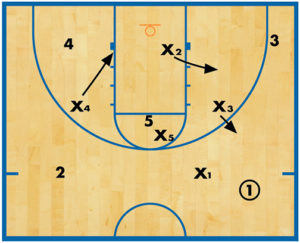
DIAGRAM 3: Ball in corner. 5 closes out on the low side and does not allow baseline penetration. 4 moves in a line with 5 and gets the low side on the block. 3 steps just inside the free throw line anticipating a post entry. 2 gets into a gap to eliminate penetration to the middle. 1 puts his backside to the baseline, sinks to the level of the ball and anticipates the skip pass.

DIAGRAM 4: Ball in post. 5 may dig if the post is a great player, otherwise, gets in between post player and corner. 4 maintains post defense on the low side and keeps the post player from going baseline. 3 doubles hard with hands up. 3 gets on the post’s shoulder to limit his vision for a possible ball reversal. 2 plays in the passing lane for the wing. 1 anticipates the next pass across the mid-line.

DIAGRAM 5: Post pass to opposite corner/wing. 1 covers first pass across mid-line. 4 sprints to cover the corner and calls off 1. 5 sprints to cover the block. 3 sprints back to the free throw line and may need to help on a quick reversal from the corner to the wing. If this does happen, 1 calls off 3 after 1 sprints off the corner. 2 stays at home and waits for the reversal.

DIAGRAM 6: Pass from corner to opposite corner. It is critical that players sprint off their man and move when the ball is in the air. 4 calls off 1 when he gets to the pass. 3 helps on the possible reversal back to the wing.
Rotations vs. 1-3-1 zone offense
The key to defending against a 1-3-1 zone offense is constant communication. The middle of your defense is more exposed in this offense.
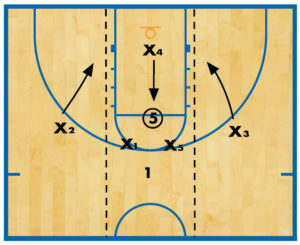
DIAGRAM 7: Ball on top. 3 puts his toes on the 3-point line. 1 and 2 pinch to the middle and close hard on the wing pass. 5 plays high side on the post player. 4 puts his backside to the baseline and shows higher in the post.

DIAGRAM 8: Ball on wing. 3 flattens on the high post. 2 plays the wing with the ball and guards the dribble to the corner. 1 plays two steps below the free throw line and may sink lower depending on where the wing player goes. 4 plays the mid-line and helps if the high post dives.

DIAGRAM 9: Ball in post/post dive. 3 traps hard on the post player’s shoulder and doesn’t allow him to see opposite. 4 takes the high post or bumps the post dive. 2 sinks toward the lane and traces the strong-side wing. 1 puts his backside to the baseline, watches for a possible wing back-cut and anticipates the post-to-point pass.

DIAGRAM 10: Ball in middle. Everyone pinches to crowd the ball. 1 and 2 cannot turn their backs on the perimeter. 4 stays in front. 5 has to take away the middle so he does not get sealed. 3 crowds the 3-point line.

DIAGRAM 11: Post-to-point pass. When the ball is passed to the point at the top, 1 anticipates the pass and takes the top position. 3 sprints hard out of the trap to help cover the wing who is unoccupied. 4 needs to help on the high post or strong-side block (if there is a post flash). 5 needs to rotate to help the high post if the offensive post player flashes across the lane.
RELATED
News
Videos


Shop


