
A simple 1-3-1 motion offense
Some seasons you just don’t have the kind of talent on your team that you’d like. When this occurs in our program, we use our simple 1-3-1 motion offense.
Very basic in its patterns, this offense is geared toward finding open-shot opportunities for the average player. It can be run to each side of the floor and is continuous in its motion.
 |
DIAGRAM 1: The basic alignment is a 1-3-1 set with 4 starting at the right elbow, while 5 is on the opposite post, diagonal to 4. The guards are wide and will cross through to the opposite sides. Once the guards have gone through, the high post sets a diagonal cross-screen for the low post.
 |
DIAGRAM 2: 2 first looks to pass to 5 in the lane for the high-percentage shot. If 5 doesn’t receive the pass, he or she rolls back across the lane and sets a staggered screen with 1 to try to get 3 open. 3 uses the staggered screens and looks for the pass from 2. After setting the screen for 3, 1 flares out to the opposite wing area, while 4 flashes from low post to low post.
 |
DIAGRAM 3: 3 now has the ball on top and looks to reverse it to 1. On this time through the motion pattern, 5 doesn’t set a screen for 4. Instead, 4 and 3 set staggered screens for 2. From there, the motion continues.
Weak-side entries
There’s also a weak-side entry into the simple 1-3-1 motion offense. This set creates a different look for opponents and makes it tough to defend.
 |
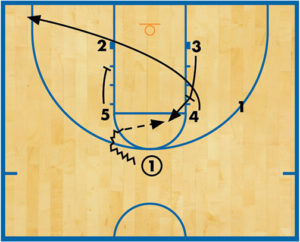
DIAGRAM 4: The point guard (1) dribbles the ball to the low-post side and throws a pass to 3. Again, this happens after the guards have gone to the opposite side from the original 1-3-1 set. 5 sets a diagonal backscreen for 4, after 4 has walked his or her defender toward the screen. 1 and 5 set staggered screens for 2, who cuts over the top and looks for a return pass at the top of the key. After this initial movement, you’ll be right back into the motion offense.
Motion drills
The following drills break down the motion-offense movements on a section-by-section basis.
 |
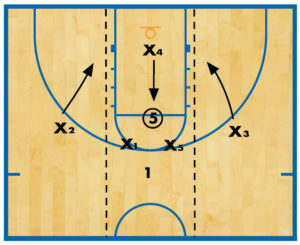
DIAGRAM 5: Catch-And-Shoot Cone Drill. Place cones at the spots where you want your guards to catch the ball. Send the guards through and stress the correct footwork as they come around the cones to catch and shoot the ball. We also work on catching and taking the ball into the key areas for dribble penetration.
 |
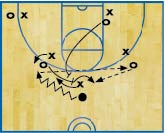
DIAGRAM 6: 2-On-2 Coming-Off-Screens Drill. This drill works the post players on their screening ability and teaches them how to come toward the ball off screens. From a 2-on-2 setting, have a coach demonstrate proper entry passes to the post players.
 |
DIAGRAM 7: Shooting-Off-Staggered-Screens Drill. The final drill teaches your players how to set staggered screens and how to run players off them. A coach stands on the wing with a ball and throws a pass to a shooter coming off the staggered screen. Start out with no defenders and use it primarily as a shooting drill, then gradually add players on defense.
RELATED
News
Videos


Shop


