
Simple offensive attacks against even-fronted zones
The following is a simple, highly productive, zone offense with a number of options that consistently result in open shots. The offense makes use of some standard zone-attack principles, such as a dribble-entry and shallow-cut replacement, overloading one side of the floor, rapid ball movement, screening the zone, skip-passes, attacking the short-corner and post-entry passes.
This offense is simple, requires a minimum of player movement, is quick to teach and easily executed. It’s intended to be used against even-fronted zones (2-3 zone, 2-1-2 zone, etc.) and it has proven to be appropriate and effective at just about every level from youth basketball to the Division I college game.
Initial 1-2-2 set
The offense is run out of a 1-2-2 set. For purposes of this article, the diagrams show the offense being run against a 2-3 zone defense. The play can be run to either side of the floor with the movements of the offense being the same —only reversed.
 |
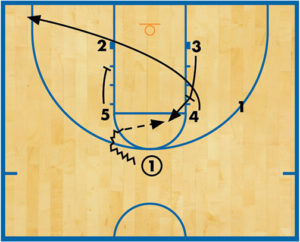
DIAGRAM 1: Initial set begins out of a 1-2-2 set.
Generally, the play should be run away from your best wing shooter. Passes should be made quickly so as to create difficulties for the zone defenders in adjusting to cover the offense.
There are at least four weak-side options that can be tried. Any of these four should be effective in getting an open shot.
 |
DIAGRAM 2: The offense begins with the point-guard (player 1) executing dribble-entry to a wing area. As this is occurring, the ball-side wing (player 2) shallow-cuts through the zone and comes out on top to replace the player at the point.
The ball-side post player (player 4) crosses the lane and sets up a double stack on the weak-side block.
 |
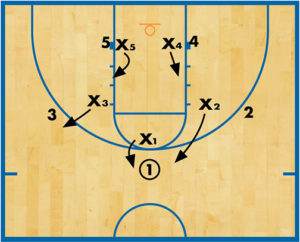
DIAGRAM 3: The ball is reversed back to the top. This simple, little action of dribble-entering and shallow-cutting to replace, when run against even-fronted zones, results in immediately occupying the top defenders.
Other options
Zone defenses generally cover the movement as diagrammed earlier. At this point, a number of different options can be utilized.
 |
DIAGRAM 4: Option 1. This option utilizes a skip-pass from the top to the corner, with the post players screening the zone in order to obtain an open shot.
3 drops to the weak-side corner and uses the double screen set by 4 and 5 on the bottom defenders of the zone to catch and shoot the open jumper.
 |
DIAGRAM 5: Option 2. This option has 3 on the free-throw line extended to draw out the bottom zone defender (X3). 4 goes to the short-corner and the other post player (5) slides slightly up the lane.
This movement creates a defensive match-up problem inside.
 |
DIAGRAM 6: If the middle zone defender (X5) covers 5, then the ball should be entered into the short corner. This forces X5 to choose between covering the ball, which should result in a quick pass to 5 for a layup, or staying on the post player, in which case 4 makes a baseline power move to score.
 |
DIAGRAM 7: If the middle defender covers the short corner instead, the ball should be entered into the post to 5, who looks immediately to score.
If the middle defender (X5) recovers to defend the post, the ball should be touch-passed to 4 cutting in from the short corner for the layup.
This option attacks the short corner and the ball should again be moved quickly, so as to not give the defense time to adjust to the match-up problems that the offense creates inside.
 |
DIAGRAM 8: Option 3. Another option can be run for 4 who steps to the corner and hits the open shot. Rapid ball movement and screening the zone should result in an open shot when running this option.
As in the second option, 3 sets up on the free-throw line extended and on the reversal pass to the weak side, draws out the bottom defender (X3). 4 pops to the corner, while 5 screens the middle defender of the zone (X5). The ball can be quickly passed to 4 in the corner for the open shot. If X5 slips the screens, 5 immediately pivots and posts up hard, looking for the ball.
 |
DIAGRAM 9: Option 4. The fourth option attacks the interior of the zone by making a post-entry pass. In this option, the top offensive post player in the stack (5) cuts hard up the lane and to the opposite box. This movement is intended to draw the attention and coverage of the middle zone defender (X5).
 |
DIAGRAM 10: Immediately after 5’s cut, the bottom offensive player in the stack (4) follows and makes the same hard cut. This cut should draw the coverage of the bottom weak-side defender (X3).
2, with the ball at the top, makes a post entry pass into 4. If this is open, he or she will have the entire left side of the lane without any help-side defense to make a power move. Or 4 can easily kick the ball out to 3 on the wing, who should be wide open as all of the zone defenders are occupied.
If the post-entry pass isn’t open, 2 can also immediately pass to 3 on the wing for an open jumper.
RELATED

News
Videos


Shop


