
Inside look at a high-powered transition game
Our program prides itself in our transition game. Specifically, we drill and practice our primary and secondary fast breaks every day.
Having a solid transition game puts constant pressure on the defense to get back and it can help you smoothly move into your half-court offense.
For our primary fast break, the goal is to always attack the middle of the floor and work for 3-on-2 or 2-on-1 opportunities.
 DIAGRAM 1: Primary Fast Break. Any ball handler who secures a rebound attacks with the dribble. The ball handler must always look to advance the ball by passing to anyone ahead of him or her.
 DIAGRAM 2: Primary Fast Break (Reversals). Players must fill in the spots as shown. If you do not have anything open to the basket initially, you should reverse the ball to the other side of the floor within two passes.
On any reversal, players must interchange to occupy the weak side.
 DIAGRAM 3: Primary Fast Break (5’s Screening Options). 5 may chase for a ball screen or screen away for 1.
Secondary break
If you can’t score on the initial fast-break attack or the quick ball reversal, you players must quickly fill the designated secondary spots (see Diagram 4).
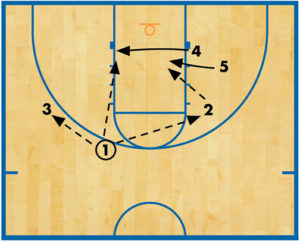
 DIAGRAM 4: Secondary Break (Initial Spots).

DIAGRAM 5: Secondary Break (Initial Movements). The ball is entered into the post with a pass from 1 to 4. After making the pass, 1 sets a downscreen for 2, who uses the screen and pops to the ball-side wing. 5 dives to the basket and 3 fills 5’s spot.
 DIAGRAM 6: Secondary Break (Alternate Post Entry). Another means of getting the ball entered into the post is by 1 passing to 2 into the corner. After making the pass, 1 cuts through the lane and clears into the opposite low corner. 2 makes an entry pass to 4 in the post.
Other options

DIAGRAM 7: Secondary Break (Option 1). Once the ball has been entered into the post, 2 makes a Laker cut to the basket, 5 dives down the lane and 3 fills 5’s spot.
 DIAGRAM 8: Secondary Break (Option 2). To set up another secondary break that looks similar to the first option. 1 passes to 2, cuts through the lane and clears to the opposite weak-side corner.
 DIAGRAM 9: Secondary Break (Option 2 — Cont.). Once 2 has the ball, 4 break out and sets an on-the-ball screen for 2. 2 and 4 play a pick-and-roll game on the right side of the floor. 3 and 5 both slide down to clear space.
 DIAGRAM 10: Secondary Break (Option 3). 1 reverses to 5 on top. As the pass is made on top, 4 ducks into the paint calling for the ball. 5 has the option to shoot or drive.
 DIAGRAM 11: Secondary Break (Option 3 — Cont.). If a good shot opportunity isn’t available, 5 looks to pass to 4 on the cut into the lane.
 DIAGRAM 12: Secondary Break (Option 4). For another look, you can reverse the ball all the way to the other side of the floor with a pass from 1 to 5 to 3. As the ball is being reversed, 4 ducks into the lane.
 DIAGRAM 13: Secondary Break (Option 4 — Cont.). After reversing the ball to the other side of the floor, 1 and 5 set staggered screens for 2 on the weak side. 2 curls around the staggered screens and pops to the foul line or top of the key. After setting the screen, 5 seals back into the lane.
 DIAGRAM 14: Secondary Break (Option 4 — Cont.). 3 has the option to shoot, enter the ball to 4 for a post-up opportunity or swing the ball to 2 on top.
If 2 gets the ball on top, he or she can shoot or look to hit 5 on the duck into the lane.
 DIAGRAM 15: Secondary Break (Option 5). The ball is reversed from 1 to 5 to 3.
 DIAGRAM 16: Secondary Break (Option 5 — Continued). After the ball is reversed, 5 can set an on-the-ball screen for 3. Meanwhile, 1 sets a downscreen for 2. 2 V-cuts, uses 1’s screen and pops to the top. 3 dribbles around the screen and either drives to the basket or hits 2 coming off the screen. If 4’s defender helps to stop the drive, the 3 should look to hit 4 in the low post, slipping to the basket.
RELATED

News
Videos


Shop


