
4-1 zone defense bewilders opponents
The 4-1 defense changes and rotates when the ball is passed to the wing and toward the baseline. Soft traps and the bounce-and-fan continue to play important parts of defending both of these situations.

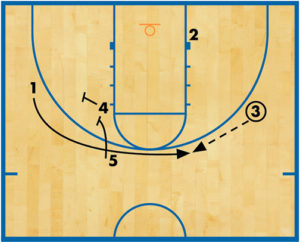
DIAGRAM 4: Defending the wing. If 1 passes the ball to the wing, the zone morphs again. The rotations are identical on both sides of the floor unless specific adjustments are made.
In this situation, 1 passes to 3. X1 and X2 form a soft trap to cover 3. X1 and X2 also bounce and fan to discourage a pass to 4.
X4 covers the area around the strong-side block and is responsible for any post players in this area.
X5 is responsible for denying the pass to the high post. X5 needs to deny this pass from the basket side.
X3 rotates to the weak-side block to discourage any diagonal passes.

DIAGRAM 5: Defending the baseline (A). If 3 passes to 2, X2 needs to rotate to cover 2. This probably is the most difficult rotation in the zone and it requires X2 to move with a sense of urgency and purpose.Ideally, the bounce-and-fan forces 3 to throw a lob pass to 2, which allows extra time for X2 to make the rotation. The key is for X2 to rotate as soon as the pass leaves 3’s fingertips.
This rotation is made with high hands to discourage shot attempts and needs to be made at an angle toward the short corner to dissuade dribble penetration.
X2 then closes out 2. This situation is OK for you as a baseline three-pointer is a low-percentage shot, so it’s not going to kill your defense. Also, if you continually are being hurt by the baseline player, just adjust your rotations to cover both the wing and baseline players (see next diagram).
Rather than form a soft trap, 1 rotates to an apex between 3 and 2. In this position, X1 has the ability to help with 2 and recover to 3. X4 still is responsible for the strong-side post area. X3 still is on the weak-side block.

DIAGRAM 6: Defending the baseline (B).If the opponent places a shooter in the baseline corner and that shooter continues to make shots, adjust your rotations to better challenge this player.
In this case, 1 passes to 3. 2, the shooter in question, is in the corner. As the ball is passed from 1 to 3, X1 makes the usual rotation to cover 3. However, instead of forming a soft trap with X2, X1 bumps X2 over to cover 2. To do this effectively, two things must happen.
• X1 must communicate with X2 as to when X2 needs to bump.
• X1 and X2 must rotate with proper timing so that neither 2 nor 3 is left open. X3, X4 and X5 make their usual rotations.
Defending out-of-bounds plays
The 4-1 zone also is effective in defending your opponent’s baseline and sideline out-of-bounds plays.
You never want your opponents to score on an out-of-bounds play, so go to the 4-1 defense and keep the ball out of the funnel.
DIAGRAM 7: Defending baseline out-of-bounds plays. The setup against a baseline out-of-bounds play appears to be a compact 2-3 zone but you resume your standard 4-1 rotation as the ball is inbounded. However, this is contingent on if your defenders are successful in preventing the ball from entering the funnel.
All of 1’s options to pass the ball are outside the funnel, so you should have no problem keeping the ball out of this area — just don’t let your defense become lax as they become more susceptible to an easy score in the lane.

DIAGRAM 8: Defending sideline out-of-bounds plays. When defending a sideline out-of-bounds, your philosophy is no different than when defending the baseline. Set the defense according to where the ball is set to be inbounded and assume the typical 4-1 rotations when the ball is passed.X1 and X2 handle the perimeter area on the ball side of the floor. X4 and X5 keep players from entering the lane and X3 covers the weak side within the lane to keep any hiding offensive players out of the funnel from this side.
Trapping from the 4-1 zone
There are two different traps to use from the 4-1 zone. Use hand signals to communicate trapping situations to your players without alerting the offense to what you’re doing.

DIAGRAM 9: Double-first trap. The Double-Fist Trap is designed to trap the first pass the offense makes to the baseline corner. The bounce-and-fan technique is critical in this situation as it forces a lob pass to help your defenders rotate more efficiently.In this situation, 3 passes to 2. As this pass is made, X2 and X4 rotate to trap 2. X5 rotates to deny a pass to 4. X1 denies a pass back to 3. X3 rotates according to how the offense is set. In this situation, X3 rotates to deny a pass to 5 in the high post.
If you do not force a turnover on this initial trap, then resume your standard 4-1 rotations.

DIAGRAM 10: Two-fist trap. The other trap run out of the 4-1 zone is called 2-Fist. It is designed primarily to move the ball out of the funnel.
In this situation, 1 advances the ball into the front court, X1 and X5 jump the ball handler with the intent of either forcing 1 to kill his or her dribble or rush a bad pass to the wing.
As X1 and X5 trap 1, X2 and X3 deny 3 and 2, respectively. X4 rotates up the lane. X4 has some liberty to roam and intercept long passes but must be intelligent when doing so. X2 or X3 is responsible for rotating to the basket from the weak side depending on the location of the ball.
Once again, if you do not force a turnover on the initial pass, rotate into the standard 4-1 zone.
The 4-1 zone is a unique addition to an overall defensive schedule. It is built on causing confusion for the opponents by playing multiple defenses. Use it as a major tool in your defensive schemes. Remember, keep players moving and adjust your rotations accordingly for maximum success in this alignment.
RELATED


News
Videos


Shop


