
Drills for inbounding the basketball
Probably the most rewarding part of coaching basketball is breaking down the game to eliminate mistakes. The most successful coaches have the ability to see the little things that win or lose games.
 One of those simple “little things” has to be the ability to inbound the ball. In a 32-minute game, you are going to inbound the ball approximately 40 times, depending upon the score, fouls, and turnovers.
There is a simple solution: Treat every possession as if it were the most important one of the game. In short, create drills to complement your personnel and mentally prepare them to execute the throw-in under any condition.
I emphasize matching drills to complement your personnel for the simple reason that as a high school coach, you are not always going to be blessed with an exceptional point guard who can handle the ball, but you will still have to inbound the ball.
The following is a series of drills and sets that I would recommend for your first few days of practice.
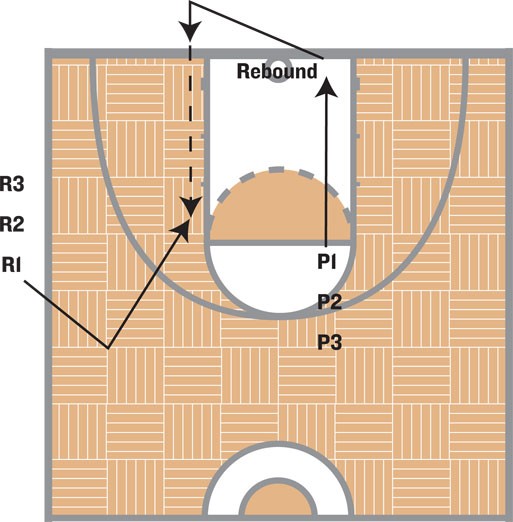
Diag. 1, Outlet Pass:
Designed to get the ball inbounded as quickly as possible. The outlet man (1) drives the lane, grabs the ball out of the net, steps away from the backboard, and uses a two-hand over-the-head pass to inbound the ball to R-1 V-cutting down the side. (The two-hand over-the-head pass is used to eliminate turnovers in the passing lane.)
Coaching Point: Have the outlet passer bank the basketball off the glass to simulate the ball coming through the net.
 |
| DIAG. 1 |
P1 (Passer 1) banks the basketball off backboard, catches basketball, steps out of bounds away from the corner of the backboard and executes a two-hand over-the-head pass to R1 (Receiver 1). R1 takes at least two steps down court and jab steps to reverse and come back for pass from p1. Coaching Point: Banking the basketball off the backboard simulates game conditions and helps the timing of the outlet pass.
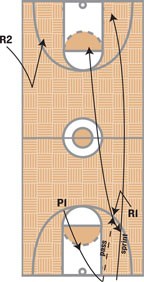
Diag. 2, Outlet Pass Following a Full-Court Lay-up:
A full-court drill that utilizes several fundamentals and all kinds of cutting and passing. It starts with a pass from #1 to #2, who slips the ball back to #1. #1 whips the ball to #3 at midcourt and sprints all the way down the floor for the lay-up.
On the way, he may find it necessary to hit #4 on the sideline and then get the ball back to continue for the lay-up. #4, as you can see, comes around to the opposite side of the lane to become the outlet man for the next full-court move. Extra players line up behind #2 at the start.
Coaching Point: Once the drill has been learned, you can assign a ball to each basket for continuous movement.
 |
| DIAG. 2 |
P1 and R1 execute an outlet pass. P cuts off R1 for the return pass and sprints the length of the floor for a lay-up. R1 follows, rebounds, and becomes the passer and executes an outlet pass with R2.
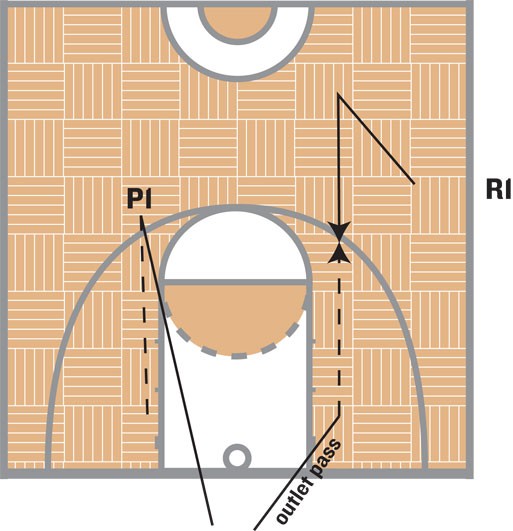
Diag. 3, V-Cut Pass:
The second drill is designed to get the receiver of the inbound pass into the best possible position to receive it.
Enter the V-Cut. When properly executed, it will eliminate the turnovers caused by catching inbound passes with the back to the defense. Bad things happen when you don’t see the ball. You can turn and run into the defense (an offensive foul), turn and see the defender too late and walk, or let the defender come from behind and deflect the ball.
To properly ensure the throw-in, the player receiving the pass must get down the floor past the free-throw line and, with his butt turned to the sideline, V-Cut back toward in the inbounder.
Coaching Point: Add a defender to force the receiver to V-Cut back to the basketball. Emphasize the jab step into the defender to get the space needed to come back for the pass and decrease the possibility of defensive deflections.
 |
| DIAG. 3 |
R1 steps on floor with butt to sideline. As P1 takes the basketball out of the net, R1 takes at least two steps down court, jab steps, and returns for the inbounds pass. As R1 returns to the basketball, he shows a target hand away from the defense, catches the ball, and pivots to see the court. Once the drill is learned, add a defender to make it a competitive drill.
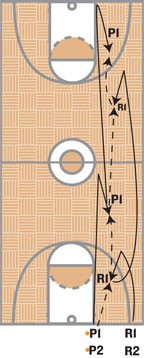
Diag. 4, Continuous V-Cut:
A drill that will give every player experience in V-cutting to get open, communicate, show a target hand to the passer, and finish with a lay-up.
Divide the squad up into big man, little man pairs, each pair with a basketball, and set them up in two lines outside the line at the end of the court.
Player 2 starts the drill by V-cutting down the court to the hash mark, where he turns his butt to the sideline, plants a foot, and V-cuts back toward #1. The latter waits until #2 has taken two steps toward him before passing him the ball.
#1 sprints to the half-court line and cuts for the basketball. The drill continues with #2 sprinting to the next hash mark and executing the same V-cut.
When #1 passes to #2 this time, he cuts to the basket for the return pass and lay-up. #2 follows for the rebound, and the drill is continued in the opposite direction.
Coaching Point: The next two players in line leave as soon as #2 passes to #1 at half-court. In communicating and concentrating, both the passer and receiver call out their names – eliminating confusion, mistakes, and turnovers.
 |
| DIAG. 4 |
R1 executes a V-cut and P1 passes the ball to him and runs down court and V-cuts back to receive the pass. The drill continues down the court for two more repetitions. For continuous movement, start players on both ends of the floor.
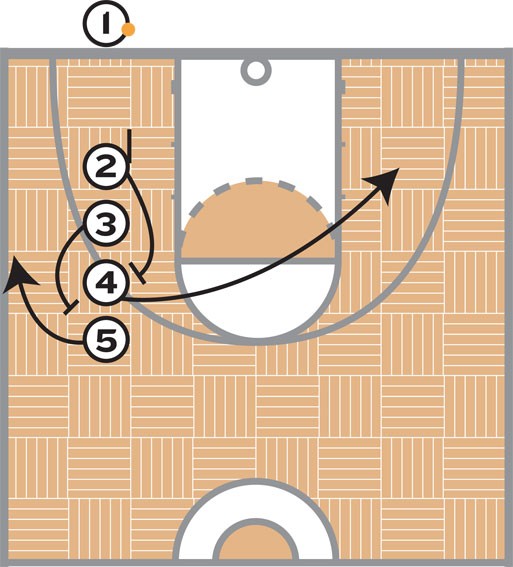
Diag. 5, Stack:
This set is used most of the time, especially early in the game.
#1 is the passer. #2 and #3 are the best catchers. #4 and #5 are safety outlets if #2 and #3 cannot get open.
As #1 raises the basketball to begin the sequence, #3 places one hand on #2’s hip #2 will cut opposite the hand. #2 will hesitate a count and cut in the other direction. #4 hesitates a count and then cuts straight to the ball. #5 also hesitates a count and runs to an open area.
Once the basketball is inbounded, the players must get into their offensive set to attack the defense.
 |
| DIAG. 5 |
#3 places hand on #2’s hip. #2 cuts opposite of the hand. #3 cuts in opposite direction. #4 hesitates and cuts directly to the basketball. #5 is the safety outlet and goes to an open area of the floor to receive the inbound pass.
Diag. 6, Double Stack:
This set is used whenever we are unsuccessful with the attack. The players line up in the same set (the attack) but allows at least three feet of space between players.
Before #1 raises the ball to begin the inbound play, #2 raises his right hand or left hand to signal which way he is going to screen for #4. As the ball is raised, #2 screens for #4 and #3 hesitates one count and screens in for #5 in the opposite direction.
 |
| DIAG. 6 |
#2 raises hand to signal which way he will set a screen for #4. #3 will screen for #5 in the opposite direction. After the screen, #2 returns toward #1 and looks for the inbounds pass. After #3 screens for #5, he looks for an open area of the court to receive the inbounds pass.
Once the players become familiar with these drills, they will not panic at any of the pressure or turn the ball over in rebounding it.
By conditioning your team to react to whatever the defense tries against you, you will always be able to stick to the game plan. It will make you a winner!
You Might Also Like


News
Videos


Shop


