
Bombs Away Game Winner!
In the course of a season every team finds itself in last-minute situations when a 3-pointer is needed. In considering what plays to design for these situations a coach should ask what he or she would be telling their own team if it was ahead at that instant. Two of the biggest pieces of strategy often used are:
- To switch every screen.
- To run at any potential 3-point shooter. The rationale being that in certain situations with a 3-point lead a shot fake and drive for 2 points is an acceptable shot to give up.
With these tactics in mind plays designed for 3-point shots should:
- Look to hit the screener for a 3-point shot.
- Ensure that the pass made to a hopefully open 3-point shooter is as short as possible to give the defense the least possible time to recover and contest the shot.
2-Point 3-Point Option
This look is effective in situations where your team is down by 2 points. The play forces the defense to respect a cut to the basket that could result in a tying 2-point basket.
It’s great to use when you want to play for the win and avoid overtime such as when your team is facing a more talented team is on the road is short-handed due to injuries or in serious foul trouble.

Diagram 1. In setting up this play 2 is your best shooter. 5 and 4 are bigger players whose defenders will either not switch effectively or not switch at all.
1 has the ball near the middle of the court to shorten the eventual pass to 2. Players 2 and 5 are positioned just off the left elbow with 2 slightly higher than 5.

Diagram 2. 4 makes a basket cut off 2. To discourage the defender X4 from switching onto 2 2 and 5 should be facing the basket so that the defense does not treat the cut as a screen and switch. 4 should not cut so tight off 2 that X4 runs into 2 and switches unintentionally.
The goal of 4’s cut is to force X2 to step away from 2 to provide help on the cut. If he or she doesn’t 4 may be able to get a layup off a pass from 1.

Diagram 3. As soon as 4 runs off 2 (hopefully forcing X2 to sag a bit) 5 headhunts and down screens X5. Meanwhile 2 steps back behind this double screen (5 and X5) and looks for a pass from 1 for a 3-point shot.
In order to contest this shot X2 must recover through or around both 5 and X5.
Keys: The farther down that 5 can pin X5 away from the 3-point line the less chance that X5 has of jumping out and contesting 2’s shot.
The closer that 1 is to the middle of the floor the shorter the pass to 2 will be giving X5 and X2 less time to get out and contest the shot.
Screen The Screener With A Twist
This look is very effective if your team utilizes a lot of screen-the-screener actions throughout the game.
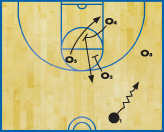
Diagram 4. Everyone is familiar with the widely-used screen-the-screener technique of having a back screener (4) run off a down screen (from 2) for a 3-point shot.
Unfortunately in late-game situations the defense can switch off the down screener and effectively deny the 3-point shot.

Diagram 5. To beat this strategy of switching have the back screener set a flare screen for the down screener. In positioning your personnel 2 should be your desired shooter while 4 and 5 should be players guarded by the other team’s poorest defenders who will either not switch or will do so ineffectively.
If 4 is a 3-point threat he or she will act as a good decoy as the defense will expect that player to come off the down screen.
On the initial back-screen action 4 should not actually look to get a piece of defender X5. This will help keep X5 from switching onto 4 which would put X5 in better position to switch onto 2 who’s running off 4’s flare screen.
4 should not get too far across the lane as this would also put X4 in better position to switch out and contest 2’s eventual 3-point shot.

Diagram 6. As 5 cuts by 4 into the post 2 should walk his or her player down to the elbow as if he or she is down screening for 4. This movement will often get X2 to jump to the ball side of 2 in anticipation of X2 switching out onto 4 coming off a down screen from 2.
Instead of coming off a down screen by 2 4 slides up the lane and tries to pin X2 on the side. 2 then flares away from X2 and receives the pass from 1 for a 3-point shot.
Keys: On traditional screen-the-screener action 1 would want to be wide toward the sideline to hit 5 cutting into the post or 4 coming off the down screen. In this case 1 will want to be closer to the middle of the floor to make for a shorter pass to 2 giving X2 or X4 less time to recover.
Also the screening angle utilized by 4 is crucial. If 4 gets too far across the lane or too high up the lane on the initial back screen X2 will be better able to see the screen coming and possibly fight over it. Or X4 will be in a better position to switch onto 2 coming off the screen. By sliding up the lane from X2’s backside X2 is easier to screen and X4 is in poorer position to get out and cover 2.
Flare Screening Off A Staggered Double Screen

Diagram 7. 2 should be your best 3-point threat which should attract plenty of attention in a late-game situation and therefore make him or her a very effective decoy. 3 should be your second-best shooter and 5 should be a good screener and/or the player with the defender least able to effectively jump out on a switch and cover 3’s eventual 3-point shot.
The play begins with 2 looking to curl off a staggered double from 3 and 5. It’s critical that prior to cutting 2 gets separation from X2 by taking that defender opposite the cut thereby forcing X2 to chase.
If X2 tries to go on the inside of the screens 2 should immediately read this and fade to the wing. 3 and 5 should seal all three defenders to the inside allowing 2 an open 3-point shot.

Diagram 8. If X2 chases 2 around the screens (a much more likely scenario) 2 should curl hard to the middle of the floor. The objective of the cut is to force X3 to switch onto 2 or at least give defensive help.

Diagram 9. 3 doesn’t actually screen X2 as contact would give X2 a great opportunity to switch onto 3. Instead as 3 sees X2 start to run by he or she runs behind X2 to the sideline looking for a flare pass from 1.
Depending on the location of X2 and X5 5 should either flare screen X2 (if X2 is chasing after 3) or screen-in on X5.
Keys: Once again 1 should position him or herself to make the pass to 3 as short as possible to give X2 and X5 the least amount of time to recover to 3 and for 5 to screen as far in from the 3-point line as possible to give the player he or she is screening a lesser chance of contesting 3’s shot.
News
Videos


Shop


