
‘Bomber’ offense provides points explosion
“Bomber” is a quick-hitting offense that produces open 10- to 15-foot shots but can easily be extended to the 3-point arc.
Designed to attack 1-2-2 zone defenses, it’s also effective vs. 1-3-1 zones and man-to-man defenses. The Bomber can be taught and implemented in a short period of time. It’s most effective when you have good shooting forwards and centers.
Bomber setup

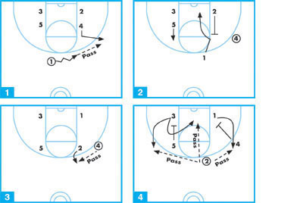
DIAGRAM 1: Initial set vs. 1-2-2 zone. 4 should start above the block, while 3 can start off the block.
The guards begin the offense on the lane lines extended. 3 should be your best shooter, 4 the second best shooter, and 5 your best rebounder.
The stack may be set on either side of the floor depending on several factors, such as:
- The favorite shooting side for 3
- Side of the weakest defender
- An offensive change of pace
One option is to allow 3 to change sides, while 4 and 5 remain constant.
Lighting the fuse
When initiating the Bomber offense, it’s important for your guards to recognize on which side of the floor the stack is located. The bottom player on the stack should avoid trying to catch up with the ball on the initial movement of the offense.
3 should hold his or her position until the offensive guards attack with dribble penetration to the stack side of the floor.
DIAGRAM 2: It’s important that the guard on the stack side attack the defender, forcing X2 to defend penetration and open the passing lane for 3, who steps out from behind the inside screen by 4.
3 must remain patient and not break out too early in order to give X4 more time to get around the screen set by 4. Patience will result in a better shot.

3 should be taught to receive the pass from 2 facing the basket in shooting position. Teach your players good footwork, as catching the ball with bent knees in shooting position produces open shots.
The guards should pass to the basket side of the baseline shooter to provide a quicker less-defensible shot.
Tough on baseline defenders
DIAGRAM 3: As the defense attempts to adjust to this move, the baseline defender (X4) anticipates the screen and reacts early to avoid 4’s screen. If X4 steps out to cover 3, 4 is wide open on the block for a power layup.
The Bomber offense constantly forces the baseline defenders (X4 and X5) to cover two offensive players.
After passing, 2 should drift to a spot behind the 3-point line at the free-throw line extended. 1 moves above the top of the key.
Ball reversal
If neither 3 or 4 are open for a shot, 2 passes to 1 at the top of the key. Teach your guards not to pass the ball to the baseline unless the player has an open shot.
DIAGRAM 4: As the ball is in the air between 2 and 1, 5 sets an inside screen on X5. 4 cuts baseline below 5’s screen.
1 attacks X3 looking to 4 or 5 for open shots on the baseline as was done earlier on the other side of the floor.
When the ball is reversed, the player who sets the inside screen cuts to the opposite side of the floor. Another option is to have 3 be the only cutter. This allows your best shooter (3) to score from both sides of the floor. It’s up to the coach to determine which option would be most effective for their team.
Once 1 passes to the baseline, he or she floats to the 3-point line at the free-throw line extended, while 2 moves to the point. Shots for 1 or 2 generally occur when the ball is passed from the baseline back out to the guards.
The Bomber can be run continuously from side to side until a good shot is obtained.
Other Bomber options
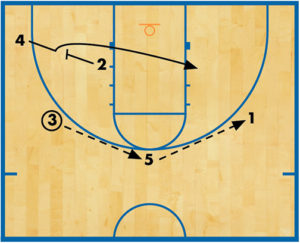
 DIAGRAM 5: Dribble pull. If 3 is unable to take a shot, he or she can dribble pull off the baseline with 4 replacing 3 on the baseline. On this move, 5 should consider flashing into the lane.
DIAGRAM 6: Cross-court option A. 5 moves up and sets a screen on X3, allowing a skip pass from 2 to 1 behind the 3-point line.
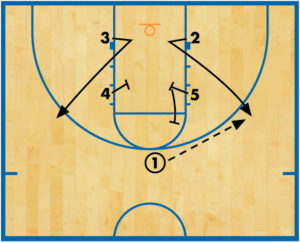
DIAGRAM 7: Cross-court option B. 1 initiates the offense by dribbling opposite the stack. 5 moves out for a possible pass, while 4 sets an inside screen and 3 breaks out for a skip pass from 1.
RELATED
News
Videos


Shop


