
‘Pride Drill’ increases defensive intensity
The “Pride Drill” can be an individual defensive drill that works on techniques and skills. This drill is important in developing a tough, hard-nosed attitude for every defensive player, while establishing a high level of intensity.
With the physical and mental effort that this requires, the drill becomes a great exercise to improve conditioning. We incorporate offensive fundamental work into the drill to add offensive elements and additional intensity for both the offense and the defense. This drill, when properly performed by both the coaching staff and the players, produces exactly what its name implies — that is pride in how well the team plays defense.
 Some of the offensive fundamentals and techniques that we work on are the different kinds of screens, cuts, passes and other offensive fundamentals used in every game. The various types of dribbling that we expect our players to be able to use in games are heavily emphasized.
The dribbles that our players should use in games and practice daily are behind-the-back dribbling, between-the-leg dribbling and front-crossover dribbling. We constantly emphasize the proper techniques of all offensive fundamentals used in this drill. Each player is required to go at game speed.
The Pride Drill can be expanded in different manners. One form of expansion is described below.
The drill begins with offensive restrictions for two important reasons. The first is to allow the defense an opportunity to succeed before making the drill more difficult and more “game-realistic,” as the defenders progress in developing skills and confidence. The second reason for giving offensive restrictions is to force the offensive players into working on specific ball-handling techniques on which the coaching staff feels they need to improve.
One way of making the drill more difficult (and therefore more realistic to game scenarios) is to lengthen and widen the dribbling area. At the beginning, it can be shortened and narrowed to promote success for the defenders. As the defenders master the defensive skills and techniques, the drill can be made more challenging by expanding the offensive dribbling area.
We try to use the “overload theory” in all of our drills to make the drills tough as possible. The intensity level, the pressure, the competition, the demands, and the game-speed is meant to simulate what they would face during competition. If players can handle these demanding drills, they will be better prepared to handle the pressures and challenges of an actual game. We want the games to be easier than the drills.
As the players develop their confidence, their ability levels and the proper techniques, we can expand the area used in the Pride Drill. When widened and lengthened to using the full length of the court, the drill can then help improve the many different defensive techniques being applied during the course of the Pride Drill.
Defensive techniques
Some of the defensive techniques that can be emphasized in the Pride Drill are:
- Taking the charge.
- Defending a “killed dribbler.”
- Defending a cutter on a give-and-go situation.
- Boxing out a shooter off of the dribble.
- Recover after the dribbler has actually beaten the defender.
- Diving for loose balls.
- Closing out on a potential driver or jump-shooter.
- Defending against an on-the-ball screen.
- Defending against an off-the-ball screen.
- Helping out on a teammate’s man, and then recovering onto their own man.
- Sprinting out of a trap situation and picking up their own man.
- “Wolf” deflecting from behind and getting ahead of the dribbler.
- Jump-switching onto the new dribbler.
These, and other defensive scenarios, can be practiced at the beginning and the end of the dribbling area. Different situations can be used every time at the beginning and end of each trip down the lane, both offensively and defensively. This keeps all participating players mentally alert and focused.
Offensive techniques
Some of the scenarios that your offensive players can work on at the beginning of the “offensive trips” are:
- Receiving a normal pass.
- Receiving off-the-ball screens before catching the pass.
- Shot faking after receiving the pass, but before starting the dribble-drive.
- After catching a pass and receiving a ball screen.
During the offensive trip, the dribbler may be asked to work on or use a specific type of dribble, make a specific type of pass and run a give-and-go cut.
At the end of the offensive trip, the dribbler may be required to shoot the ball, charge into the defender, kill the dribble or roll the ball across the floor to simulate a loose ball.
It must be clearly stated that the defensive techniques emphasized in the Pride Drill must be taught to the players first before they are stressed and emphasized in any drill. Once they are taught, they can be practiced and worked on, in this and other particular defensive drills.
Here is an example of the different “defensive trips” that your team can work on. Different combinations should be created daily. This will help all players learn how to listen and follow instructions, offensively and defensively.
First trip
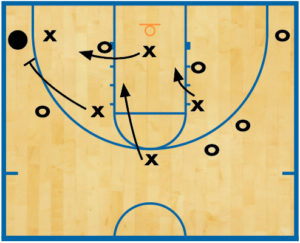
On the first trip down the court, shown in DIAGRAM 1, the dribbler and the defender can create a situation where the defense must guard the new dribbler after he or she has received the skip pass.
The defender starts in a pistol stance, as if they were playing help-side defense and the offensive player is more than two perimeter passes away from the ball. A coach could then skip the ball to the defender’s man. This would force the defender to start the first trip by closing out on the new receiver-dribbler.

The dribbler now zig-zags down the dribbling area with the defender applying the proper on-the-ball defensive techniques. When the dribbler gets to the end of the lane, the defender then draws an offensive charge on the dribbler. The dribbler can simply put the ball into the chest of the defender to establish the physical contact required to initiate the offensive foul. There does not have to be any other physical contact between the two players, thus decreasing the risk of injury to either player.
When the ball makes contact with the defender, the defender pushes off on their heels, falling to the floor. In drawing the charge, the following points of emphasis must be stressed to the players:
- Protect the groin and chest area by locking the arms in front of those areas.
- Push off backward with the heels at the exact moment of contact.
- Tuck the chin.
- Try to slide on the tail on the floor.
- Raise the legs up into the chest area to protect from the offensive player landing on the defender.
- Grunt loudly to help the official make the charging call.
We have the offensive player help the defender off the floor after taking the charge. The drill then continues with a new pair of players. The first pair goes to the end of the line and switches defensive-offensive roles.
Second trip
The second trip (Diagram 1) can begin with the main defender starting as an off-the-ball defender one pass away.
The “dummy dribbler” should force their way into the gap of the two defenders. The main defender then helps to stop penetration and recovers to his or her original man as the offensive opponent receives the pass.
From there, the defender uses the proper “push-push-push” and “drop-step” techniques as they zig-zag down the dribbling alley. When the dribbler reaches the far baseline, he or she kills the dribble. This causes the defender to defend a “killed dribbler.”
The major points that are highlighted in defending a killed dribbler are:
- Stepping hard into the killed dribbler and forcing the potential passer to put the ball over their head or turn away from the hard defensive pressure that is being applied. This takes away the majority of the potential pass receivers. Remember that the passer has only five seconds to find that open receiver and make the pass
- Crossface with the hands and prevent the passer from bringing the ball down to the waist or chest
- Tell the defender to yell “Work! Work! Work!” and pressure the passer as much as possible.
Third trip
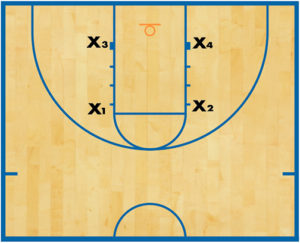
The third trip, as shown in DIAGRAM 2, can be initiated with one or two dummy screeners ball-screening the defender.
On the third trip down the defensive lane, the defender is working on the proper ball defender’s techniques with the feet and hands. The proper stance is stressed with the proper “push” technique of the feet legs. The “dig hand” and the extended hand and arm techniques are constantly reinforced. The defender must feel for the screen and go over the top (ball side of the screen) and hustle to stay or get ahead of the dribbler.

After turning the ball handler several times down the dribbling alley, the dribbler passes the ball to a coach or manager standing near the midcourt line. As soon as that pass is made, the dribbler/passer becomes a cutter/receiver. They make a very hard give-and-go cut toward the end of the alley. The defender must play against a receiver (instead of a dribbler) and defend the give-and-go cut.
The defender also should jump to the ball and match hands and belly-buttons, yelling “Help!” while attempting to see the ball and his or her man. The dummy passer should force a pass to the give-and-go cutter, resulting in either a completion, pass deflection or interception.
Fourth trip
The fourth trip (Diagram 2) could start with an off-the-ball screen on the original defender. They should go to the ball side of the screen and slide through with a long-arm. The defender should go at full speed but allow the pass to be made.
Once the pass is completed, the dribbling and defensive zig-zagging starts again down the dribbling alley, with both players working on their respective techniques. At the end of the fourth trip, the dribbler jumps and shoots the ball at an imaginary basket several feet in front of him to simulate a jump shot off of the dribble. At the end of this trip, the defender works on defending and boxing out a shooter.
The defender plays against the shot by:
- Not leaving the ground until the shooter leaves the ground.
- Extending the hand nearest the ball with one arm as high as possible.
- Front pivoting into the shooter and boxing out.
The defender should maintain contact on the shooter for three seconds before quitting. Cardinal rules that we stress to our defenders on the shooter are:
- Don’t foul a jump-shooter.
- Don’t leave the ground until the shooter leaves the ground.
- Don’t give the shooter a second scoring opportunity.
Fifth trip
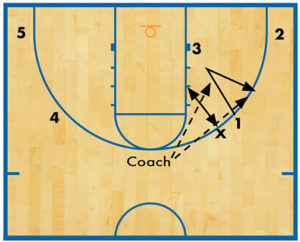
 On the fifth trip, shown in DIAGRAM 3, the dribbler is allowed a two-step advantage on the defender. The ball defender works on the premise that the offensive dribbler has beaten them, and they must recover and continue guarding the offensive player.
The defender must realize that they are beaten, pivot and open up, get the correct pursuit angle, and sprint to a spot ahead of the advancing dribbler. They then must get in front of the dribbler and square up, knowing that the dribbler will try to change directions.
The point of emphasis is to tell the defense they are there physically, but mentally they are already drop-stepping toward the new direction by the dribbler. The dribbler then continues zig-zagging toward the far baseline.
At the end of the trip, the dribbler simulates a loose ball. After the dribble is killed, the ball handler rolls the ball for the defender to dive after.
Obviously, this is a defensive-minded drill that requires effort from all players and coaches. But the drill is enhanced by having the dribbler working with both hands on various types of dribbles. The head should stay up, with the body in a semi-crouch, dribbling quickly but not in a hurry. The coaching staff could instruct the dribblers to use specific dribbles to improve upon, or a combination of them to work on offensive improvement.
Coaches should constantly move up and down the alley, as they are teaching, correcting, cheering and motivating. The more excitement the coach can generate, the more motivated the players will be. Players will feed off of everyone’s intensity level and desire.
Coaches should offer constructive criticism whenever it’s needed, but remain positive in their teaching the techniques. It’s important that coaches work hard to be a good example for players.
RELATED
News
Videos


Shop


