Slipping the ball-screen bolsters offenses
With the popularity of dribble-drive offenses, slipping the ball-screen has become a large component of many man-to-man offenses.
There are similarities between pick-and-pop and slipping-the-screen action along with some distinct differences. Pick-and-pop is the minimal movement of the ball screener after setting the screen with the screener primarily remaining in that location as a shooting, passing or driving threat. We look at slip-the-screen action as players releasing their screen and sometimes cutting to the basket or remaining on the perimeter after flare-cutting. These cutters also become scoring, passing and driving threats, both on the perimeter and in the interior.
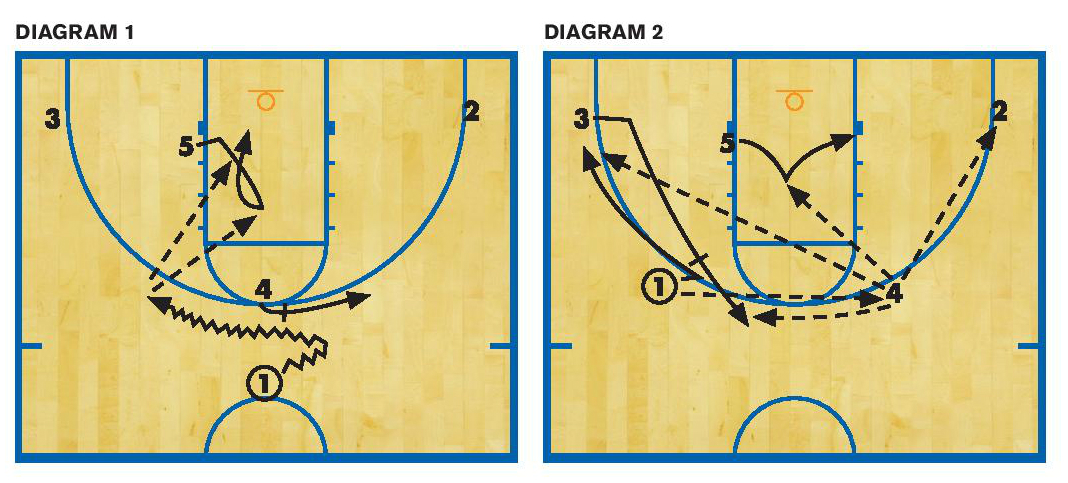
Slipping the ball-screen can be an invaluable weapon for man offenses. The action can pull defensive bigs away from the basket, or it can give offensive post players an opportunity to highlight their perimeter skills. It also provides spacing to invert perimeter players inside to post up. In short, it allows various offensive players to showcase their unique offensive skills and attack defensive weaknesses.DIAGRAM 1: Play one (A). This play can be executed from the three-down set. With 4 at the top and 3 and 2 flattening out the defense, 1 approaches the arc on the strong side of the floor. At that point, 5 makes a duck-in cut into the middle of the lane. 1 can make a bounce pass or a lob to 5, dependent upon how 5’s defender is guarding. 1 then dribble-scrapes off of 4’s top shoulder and looks to penetrate the defense. If 1 cannot make it into the lane, they should end up near the new ball-side high elbow. At the same time, 4 slips the ball screen and moves to the new weak-side high elbow spot-up area.
DIAGRAM 2: Play one (B). If no shots are available, 1 should reverse the ball to 4 on the opposite side of the floor. 5 continues his isolation in the lane by following the ball, while 3 steps up to flare-screen 1 on a cut to the now vacant deep corner.
After flare-screening for 1, 3 slips the screen and steps into the weak-side high elbow spot-up area. All players are spotted up in the four-out, one-in locations for a second phase offense to smoothly continue its attack on the opposition. This next phase could be any number of continuity or motion offenses that can be executed from the four-out, one-in spot-ups.
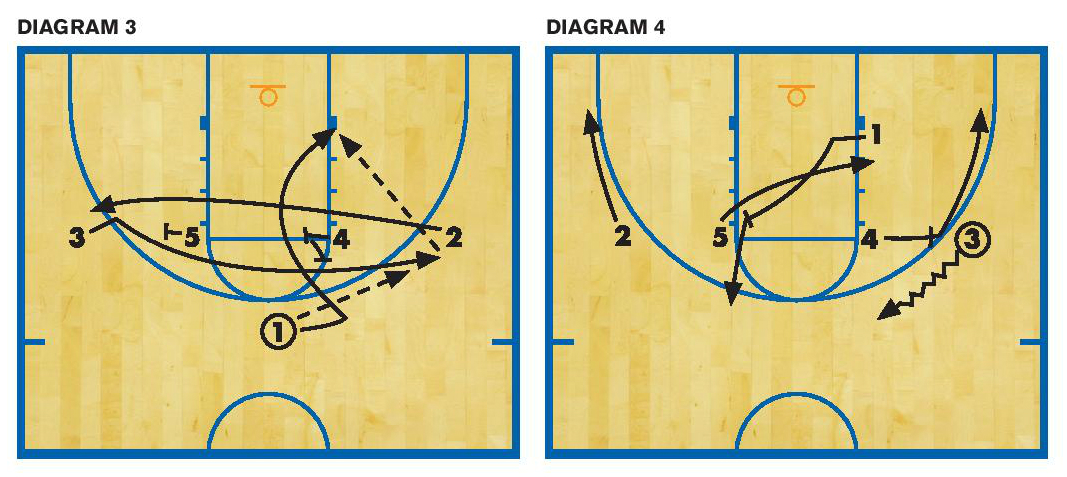
DIAGRAM 3: Play two (A). This begins in a five-up set. This play can be executed to either side, making it much more unpredictable.
3 makes an Iverson-cut over 5 and 4 to the opposite wing area, while 2 makes an Iverson-cut below 5 and 4 to the opposite wing spot-up. In this diagram, 1 makes the wing pass to 3 on the offense’s right side. 1 has the option of then making a UCLA-cut by scraping off of either side of 4’s high-post stationary backscreen. This action not only inverts 1 but also isolates his perimeter defender in an unfamiliar area.
DIAGRAM 4: Play two (B). If 3 does not make the inside pass to 1, 4 steps out to set an inside ball-screen for 3 to dribble out to the ball-side elbow area. At the same time, 1 steps up to set a small-on-big diagonal backscreen for 5 to slash to the ball-side block area.
After 4 sets the screen, he slips and cuts to the new deep ball-side corner. If 3 does not make the inside pass to 5, 3 could make a throw-back to 4, who could have a shot, baseline drive or an inside pass to 5 on the ball-side block. After 1 sets the backscreen for 5, 1 slips and steps out to the weak-side high elbow, opposite of 3 and the ball. 2 drift-cuts to the weak-side deep corner. All players end up in four-out, one-in spot-ups for a smooth transition into the designated offense.
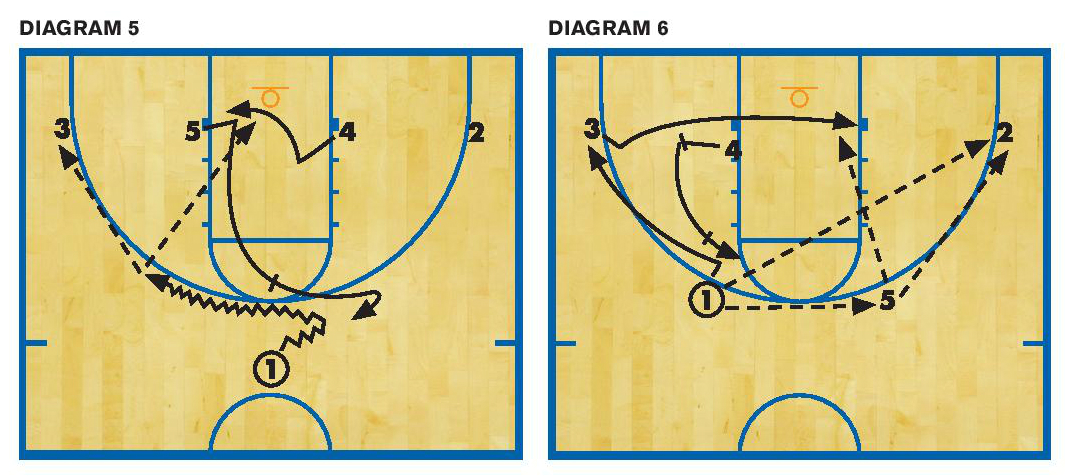
DIAGRAM 5: Play three (A). This play begins from a four-down alignment and, like play two, can be executed to either side. 1 starts the ball shaded to the right side of the floor to set up the defender. At the same time, 5 breaks up to the top of the key, allowing 1 to dribble-scrape off of 5’s top shoulder to the newly declared high elbow area. 4 breaks from the new weak-side post and flashes across the lane to the new ball-side block looking for an inside pass from 1 or 3. After 5 sets his ball-screen, he slips and positions himself at the new weak-side high elbow area opposite of 1 and the ball. 1 first looks for passes to 4 or 3 in addition to a pull-up jumper.
DIAGRAM 6: Play three (B). If 1 reads 2’s defender sagging off to help 4’s defender, 1 could skip the ball to 2 in the weak-side deep corner for a 3-pointer. 1’s other option is to reverse the ball to 5. This reverse pass triggers the action on the new weak side. 3 makes a flex-cut off of 4’s backscreen and cuts across the lane to post up his inverted perimeter defender on the new ball-side block. 4 immediately slips the screen and steps up to set a flare-screen for 1 to flare-cut to the new weak-side deep corner. After setting a screen for 1, 4 slips and fills the weak-side high elbow spot-up. The four-out, one-in spot-ups are filled for the next phase of attack.
These are examples of how valuable and simple slipping screens can be to a team’s man-to-man offense. Creative coaches can make other entries out of one or two of the offensive sets already discussed to become more dynamic. Defenses will not only have to worry about defending the initial screen, but the action that follows that specific screen.
John Kimble coached basketball for 23 years in Illinois and Florida at the college and high school levels, accumulating more than 340 victories. He has authored five coaching books.


