
Installing the 1-3-1 extended zone defense
Playing tough, man-to-man defense is the cornerstone of most coaching philosophies. Even when your team is not blessed with explosive offensive firepower, you still remain competitive by getting after it on the defensive end.
 But, predictability often leads to defeat. Simply playing man-to-man all the time allows the opposition to know what to expect. Teams no longer have to scout you and opposing coaches become familiar with your tendencies, strengths and weaknesses. You as a coach become stale by barking out the same instructions over and over again. Sure, a good coach who believes in his man-to-man defense never is going to abandon it but to break out of your predictability, try installing a new defense, like the 1-3-1 extended zone defense.
Seven basic rules of the 1-3-1
The 1-3-1 extended zone defense is a great way to keep offenses guessing and out of their rhythm. Here are the basic rules.
Rule No. 1: Force lob passes as often as possible. Make opponents throw over your defenders from the wings to the corners and vice versa. Do not allow direct or penetrating passes.
Rule No. 2: Teach defenders to be on their toes while being tall, athletic, active and to cut off passing lanes.
Rule No. 3: Hands are up and players are bouncing in position to distract the offense. The three defenders closest to the 3-point line need to keep their hands high with their wrists as high as the tops of their ears.
Rule No. 4: When the ball leaves a passer’s hands, your defenders need to be moving to their next spot on the floor.
Rule No. 5: Bait passers into seeing something that isn’t there. Steals and deflections are available in this defense if your players lull the opposition into throwing “innocent” passes.
Rule No. 6: Anticipate passes and jump in front of them. Know the passes most likely to be made.
Rule No. 7: Rebound! Rebound! Rebound! This does not go without saying. The most difficult part of any zone defense is finding a man to box out. Remember, most offenses attack this zone from a modified sort of square set with high wings, corners and a post roaming the middle.
Many coaches disparage the 1-3-1 as a “junk” defense or the sign of a weak team. These are the coaches you want to face because generally they don’t know how to attack this type of defense.
In fact, there are eight solid reasons to run an extended 1-3-1 as a complement to your primary defense:
1. The 1-3-1 changes the tempo of the offense. Many teams become programmed into hitting their entry pass and running to their familiar spot on the floor. The 1-3-1 makes them slow down and think of a new way to attack. When teams slow down, they are not playing their game.
2. Dribble penetration decreases. Any zone defense, when run properly, always has help built into it. When teams do penetrate, it often is from angles from which they are unfamiliar. This leads to poor passes or shots.
3. A regular zone offense becomes disrupted against a 1-3-1 extended zone. Many teams attack zones with a three-out, two-in alignment. This actually plays directly into the strength of the 1-3-1.
4. Weak ball handlers are forced to handle the ball more often. Since the 1-3-1 gives the illusion of more open spaces, teams are tempted to throw the ball to anyone, even weak ball handlers, in the belief that if that ball handler is alone in a space, then he or she has a chance for success.
5. The extended 1-3-1 also creates the illusion of good shots for the offense. The fact is that players may have more open looks but they are catching the ball outside their comfort zone.
6. The offense has a “hurry up” mentality because they feel a double-team is coming at them.
7. The opposition now must plan for the 1-3-1 and not simply focus on your man-to-man defense.
8. Your players have a chance to conserve some energy for a few minutes while protecting a player who may be in foul trouble.
Initial set
This defense works best if you have a couple of long-armed, lanky players who anticipate well.
Know your players individual strengths and weaknesses to position them in the spots where they are going to be most successful in this set. Consider the following responsibilities when using this defense.

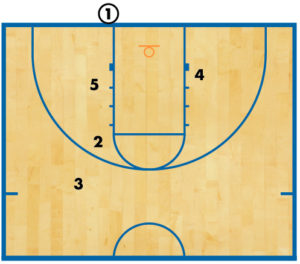
DIAGRAM 1: Initial set.
X1: X1 is your most athletic big guard with a big wing span and good anticipation skills. X1’s responsibility is to force the ball to a side, then try to keep it on that side or to force the opponent to throw a lob over his head to the opposite guard on the high wing. X1 never faces the opposite baseline. X1’s feet face the ball-side sideline. If X1 is square to the baseline, he or she cannot force the lob or influence the ball to one side.
X5: This is your least mobile player. X5’s job is to defend the center triangle. X5’s motion always is from block to high post to opposite block (in that order) as the ball moves from side to side. X5 never moves block to block unless there is a very rare corner-to-corner skip pass. Even on a corner-to-opposite-wing skip pass, X5 moves from the ball-side block to the high post with arms wide to defend a penetrating pass or drive. X5 tries to front all players and force lob passes.
X3, X4: These two players are your third and fourth best athletes. They need to have good instincts, be active (bouncing with wrists at their ears) and be good rebounders. As the ball comes up the floor, they face quartering toward the ball (or sideline). They are looking to bait a lazy pass or force a lob pass to the corner.
X2: This is your quickest player. X2 needs to be tough and aggressive and often is your best defender. X2’s job is to run corner to corner, covering the baseline while forcing action up the sideline away from the basket. On skip passes, X2 must switch sides of the floor as the ball is in the air. A good offense will try a skip pass from the ball-side corner to the opposite wing to draw the defense, then kick to the new ball-side corner for a 3-pointer. X2 needs to challenge this shot.

DIAGRAM 2: Cat and mouse. Teach your players to jump up and back and side to side. They need to bounce a lot. When the ball crosses mid-court, the ball-side wing (X3 in this case) slides higher to cause problems for the entry pass. X2 rotates to the ball side and X4 covers behind.

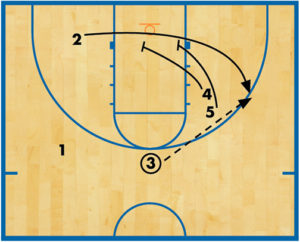
DIAGRAM 3: Pass to corner. When the pass is in the air, players need to get to their spots before the catch is made. In this case with 1 passing to 3, X3 and X2 must double-team 3 in the corner immediately. X5, knowing the ball is going to the corner, slides to the ball-side block to cut off 5, who should be cutting to that spot. X1 then slides to the foul line.

DIAGRAM 4: Skip to wing. The weak-side wing defender needs to see the entire floor and move down the key as low as the lowest offside offensive player. This defender also anticipates cross-court skip passes, as well as be the communicator to call cuts and flashes from the weak side. The baseline defender (X2) is quick to cover corner to corner and never gives up a baseline drive.

DIAGRAM 5: Out of the middle. Even if a ball is passed over the top of a defender’s position, the defender must collapse with his or her back to the baseline while looking to strip the ball. The center denies the post everywhere and is responsible for stepping up and stopping dribble penetration. Everything must be forced from the middle of the floor — the shaded area in the diagram is where the ball never should enter.Use the 1-3-1 as a change of pace. Use it after dead balls, beginning of quarters and any point when you want to catch the offense off guard.
RELATED

News
Videos


Shop


