
Two defensive drills to improve hands, feet quickness
Before any team defense can be developed to its maximum potential, your players must become proficient at not only handling the attacker (man-to-man) or area (zone) they are responsible for, but also at defending an unlimited number of recurring offensive situations.
 Some of the elements include stopping an open attacker who is driving, forcing a hurried jumper, denying the pass to an inside cutter, and defending the stationary post.
These components appear and reappear whether your team is playing man-to-man, a zone or a combination of the two.
Here are three fundamental defensive drills that will help prepare your team.
Quick-hands drill
The objectives include teaching:
- Quick, aggressive hands.
- How to slap at a loose ball for recovery.
- Recovery of loose balls.
- 1-on-1 defensive techniques.
- Conversion from offensive to defensive play.
- Hustling defense.
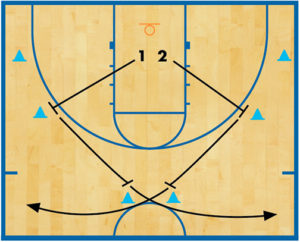
 DIAGRAM 1: Two lines should be formed near a line on the court. Have the first two players step out to the middle of the free-throw or center-court line. The coach should require that players place their hands on their knees, hands in the proper defensive position, hands immediately in front of their face, or anywhere the coach wants the defender’s hands.
The coach tosses the ball waist high between the defenders or bounces the ball off the floor about waist high. Two players try to recover the loose ball. The player recovering the loose ball is on offense, and the other player is on defense. They play a 1-on-1 game. After a score, players move to the end of the opposite line.
The next two players step to the center of the free-throw or center-court line and the drill continues.
Quick-foot movement drill
The objectives include:
- Teaching defensive foot quickness.
- Conditioning players to play in a crouched position for long periods of time.
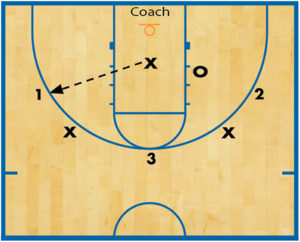
 DIAGRAM 2: Three players place their feet on A and B: right foot on A, left foot on B. Several different quickness drills begin from this foot position. Players jump in with their right foot, touching C, then out with the right foot, hitting D and the left foot hitting F. The player immediately makes a 180-degree turn, putting the left foot on D and the right foot on F. The player puts the right foot on C, then jumps out with the left foot hitting A and the right foot hitting B. The player executes another 180-degree turn. The process continues.
Instead of originally jumping onto C with the right foot, your player can begin with the left foot. The same process continues. Many other variations are possible such as: one foot only (in sequence A-B-C-D-F-C repeat), no 180-degree turn, no middle step etc.
Run the drill for 25 seconds, and record the number of full revolutions each athlete manages. As they do the drill more quickly, the number of completed revolutions increases.
Because quickness is an important test on defense, your players should not raise their feet off the floor or drag their feet along the floor. You want your players to glide, quickly lifting his or her feet slightly with the sensation of their toes grabbing the floor as the player glides through the drill.
RELATED
News
Videos


Shop


