Phil Martelli’s warmup drills to prep players for practice
Our team starts every practice with a drill that serves as a great warmup routine. During warmup drills, time your players and give them a specific goal. Once your players meet the time and goal, have them move on to the next drill.
After a healthy set of warmup drills, your practices will be crisp, sharp and productive.
Are your drills symmetrical? Do they have a flow that’s fresh and challenging? The first coach that I worked for warmed up the team the same way every day for the first five years. We did a drill called “Jack Ramsay,” followed by two-line layups and a brief scrimmage.
Everyday. For five years.
Finally, I asked the head coach, “Do you think we could run the ‘Jack Ramsay’ drill to the left side?” The answer was, “No. Ramsay always did it to the right side.”
It’s important to mix things up and keep your players thinking and challenged. Communication is one of the skills that players lack, so talk to the oldest players before warmups and say, “Be ready. We’re going to switch directions in the drill at the two-minute mark. Let your teammates know.”
‘Jack Ramsay’ Drill
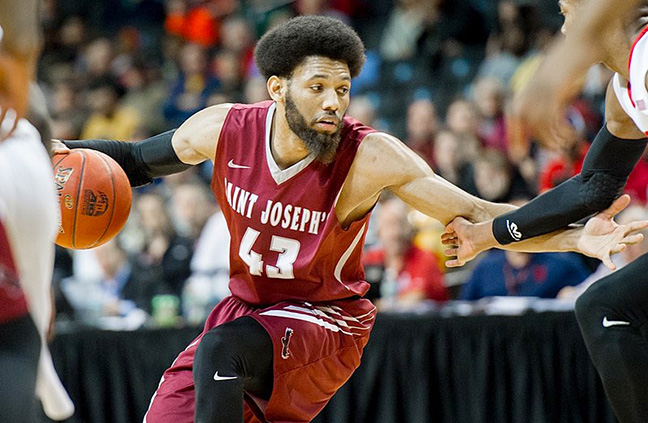
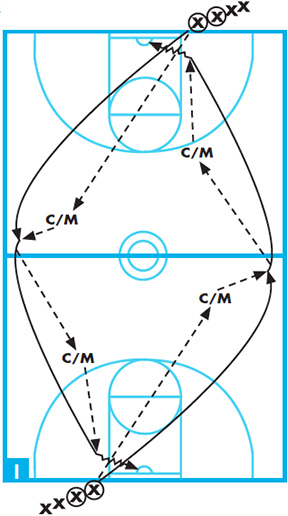 We named this drill after Hall of Fame coach Jack Ramsay, who won a NBA title as coach of the Portland Trailblazers and was a coach at St. Joseph’s. In the St. Joe’s gym, this drill has been done forever.
This is a simple, effective warmup drill and can be completed in four minutes. It’s also a great way to determine whether your players are ready to practice.
DIAGRAM 1: ‘Jack Ramsay’ Drill. Form two lines of players with a ball in each line. Coaches (C) or team managers (M) catch and pass. The player passes the ball to the C/M and runs on a dead sprint toward that C/M. As the player runs by the C/M, the C/M flips the ball back to the player. As soon as they secure the ball, without a dribble, they pass ahead to the next C/M.
The C/M hits the sprinting player with a bounce pass and the player shoots a layup. The next player in line takes the ball out of the net and goes the other way passing to the C/M on the other side. This action is repeated for four minutes.
After the two-minute mark, have the players switch directions going toward the left side. The C/M moves to the same spot on the opposite side of the floor. Have one coach or team manager who isn’t involved in the drill keep track of makes and misses.
» ALSO SEE: Practice drills to emphasize defensive positioning, shooting
Once your players get good at this drill, your team can get well over 100 layups in four minutes using four balls. Set 100 made layups as the ultimate goal. Initially, set a goal of 90 and the players can work their way up.
If missed layups are a problem, add a stipulation that only two to four misses are allowed. Our team turns on the scoreboard, starts it at four minutes, and posts the running tally of made layups on the board. Your players will watch the scoreboard, hustle and cheer on one another.
Celtic Drill
The Celtic drill is another four-ball drill with two lines of players positioned off to the side at the foul-line extended. Have a coach or player in the lane as a rebounder.
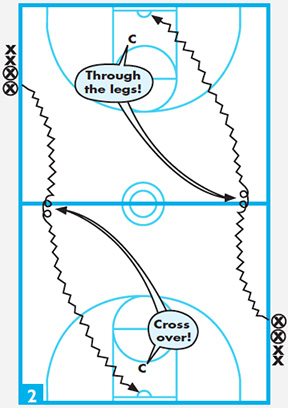 DIAGRAM 2: Celtic Drill. The first two players in each line start with a ball. The player at the beginning of the line speed-dribbles toward the basket at the other end of the court. When they reach half-court, the coach calls out a dribble move (e.g., through the legs, crossover, stop-and-go, behind the back).
After the dribble move is executed, the player continues the speed-dribble to the basket for a layup and sprints to the end of the line on that side of the floor. The drill continues for four minutes. Switch sides of the floor at the two-minute mark.
In all your ball-handling drills, encourage your biggest players to handle the ball and run as fast as they can. When a big kid clumsily kicks the ball out of bounds, encourage them to go get it and perform the drill again.
If you don’t allow that big player to handle the ball in practice in a non-threatening position, do you know what’s going to happen when an opponent presses you in a game? That big kid is going to get the ball and they’re going handle it like it’s going to explode.
All coaches need is for their “bigs” to take two dribbles and cross half-court to break the press, but that player can’t because they’ve never dribbled the ball. That’s not the player’s fault. It’s our fault as coaches for not designing drills that allow big players to handle the ball.
Vanderbilt
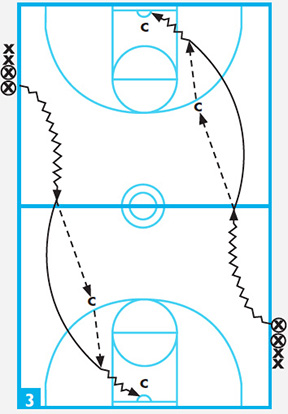 This drill is a variation of the Jack Ramsay and Celtic drills. If you’re having problems with your team’s ability to run the floor, this is an excellent drill.
DIAGRAM 3: Vanderbilt Drill. Using four balls and two lines of players, the first player in each line speed dribbles to half court. At half court, the player passes the ball ahead to a coach at the 3-point line. The player continues to streak toward the basket.
The coach throws the player a bounce pass and the player catches it in stride, lays it in, and runs to the end of the closest line. Another coach rebounds the ball and passes it to the first player in the near line.
Stanford
 Our teams had a lot of problems over the years outletting the ball. Players always threw slow outlet passes, and it was a problem that I didn’t have an answer for. This weakness became apparent one year in a game that we lost to Stanford. I noticed that the Stanford players were really crisp with their outlet passes, and they killed us in transition. So we named this drill Stanford.
DIAGRAM 4: Stanford. The players form one line at one end of the floor. Start one player wide (X1), and station another player in the outlet position on the other end of the floor (X2). Two coaches or team managers line up near center court on opposites sides.
The first player in line (X3) does a layup, grabs their rebound, and throws an outlet pass to X1. X1 takes two hard dribbles and passes to the coach near half court. X1 sprints down court, receives a pass near the elbow and drives for a layup. After making the layup, X1 grabs their rebound and throws an outlet pass to X2, who begins the same action going the other way. After making the outlet pass, X1 takes X2’s place as the outlet receiver.
UMass
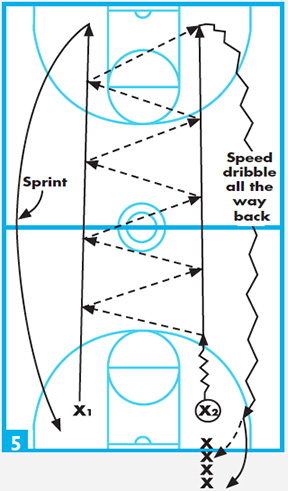 If your players didn’t perform well the night before, or didn’t play as hard as you’d like, this drill gets their attention the next day at practice. We call it UMass, because when John Calipari was in our league and coached at the University of Massachusetts, this is how his team warmed up.
DIAGRAM 5: UMass Drill. Put the whole team in one line facing in the same direction. The first player in line (X1) walks to the other side of the lane, and with the next person in line (X2), begins to pass the ball back and forth all the way down the court. Once they get to the other side, the player with the ball must speed-dribble back on four dribbles. The other player sprints back. Both players get back into line, and the next two players go.
Whether you have 10, 12, 14 or 16 players, this drill gets players working up a sweat. It’s a challenging drill and is fabulous for conditioning, passing and catching.
Pitino
 It’s a good idea to periodically mix up your ball-handling drills. Repeating the same drills becomes stagnant and boring for your players, and they won’t get a lot out of them. One of the ball-handling drills that we use most is called Pitino.
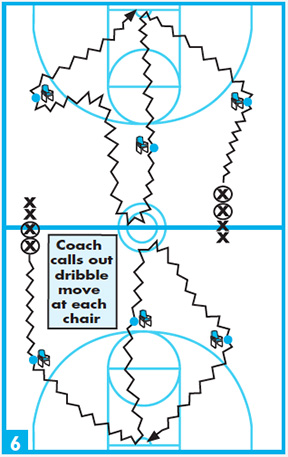
DIAGRAM 6: Pitino Drill. Split your team into two groups, and have each group line up on opposite sides of the court. Set up chairs surrounding the perimeter of the 3-point circle. Each player has their own ball.
Station a coach on each side of the floor. One by one, each player begins dribbling around the chairs in the sequence shown. At each chair, the coach calls out a specific dribble move, such as right-to-left crossover. The player executes the required move, drives for a layup, gets the ball as it comes through the net, and begins dribbling toward the next chair. As they complete the initial layup, the next player in line begins dribbling and performs the same move at the first chair. The players dribble around all three chairs, finish off with a second layup, and sprint back in line.
Conduct this drill at a good pace for up to six minutes. Even though there’s constant action in this drill, it’s a good drill to run if you’re trying to save your players’ legs.
35-Second, Three-Quick-Slides Defensive Drill
You don’t need to bust your players’ chops at practice by doing the stance-and-shuffle defensive drill for five straight minutes. When will players ever shuffle defensively for five consecutive minutes in a game of basketball?
 Instead, a coaches goal should be to have players perform intense, quality individual defensive work. There are a few excellent drills that accomplish this.
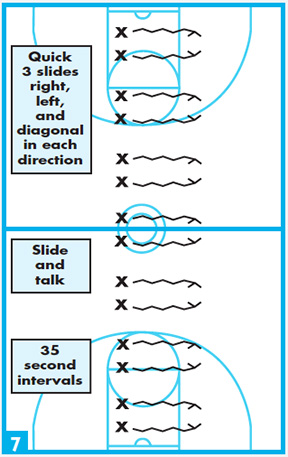
DIAGRAM 7: 35-Second, Three-Quick-Slides Drill. Have your players form a single line, basket to basket, and have two players face each other in pairs. If you have access to your scoreboard, start the 35-second shot clock.
One player acts as the offensive player, and the other defends by taking three quick slides in the direction indicated by the coach. The defender then gets back to the middle. Do repeated sets of three quick slides for 35 seconds each with 10-second breaks between each set.
Tell players they need to keep up with their partner. Tell them it’s OK to talk, yell, encourage, harass or joke with each other, as long as they slide and talk hard for the full 35 seconds.
‘Four-Groups’ Defensive Drill
 Another drill you can mix into your individual defensive work is the “Four-Groups” drill.
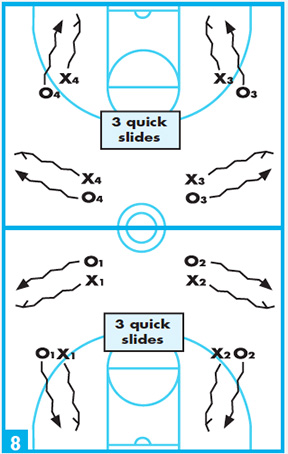
DIAGRAM 8: ‘Four Groups’ Drill. Divide players into four groups of two. O’s have the ball, and X’s are the defenders. Tell your defensive players to guard the ball for three slides, forcing the ball toward the sideline while the ball handler tries to beat the defender off the dribble.
After the initial slides, both players line up outside the 3-point circle at the elbows extended. The ball handler tries to beat the defender to the basket, while the defender forces them to the baseline. They sprint back to half court, trade the ball, and do it again. Have them do the drill for 90 seconds.
The defensive slides must be quick. Basketball is a quick game, so you don’t want the defenders using long, loping slides. Quick thinking and quick moving are the keys to good defensive control.
Defensive-Command Drill
After the other two individual defensive drills start boring your players, liven things up with the Defensive-Command Drill.
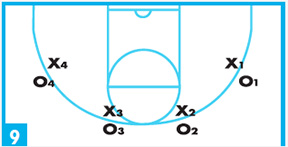 DIAGRAM 9: Defensive-Command Drill. Divide your players into pairs with no more than four groups of two at each basket. Make sure a coach is watching each group of players at each basket. Once the players are into their assigned pairs, the coach yells one of these defensive commands:
• “Shooter.” The offensive player shows the ball as they would to attempt a shot. The defender works on close-out technique and sliding at the shooter. The player with the ball doesn’t actually shoot.
• “Passer.” The defender must guard the ball handler while he or she waves the ball around looking to make a pass.
• “Charge.” The offensive player dribbles at the defender, and the defender takes the charge. Teach proper defensive techniques before doing this drill.
• “Five-second count.” The offensive player dribbles for a few steps before picking up the ball. The defender closes hard and swarms the ball handler for five seconds, simulating a forced turnover. The defender must guard at full intensity and game-like speed.
• “Foul” or “X.” Do your players know how to foul at the end of the game? If you have a costly intentional foul called on your team in a clutch situation, that’s because you didn’t teach players how to foul. To teach our players this aspect of the game, we’ve added it to our Command Drill.
» ALSO SEE: 4 drills for teaching the motion offense
It’s also important not to plant the idea into the referee’s head that you’re calling for a foul, so you shouldn’t use the word “foul.” Instead, shout out the letter “X.” Players often hear me yelling “X-him, X-him!” during end-of-game fouling situations. If you’re yelling “foul!” and the referee calls an intentional foul, it’s hard to argue that the act wasn’t intentional.
Phil Martelli spent 24 seasons as the head men’s basketball coach at St. Joseph’s University, where in 2004 he was named AP Coach of the Year and Naismith Coach of the Year. He’s currently an assistant coach for the University of Michigan men’s basketball team.
This article originally appeared in the January 2003 issue of Winning Hoops.


