4 half-court denial drills to clamp down on offenses
 Denying the pass takes a tremendous amount of athleticism, focus and preparation on a defender’s part. Here are four half-court denial drills that prepare your players for game action.
Cut the cutter
This drill develops the proper techniques used in denying a weak-side offensive player an opportunity to cut toward the basketball. In this drill, continue to tell your players, “No one cuts over your top side.”
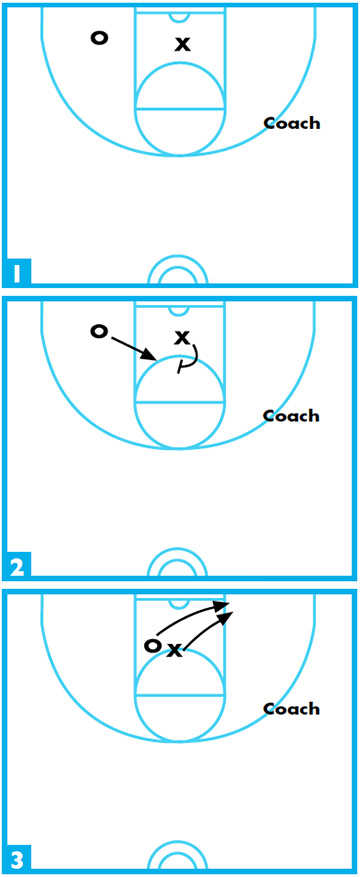
DIAGRAM 1: Cut the cutter (A). The drill begins with a coach holding a ball on the wing with the offensive player set on the weak-side baseline toward the short corner. The defensive player is set in help position, opened up, and pointing to the offensive player and the ball.DIAGRAM 2: Cut the cutter (B). To begin, the coach fakes a pass to the offensive player, who cuts straight to the basketball. The defender steps up and through the offensive cutting lane, making contact using their forearm and aligning the low shoulder (closest to the basket) with the offensive cutter’s high shoulder (closest to the half-court line). This forces the cutter to cut low.
» ALSO SEE: Heart Drill tests defensive effort
DIAGRAM 3: Cut the cutter (C). As the offensive player cuts low, the defender snaps their head through so the defender is momentarily face-to-face with the cutter. This is the only time the defender does not maintain eye contact with both the cutter and the ball.
As the cutter moves low, the defender applies pressure to force the cutter below the block and level with the backboard to eliminate a good scoring opportunity. If at any time the offensive cutter is open, the coach passes the ball and 1-on-1 play begins.
If the defender is successful in stopping the cut and denying the pass, the offensive player relinquishes the ball to the defense and rotates to the defensive position. The defender goes to the back of the line, and a new offensive player enters the court.
Stunt & cover
This drill teaches the proper techniques in stopping penetration from a ball-side or denial defensive position with recovery back to the original defensive assignment.
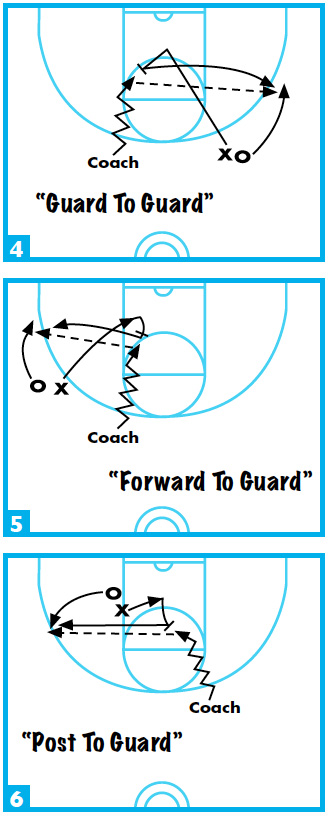
The objectives of the drill remains the same. But it’s important to vary the originating points of entry into the drill to cover various situations as shown in the diagrams.
DIAGRAM 4: Guard-to-guard.
DIAGRAM 5: Forward-to-guard. Only slightly modified from the previous diagram.
DIAGRAM 6: Post-to-guard.
Divide your team equally and use three baskets while maintaining a continuous rotation. The drill begins as a defender is in denial position on the offensive player. As the coach dribble-drives toward the basket, the defender opens up off the original defensive assignment and stunts the dribbler in an attempt to slow the drive or kill the dribble. Then, the defender immediately recovers to the original assignment.
It’s the defender’s responsibility to slow or stop all penetration. This is accomplished by the defender opening up off the offensive player with the entire body and placing the lead hand under the path of the dribbler. As the defender stunts, the player must maintain eye contact with the offensive player to avoid a basket cut and easy layup.
As the skills are developed, add movement to the offensive player while the stunting takes places. This demonstrates whether the defender actually sees both the original defensive assignment and the ball. When the defender stunts the dribbler and terminates the dribble, the defender returns to the original assignment and yells, “Kill! Kill! Kill!”
If a pass can be completed, the coach makes it and play is 1-on-1. Even if there is no open lane for the pass, have the coach throw one anyway. This allows the defender to pick off the pass and be rewarded for the hard work.
Baseline drive with help from post defender
This drill teaches a post defender the proper technique in helping on a baseline drive. It also teaches a defender who has been beaten on the baseline to rotate to the offensive post player.
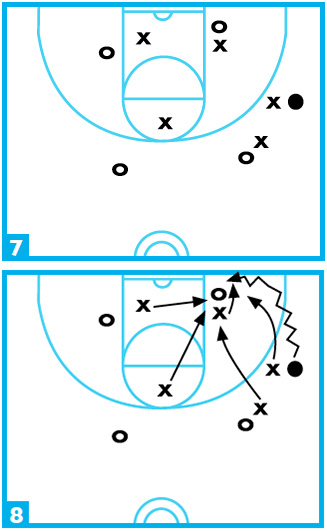 DIAGRAM 7: Baseline drive (A). The drill begins with one offensive player on the block and the other four players spread around the set. The defenders match up with the offensive players.
DIAGRAM 8: Baseline drive (B). Play begins as the offensive wing with the ball on the post side drives from the wing to the baseline as the defender shadows the dribbler. The defender allows the offensive player to gain position with the dribble and calls for help from the post defender. When the post defender hears the help call, that defender steps toward the dribbler, denies the baseline and kills the dribble.
When the on-the-ball defender realizes the help has come from the post, he or she immediately drops in front of the offensive post and stands tall with arms extended to create the illusion that the post is being guarded. This is critical because the offense typically tries to slip the ball to the offensive post player if that player appears to be open.
As the ball is driven toward and along the baseline, the other three defensive players react by jumping to the ball. By the time the dribble is killed, all three defenders should be in the vicinity of the offensive post player. The ball handler’s only option is to make a long pass from the baseline to the perimeter. The defense recovers to their original assignments if the pass is attempted.
Baseline drive with weak-side help
This drill stresses proper reaction by all players to a baseline drive and the proper method of rotation toward the baseline drive.
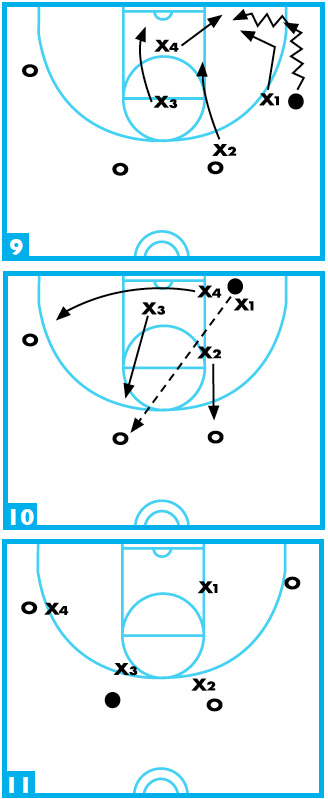
DIAGRAM 9: Baseline drive with weak-side help (A). Four offensive and four defensive players are matched on the perimeter in a “shell set.” The ball is on the right wing at the free-throw-line extended. The defender on the ball (X1) forces the ball to the sideline. The ball handler takes the ball to the baseline and starts to penetrate. In this drill, X1 allows the dribbler to penetrate along the baseline toward the basket.
As X1 gets beat, that player yells “Help!” and the weak-side forward (X4) rotates across the lane to stop the penetration before it gets into the lane. If possible, X4 takes the charge.
» ALSO SEE: Footwork, conditioning drills for defenders
When help comes from across the lane, it creates an excellent opportunity to double-team the ball. X4 and X1 double-team the ball. X3 rotates down toward the basket to cover for X4. X2 rotates into the lane in reaction to the baseline drive. Once the dribble is stopped, X2 and X3 become anticipators of the pass out of the double-team and attempt to intercept it.
DIAGRAM 10: Baseline drive with weak-side help (B). If a successful pass is made out of the double-team, all four defenders scramble to their original defensive assignments before the offense has a chance to move the ball again.
DIAGRAM 11: Baseline drive with weak-side help (C). When the pass is made from the double-team, this is how the defense looks.
In this drill, be sure to emphasize that the help-side guard drop below the pass-ing lane between the ball and the weak-side forward. Rotate all of your players to the right and run the drill again.
After all the offensive players have been in each spot, switch the offense to defense.
Andy Landers spent 37 years coaching women’s basketball at the University of Georgia, accumulating an 862-299 record during that time. He was inducted into the Women’s Basketball Hall of Fame in 2007.


