
Football: D-line techniques and drills from the 43 defense
Coaching is a world of give and take. I know that in my last years as a coach, I have certainly bent the ears of many great coaches in developing my philosophies and techniques of defensive line play.
 I have been fortunate in finding coaches who are always quick to offer their time and knowledge. I would like to start with the way I preach my version of the 10 commandments and then insert them into my practice plan in the following order:
- Alignment
- Assignment
- Stance
- Get-off/Snap reaction
- Ground-to-pads/Target
- Key reads
- Separation
- Escape
- Pursuit
- Tackle
It’s imperative for the defensive line coach to implement all 10 commandments into their daily practice plan. We often combine several of them into one drill to minimize the use of precious practice time.
Alignment and assignment
We cover this in meetings and during “cans,” an exercise where we use trash barrels to simulate the five offensive linemen.
The tight end is relegated to one of five service players who make up the rest of the offensive formations we will face every week. We usually dedicate at least 10 to 15 minutes of defensive practice on proper alignments and assignments depending on the formations and motions that we face each week.
We play a multiple front 43 at Worcester Polytechnic-Institute and use many different looks to hinder the offensive-line blocking schemes. We always start in our base front, which we term 72, and move to whichever front alignment that helps us.
The first number tells our guys we will be in a 43 look (four down linemen/three backers) and the second number will tell us where the nose guard aligns.
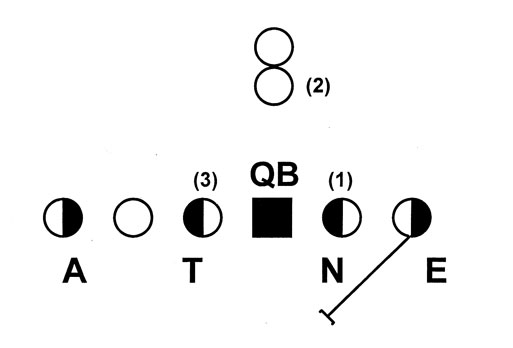 |
| DIAG. 1: VISUAL & PRESSURE KEYS |
- ANCHOR visual key (TE) pressure key (T)
- TACKLE visual key (G) pressure key (T)
- NOSE visual key (G) pressure key (C)
- END visual key (T) pressure key (Progression)
It’s also a period that we can use to evaluate each lineman’s stance and get-off, paying close attention to the proper hand down and foot back. Also, making sure that each player brings the back foot up first.
A lot of coaches claim that they don’t emphasize this in their daily teaching. This is a mistake, because everything we do as a defensive lineman starts with a proper stance.
My philosophy on stance is that I want it to be uncomfortable for them. That makes them want to get out of it and engage their man.
 |
| DIAG 2, DEFENSIVE ENDS’ PROGRESSION |
As soon as the end gets a veer release, his progression will be (1) near guard, (2) near back, and (3) back-side guard.
Our guys always start from a four-stance to get their feet and hands set in an attack position. Once they are comfortable, they simply pick up their off hand to be ready to strike.
I want them to keep their backs flat with a slightly elevated butt so that their first step will get them underneath the blocker. All of their weight should be on their toes, while paying close attention to the heels. We want the heels pushed out so that our first step is forward, not at an angle.
Our down hand is a few inches in front of our hat and the off hand hangs close to the ground, ready to strike the offensive lineman. The off hand close to the ground ensures us of not turning our shoulders, but keeping them squared up to our man.
The only disparity that I have in teaching stance is that I won’t have a guy use a hand down based on man or gap if it slows his get-off.
When facing a passing down, we elongate our stagger to increase the length of our first step. If we are also slanting, we will even our stagger, allowing us to step with either foot effectively.
We also make sure that all of our big men are shooting their hands as they begin their first step. This is the hardest aspect of defensive line play to teach, especially with young players who may have never used this technique. We call this “ground-to-pads.”
As we recognize movement and begin to take our first step toward the LOS, we want to lead with our hands and strike our opponent hard or “shock” him. A defensive lineman’s hands will tell him all he needs to know about his opponent’s intent.
For instance, if we are getting a drive block and our opponent gets into our grill immediately, our hands will surely strike very quickly.
This will alert us to a drive block and we will progress out of it by keeping our pad level low, rolling the hips, and running our feet to put the offensive lineman on his heels and control the LOS. The drive block is the hardest block we face and I put a lot of emphasis on taking it away.
Our guys know that a double team can be neutralized if we get a great strike on the drive block, forcing the second man to adjust because we have negotiated the LOS.
Practice drills
Some of the drills I use to defeat the drive block are set up in a progression, which takes my guys through the different skills necessary to achieve success.
The first drill is meant to get them leading with their hands. I use agile bags or shields to simulate offensive linemen and start our guys from a six-point stance — hands, knees, toes on the ground.
 Using a ball or my foot to simulate movement, our linemen “shoot” their hands to the target as fast as possible and return to the starting position until movement triggers them once more. We will have them shoot their hands 10 times for two sets.
Next, we move the bag off about two yards and I will key the bag-holders to simulate a drive block. The defensive linemen, still in a six-point stance, now shoot their hands to the target and dig their toes into the ground as the man with the bag tries to run them over.
This automatically engages the defensive lineman’s hips. As he rolls forward to prevent getting run over, he pops out of his six-point stance and runs his feet to gain control of the blocker. This has been an excellent drill for teaching our guys to utilize their hip power to defeat an opponent’s drive block and gain separation.
The only time we really use the hip roll is to defeat a drive because the other blocks are less aggressive and we rely more on foot speed to get out of the block.
We will then run a live drill from a three-point stance (both guys) and have them execute all the key components we just worked on separately against the drive block. This gives them an opportunity to put it all together and allows the coach to see each player’s weakness.
Initially, it’s almost always the player’s first step and use of his hands. Whenever we find a problem area, we use the “fit” drill principle to help our players improve anything they are having trouble with. “Fit” means starting a drill from a position (stance) out of which you have already taken your first step.
For example, if working the drive block, we will have our defensive lineman start the drill with his hands in a good strike/contact position and his hat below the offensive lineman’s pad level. On the whistle, he continues on and defeats the drive by rolling his hips until he puts the offensive lineman on his heels.
Once this happens again, we will complete the drill with a good press and break down to find the ball carrier. We also include a tackle drill with any of the “fit” drills to work the multiple techniques into a simple drill. The progression and “fit” drills have to be instrumental in developing our defensive linemen.
Teaching reads & blocks
This brings us to the teaching of key reads from the 10 commandments. We call all of our man blocks “battle of the one” keys. They are drive, reach, cut-off, veer, and pull sets.
 |
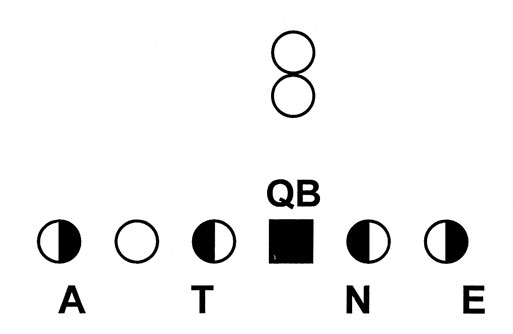
| DIAG. 3, BATTLE FOR ONE KEYS & TECHNIQUES, I |
- E – Drive, Drive
- N– Pull-Down Block, Cross-Face, or Follow
- T – Double, Drive
- A– Veer w/Tackle Down, Down to Spillbox
When teaching your players how to defend “the battle of one” keys, it’s important to tell them their hands must always adjust to the blocker. A term I use is “eyes in the palm of your hands.” This refers to the target from the 10 commandments. We always attempt to strike our opponent’s shade-side armpit area and shoot our inside hand across his facemask to the opposite breast plate.
We will always “grab cloth” whenever our hands come in contact with the offensive lineman. This enables us to gain control of our blocker, no matter what block he is attempting. Whenever we tell our guys to get their inside hand to the middle of the offensive blocker, we are giving the offensive man the advantage on certain blocks, especially drive and cut-off.
By always being straight up field, we teach our people that no matter what battle of one key they are getting, the first step must always look the same.
If we are getting a reach block, for example, our second step comes close to our first in order to push out toward the reach and allow us to penetrate the LOS and work our hips up field so that we may escape and force the stretch play back inside to our help.
The defender’s hands will adjust to the block as he takes his first step and uses a power-arm technique to get his hips outside the O-lineman in preparation for escaping.

Power arm technique involves your gap hand pushing the shoulder, and you’re inside hand pulling cloth (push-pull).
If we get a cut-off block and the offensive lineman is trying to seal us to our shade, we will simply squeeze him down the LOS, using his body as half a defender and converting our power arm. This will give us the opportunity to “see through our gap.” To convert the power arm, we simply push with the inside hand and pull with the gap hand.
We never want to cross-face unless the ball carrier has chosen his path. To defeat the cut-off, we use our second step to push inward toward the offensive lineman to squeeze him down.
As with drive-and-reach, the first step is always up field and the second enables us to get out of the block.
Another block we face is called a veer block (trap, power, counter, option). This is where our man will not want to engage us and will take a lateral step away from our shade to climb up on a backer.
When we get a veer, we cannot possibly get both hands on our blocker but again, our hands are assisting us in recognition and allowing us to play out of it with our second step.
As with the cut-off, we will push toward the blocker and jam him inside and move laterally to seal off the area he is leaving.
We expect something to come at us, whether it’s a backside guard or fullback and look to take on the next blocker. Defensive ends will often see this block when facing power and option teams.
Another man block to watch is Pull. You can’t expect your lineman to get hands on, but he can recognize direction and play out of it. The only rule in Pull is to stay home and read near block.
If the back is downhill, it’s an influence trap. If he is out, it’s most likely a toss and your 3 tech will get a down block from his near lineman or pressure key.
If we see pull inside, we will try to get to the hip of the pulling lineman to avoid the down block from the near lineman. If we are inside shade on a pulling lineman and the down block comes quick, we will cross face against the down block to add on to the play.
The last man key is pass, and we read the set of the lineman to determine if it’s three-step or five-step. We refer to this key as “high hat.” As we take our first step and shoot our hands, we will not engage an aggressive blocker. Our hands will be the first to “feel” this.
We use this to help us distinguish between run or pass. We will evaluate our opponent every week to determine any “tells” in their passing game. Offensive lines use many protection schemes for 3/5/7 step, bootleg and sprint pass.
As a result, we will work on our opponents’ schemes every week to prepare our defensive line. One point we work on religiously is the handling of hard-setting offensive linemen who punch and otherwise abuse people on the LOS.
You will be ineffective if you try to bull-rush them. Their set position will allow them to take a power position quickly. So we must get to our half man as soon as possible, with our hands up into the throwing lane and take away the short ball.
If we get a soft set (kick slide), we will have more options in our arsenal to call upon. The bull-rush is certainly one of the moves we will work out of.
Many of the great defensive line coaches with whom I have worked have talked about “stopping the run on the way to the QB!” This method of teaching your players to take the same first step, no matter what the man on key gives you, illustrates our philosophy because that first step is always toward the QB. If you stress the second step as the escape step, your defensive lineman will always have the opportunity to react to whatever his battle of one is giving him.
You should use the fit/progression drills to help your team learn how to play out of each man block. You can add a tackle drill, fumble drill or pursuit drill to the end of each unit to extend the multiplicity of the single drill and save time.
Another drill we use every day to prepare for their battle of one keys is called the “Giant Drill.” You don’t have to have full pads for this drill because it starts out at half-speed and progresses from there.
I use it in both spring and fall practices. We pair up our players (offense vs. defense) using shields or pads — they produce the same results.
The first time we introduce this technique, we call it “predicted,” meaning we will tell them what type of block we are trying to defense.
We teach the players to handle each type of man block before enabling them to distinguish one from the other. We will eventually progress to full speed, and once we have gone through all the different types of man blocks (drive, reach, cut-off, veer, pull, pass), we will run the same drills, but this time they will be “unpredicted.”
In this version, the coach signals to the offensive man what type of block to use, as well as the count.
It’s always interesting to see how that first step is no longer up field vs. the different blocks as it was when they knew what was coming in the predicted drill.
This is where your players will learn that with an aggressive first step, they may not be in great position vs. anything other than the drive, but the second step will always play you out of it and gain control of the blocker.
In-season, this is a great time to bring the offense line down and run the Giant Drill.
Another drill we use to prepare our people for their “battle of one keys” is set up in much the same way, but the defense will always “slide” down to a different lineman after each rep to get an opportunity to play against different O-linemen with varying degrees of experience.
Any time we see the tackle down; we will automatically control the C-Gap and look to find something coming at us, whether it’s FB, B.S. Guard, or ball inside (dive option). Once the tackle is down, we play the same technique as the open-side defensive end in following our progression rules.
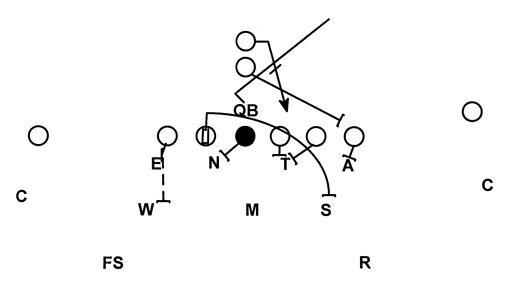
DE keys from a seven-technique
As a defensive end, whenever you get veer, there is always another key to take you to your “fit.” We work our progressions from the front side guard (1) to the fullback (2) and the backside guard (3).
If we are facing one-back offenses, our defensive ends use a technique called “Claw.” This allows them to read the “mesh point” that helps take away the zone read play that many teams run out of the spread offense. We have our ends recognize whether or not the ball is in the belly of the back.
Most QBs, when giving the ball to the tailback in the home position, will use only one hand and leave the other hand visible. This is a “tell” that we will look for in film evaluation to assist our guys in reading the mesh point.
If the QB is running a read play from the gun position, we must see the ball to make our next move. The defensive end can never turn his shoulders. He must keep them square to react off to the QB on a keep play.
The claw technique is described as using your inside hand to push the veer block inside and keep our shoulders square while taking a couple of shuffle steps to the inside, allowing us to get our read vs. one-back sets. If the back is home and the QB is under center, this is where we are able to read the off hand to assist us with the zone boot read.
Click here to read more about defensive line techniques from coach Greg Crum.
You Might Also Like


Problem displaying Facebook posts. Backup cache in use.
